|
| Group |
Round |
C/R |
Comment |
Date |
Image |
| 77 |
Apr 21 |
Reply |
I learned my PS along the way, over many years... Lots of tutorials as well as some classes and books. I searched "masks in PS basics" to fine this link. It is a well respected source: https://photoshopcafe.com/use-layer-masks-photoshop-7-layer-masking-tips/ The ideas can be applied to any version of PS. Hope that helps. There are of course many advanced tutorials as well. This is one of my favorite teachers: https://phlearn.com/tutorial/add-textures-photos-logos/ |
Apr 14th |
| 77 |
Apr 21 |
Reply |
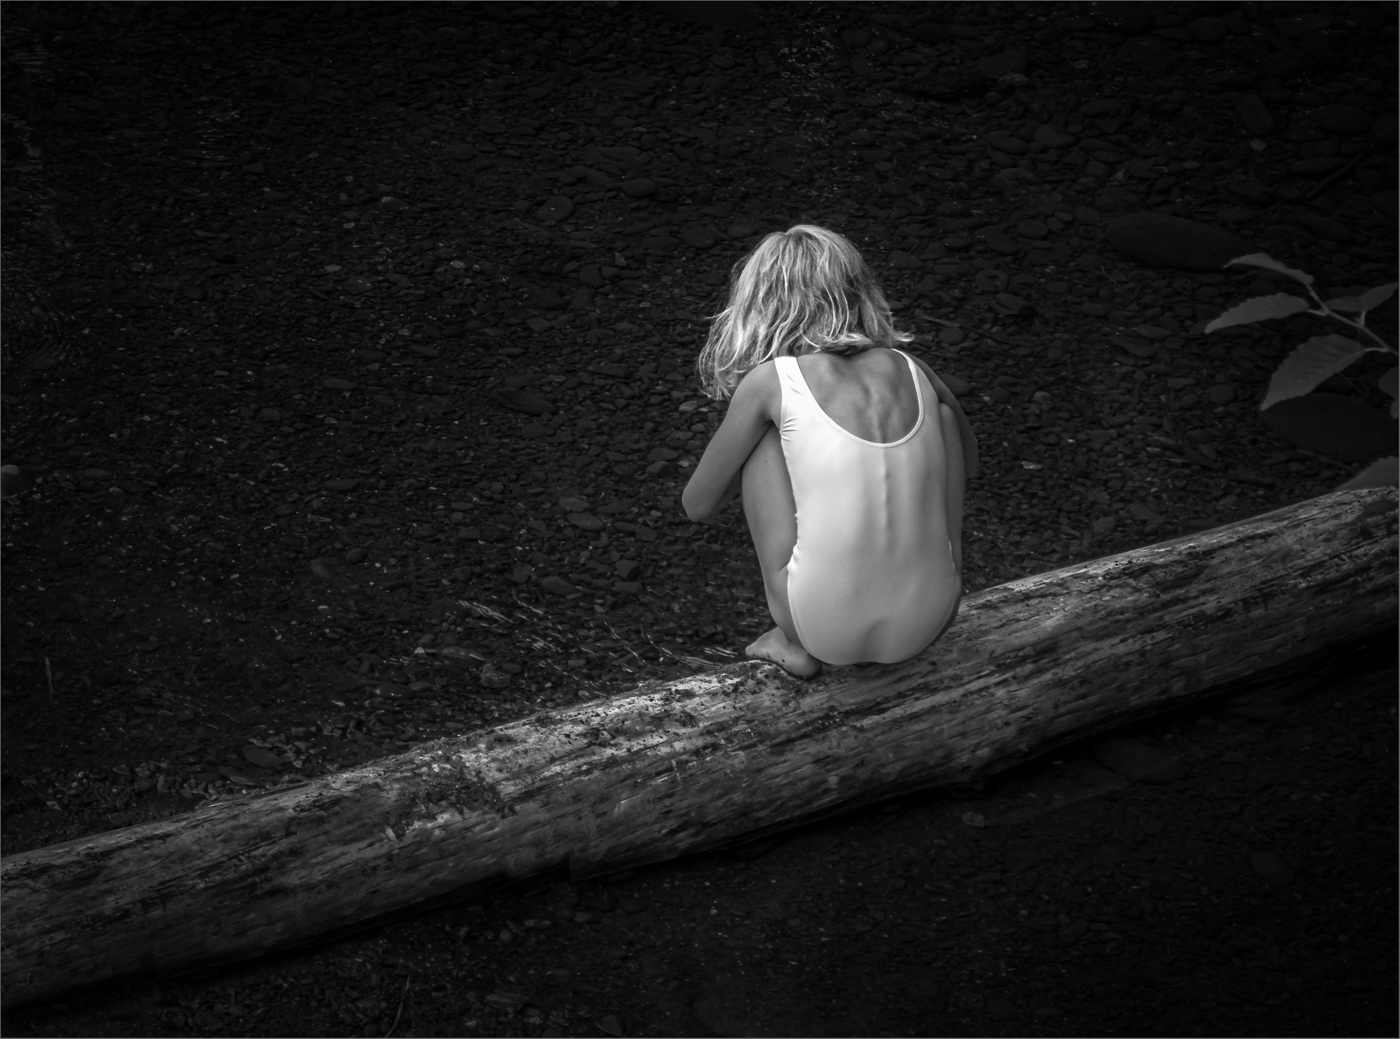
Following up... In my opinion, aside from lightening the image, it would be a plus to keep the subject stronger than the background, as it is in Orig 2. To do this try "select subject" on original 2 layer and apply this selection to the mask on the texture layer, (probably have to invert, and feather). This way the texture only acts on the background. Then lower the opacity of the texture layer. This mask will also be useful on a second levels layer to further selectivel lighten the beads. |
Apr 14th |
| 77 |
Apr 21 |
Reply |
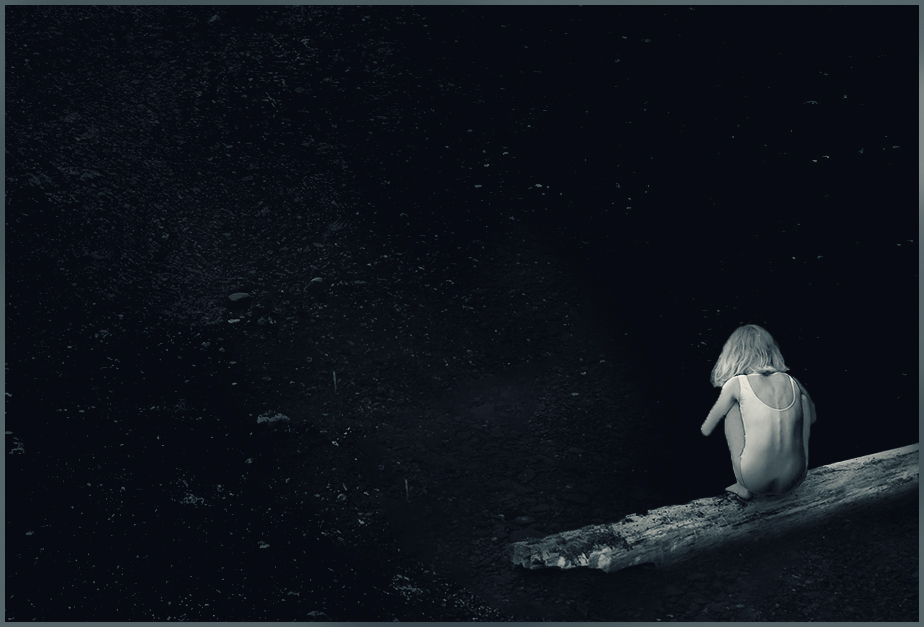
THANKS for this. What a great idea! It would never have occurred to me to make her just a small part of the photo, yet of course she is still the focus. This tells another sadder, lonelier story. I used your version (since I wanted to see it larger) and played with it a little. Kept the scene in blue, which I do like, while adding a bit of yellow to the girl... |
Apr 14th |
 |
| 77 |
Apr 21 |
Comment |
Georgianne, you've done a great job with this bit of maize��I like the view from below that you chose. I think the texture really suits the image and I like the hint of color, especially on the corn kernels. To me the image is confusing at the bottom third, where the corn is being held in the jar. There's a lot of dark tones there, and these pull the eye, but making sense of them is difficult. Perhaps if they were lighter? and perhaps some cloning away of parts of the horizontal leaves�� |
Apr 13th |
| 77 |
Apr 21 |
Reply |
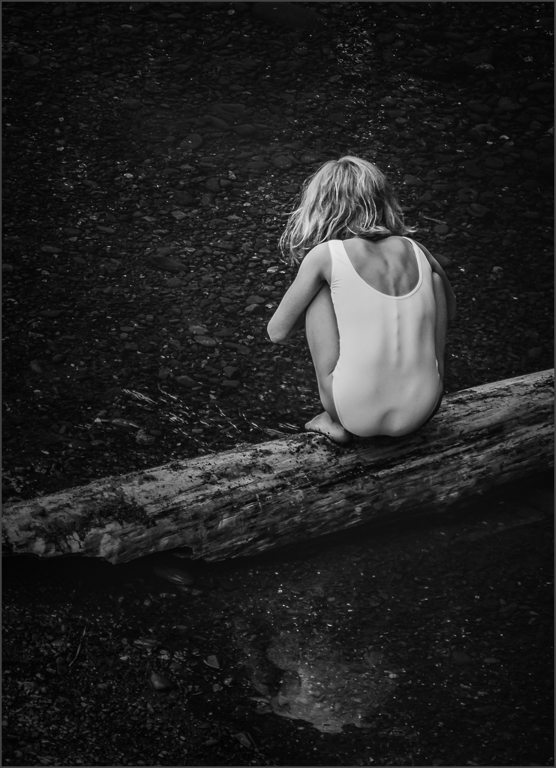
FYI, see my reply to Denise for another version of my Girl on a Log photo. |
Apr 11th |
| 77 |
Apr 21 |
Reply |
FYI, see my reply to Denise for another version of my Girl on a Log photo. |
Apr 11th |
| 77 |
Apr 21 |
Reply |
FYI, see my reply to Denise for another version of my Girl on a Log photo. |
Apr 11th |
| 77 |
Apr 21 |
Reply |
Thank you all for your comments and suggestions. They inspired me to create a different version this morning with a crop that includes the water reflection. Although I prefer the original version, this was well worth considering. |
Apr 11th |
 |
| 77 |
Apr 21 |
Comment |
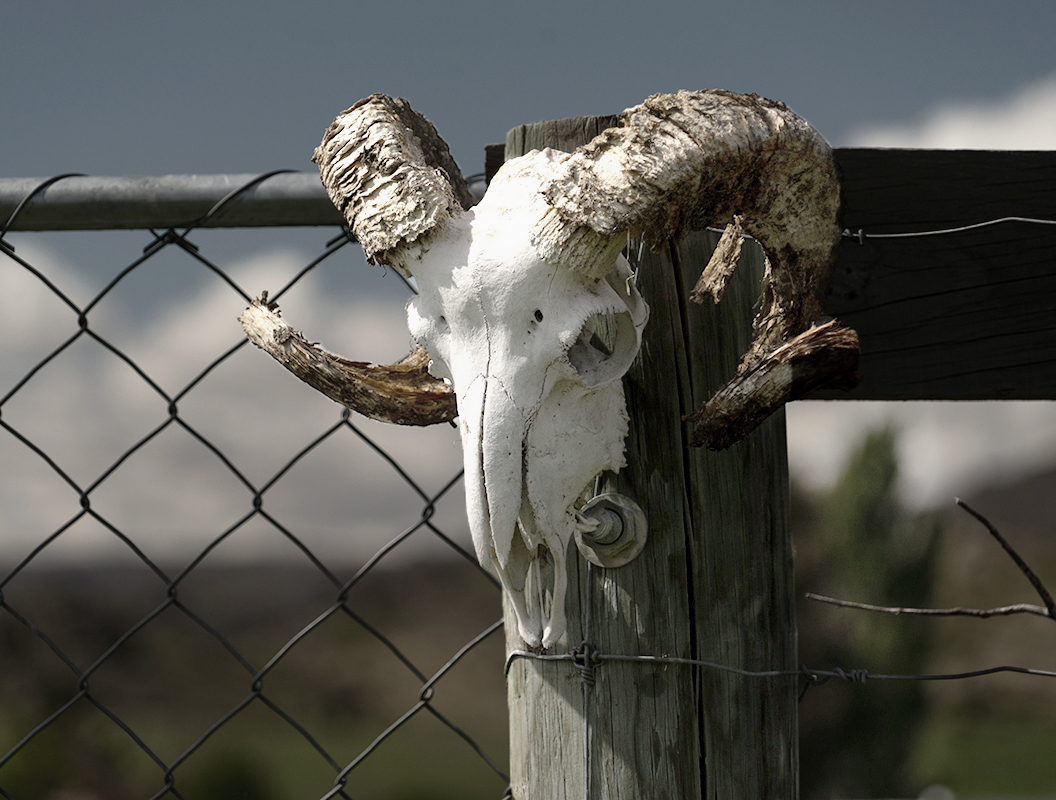
It must have been exciting to come across this rams head on a post. As you note, step one is to try to get the tonal values where you want them. The original image is dark, but maybe the highlight on the top of the head fooled the camera. I definitely prefer your final to the B&W version, where the white clouds are almost the same brightness as the skull.
In your final, the clouds still compete with the skull, so I tried taking your original and just selecting the skull and lightening it in curves. This leaves the background as shot, except the dark tree to the right of the post needed to be lightened as well. Here's a version taken that far. I like the way you brought out the detail in the post and the skull face as the next steps. |
Apr 7th |
 |
| 77 |
Apr 21 |
Comment |
Denise -It does look like a canyon. Your DOF was such that you captured plenty of detail and texture here. So it makes sense that your objective is to focus the eye where you want it. You've done that in part with your crop, and then with your software efforts.
I took your original and added some selective adjustment layers in PS - H&S, and curves, masking as needed to add interest in the valley and take away interest from the outside. Just an alternative��
Now that you have worked your photo and are clear what you want to achieve, this might be a good time for you to give it a brand new "go" from the start. |
Apr 7th |
 |
| 77 |
Apr 21 |
Comment |
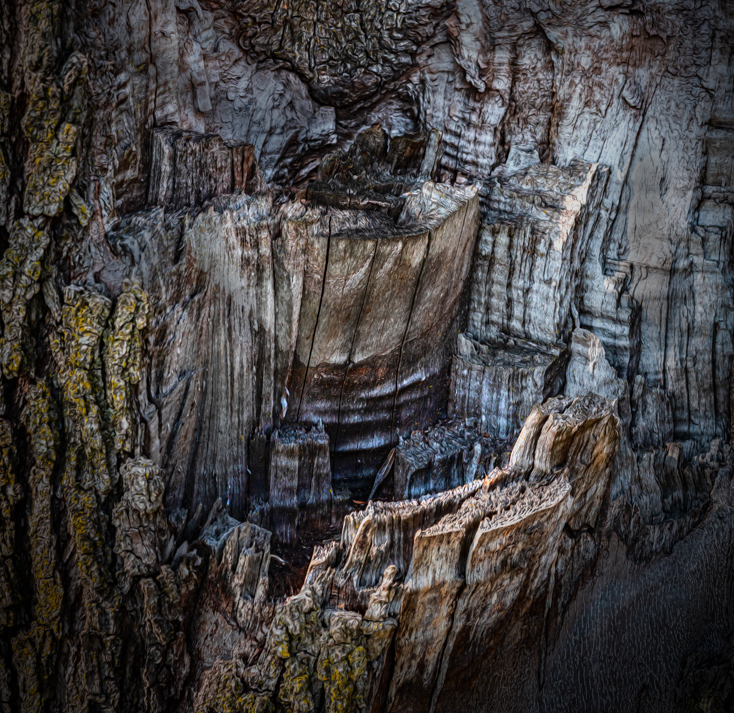
What an interesting image, with an interesting story. Was orig. 1 used to create the texture somehow? The final image is quite dark, and I think would benefit from selectively lightening the subject. Oftentimes, walking through the various PS blend modes is useful when adding textures. The darken/multiply blend modes usually need a curves or levels adjustment layer.
I think making art out of ANYTHING is OK. In this case, a bit of text at the bottom left would make for a great public service poster: Save your beads; Save our trees.
|
Apr 7th |
| 77 |
Apr 21 |
Comment |
Michael -- welcome to the group! It's fun here, so do enjoy. We've had some great discussions in the past - these can be accessed from the Bulletin Board button on our group's home page. Feel free to start another thread��
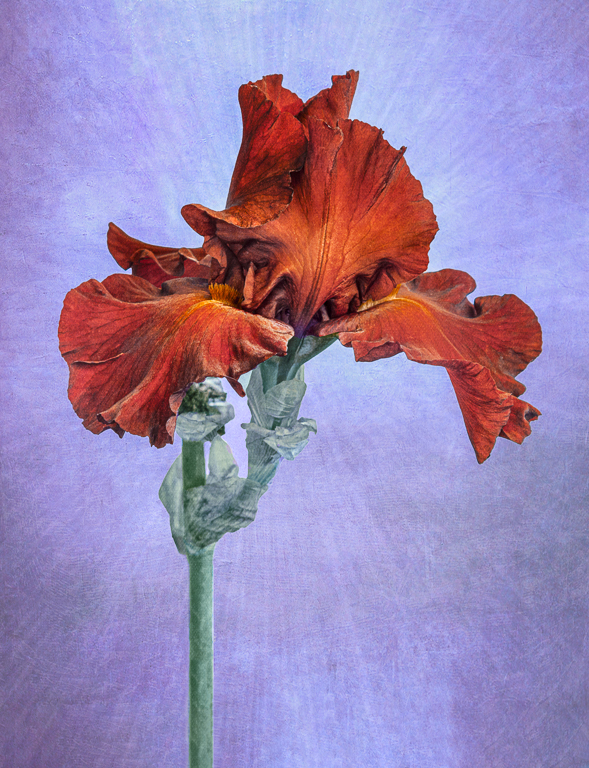
Your twins photo is a strong image that grabbed my eye. The overlapping flowers at different depths of field make for an excellent composition, and your crop and cloning made a big difference. A few suggestions: the white stoke is so bright it draws away from the photo, so maybe try a dark orange or dark yellow stroke. There are still a few imperfections in the flowers that could be cloned. My main thought is that the intensity of the flower colors, their strong saturation, means they have lost some detail; this is particularly problematic when trying to print. One way to see when this happens is by looking at the photo's histogram.
P.S. I also have a Ph.D in (organic) Chemistry and have some chemist friends who worked at Dupont, including Blake Bichlmeir and Malli Rao. |
Apr 7th |
| 77 |
Apr 21 |
Comment |
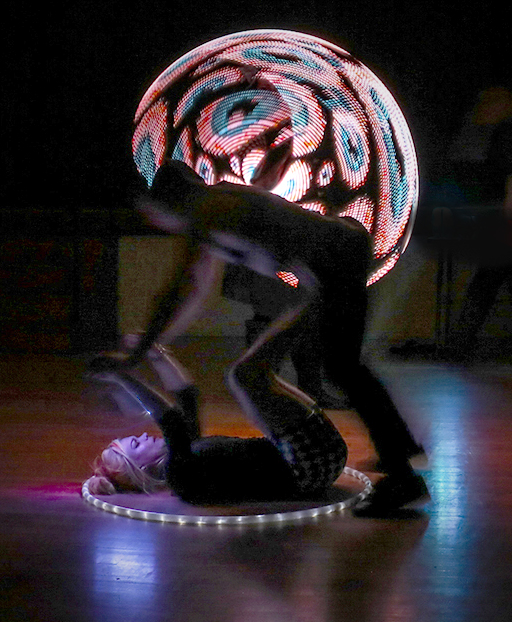
Connie , talk about a treat - spinners - who knew! This Saturn combination of shots is great. Definitely an unusual image. My thoughts for improvement: a tighter crop with less at the bottom; more stars, less evenly spaced; and desaturate that outside stroke so it's not so bright. It may be possible to content-aware fill over the guy's back.
I found the original photo fascinating, and I think it would make a great photo itself. Here's a version of it�� |
Apr 7th |
 |
6 comments - 7 replies for Group 77
|
6 comments - 7 replies Total
|