|
| Group |
Round |
C/R |
Comment |
Date |
Image |
| 65 |
Sep 17 |
Reply |
Just as an aside ...
Reversing the lens yields the magnification, but you are still at the mercy of the lens quality. From you note Lynne, I am not sure it that was clear or not. If you already knew this then "never mind ...".
Personally I have not tried this, but Janos has inspired me to give this a try |
Sep 26th |
| 65 |
Sep 17 |
Reply |
One of my thoughts on monochrome. Since these images relay primarily upon tonal differences, not every image makes a good monochrome image. First there need to be some tonal difference, but not always a lot. This image is understated in that regard, but it works. To my eye busy images with a lot of detail and clutter do not do well as monochrome. The simpler or the more defined images with areas of clear space separating areas containing detail often lend themselves better to the monochrome arena. This image is a great example of this. The clear area around the eye, framed by the eyebrow. Well seen, and a good choice. |
Sep 16th |
| 65 |
Sep 17 |
Reply |
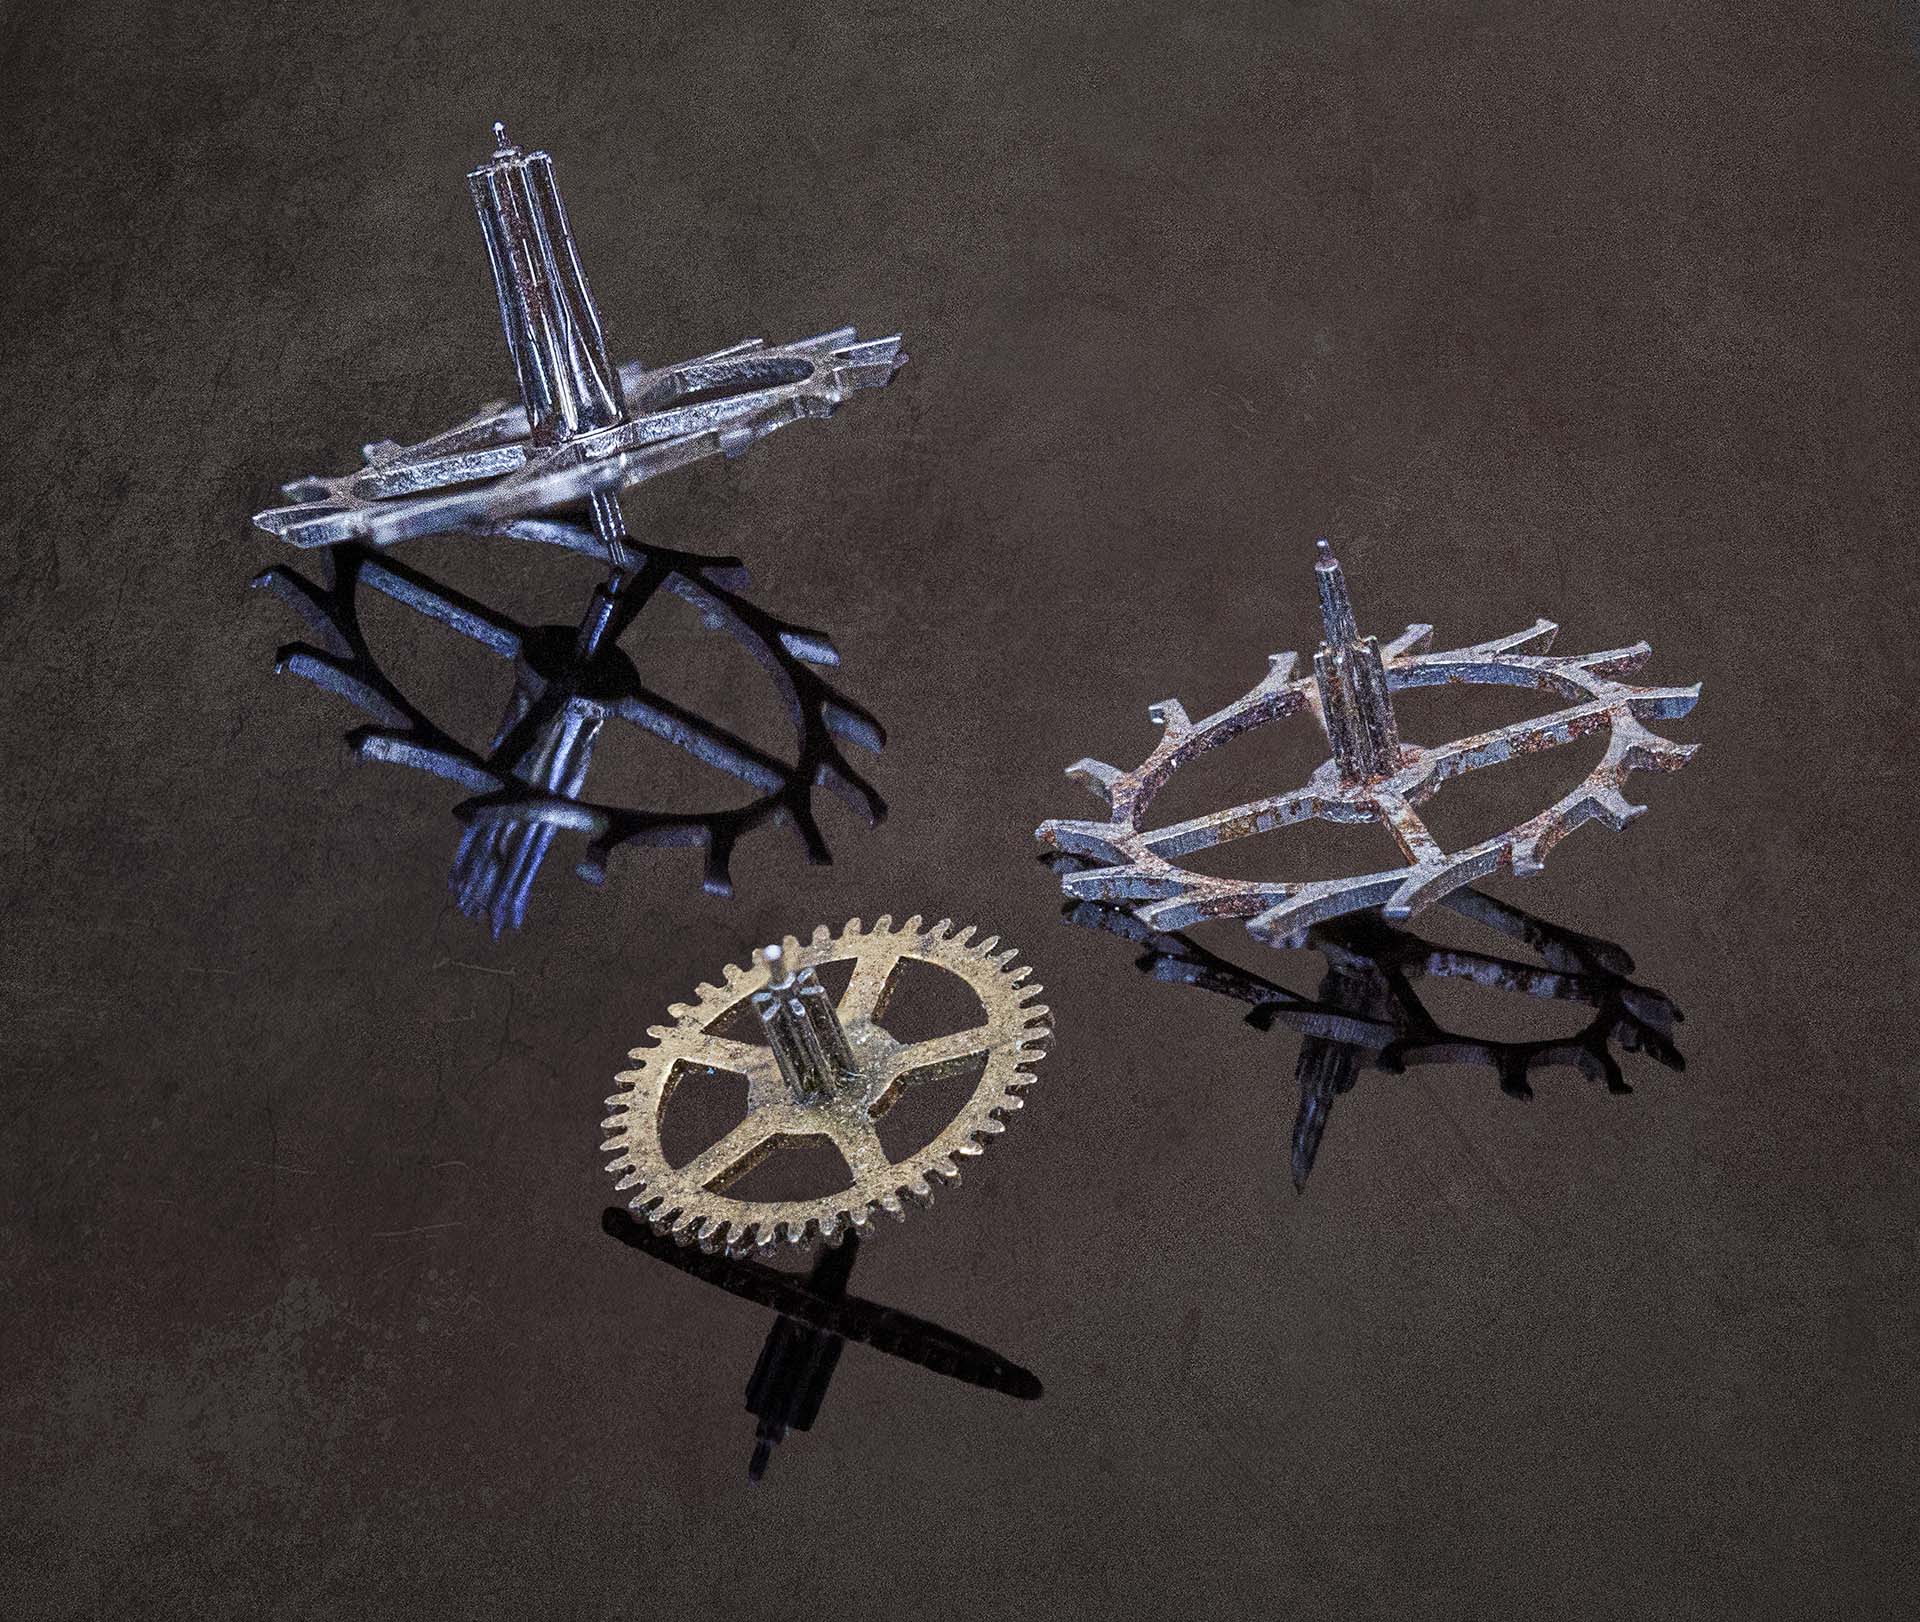
I love the story !!! "I dropped the watch, and with all; the pieces scattered on the floor I saw this image." If that isn't something that we can't all relate to, and it brought a smile to my face. It also a great instance of "seeing', something that we all need to aspire to. Thanks ! |
Sep 16th |
| 65 |
Sep 17 |
Comment |
Directions for Focus Stacking In Photoshop
Go to my image for this month. I have outlined in the comments how I "stack" in Photoshop
|
Sep 13th |
| 65 |
Sep 17 |
Comment |
Focus Stacking In Photoshop
File Preparation (Using Multi-file Editing in Adobe Camera Raw within Photoshop, Lightroom or Elements)
A. First collect all appropriate Raw (or JPEG) files into a single folder. This step is not required but simplifies the organization and preparation of the files to be stacked. The order of the files is not critical with this process.
B. Open all Raw files in the Adobe Raw Editor (may automatically open when you open Raw file)
C. Select one representative file and edit until the best desired look is obtained
D. Go to the "Presets" Tab (second Tab from the end on the right side)
E. Left clink on the Options icon at the right side of the "Presets" header bar
F. Select the "Save settings" option
i.Select the "All Settings" setting set, and Select "Save"
ii.Name the saved setting (I often just use a number as the name) set and select "Save"
G. Now select all photos opened in the Raw Editor ("Select All" button at the top left)
H. Select the newly defined Preset Name (all files will now be adjusted with these setting)
I. While all files are still selected, Save the newly edited files ("Save Images" button at the lower left).
J. While all files are still selected, load the newly edited files into Photoshop ("Open Images" button at the lower right).
2)Focus Stacking in Photoshop (not Lightroom or Elements)
A. Once all files have loaded into Photoshop, Go To => File => Automate => Photomerge
i. Select the "Auto" Layout option
ii. Deselect the "Blend Images Together" option
iii. Select "Add open Files" option and select "OK"
iv. When the Photomerge alignment process is done proceed to the next step
B. Select all open layers (select the top layer, hold the Shift key down, and select the last layer)
C. With all layers selected,
i. Go to => Edit => Auto-Blend Layers => Stack Images
ii. Select the "Seamless Tones and Color" Option and
D. When this process is completed, the final focus-stacked image should be displayed
E. If acceptable, merge all visible layers and save the resulting file as a PSD file for further editing.
F. Close all other files without saving.
|
Sep 13th |
| 65 |
Sep 17 |
Comment |
Wonderful image. I love the mix of shapes, textures and colors contained within this image, and the crop allows a view of all of the interesting parts. Also the differential focus adds to the feeling of depth in this rendition.
It might be nice to know more about the backstory of this image. Why did you take the image (intent)? Is there anything special with this watch? How did could come by a watch with it's innards' exposed. However lacking this information does not detract from the image itself.
I would though like to know more about how you captured the image. Was this had hand held (no shutter speed given). Why choose f/20 ? What was the pluses / minuses of other settings. In this forum I think its important to share that information to help fuel our discussions.
|
Sep 11th |
| 65 |
Sep 17 |
Comment |
Wow ! The world through the "Eyes of a Child". Great shot and wonderful use of macro photography to tell your story, rather than using macro photography for the sake of macro photography (something I often fall prey to).
I agree with your choice of a monochrome format to tell your story. Less distractions here giving the subject the full stage. Now that you have seen this, how about crafting an even more interesting story by playing with the content of the reflection, taking this shot is several different locations so the reflections themselves have a greater voice. Taking this shot in a playground, a cemetery, with parents and /or siblings visible or with the photographer visible all come to mind as examples which may illustrate my point.
Technically, the image is fine. Its as sharp and crisp as it needs to be, and the composition of the crop is perfect.
Looking forward to future acts to this play !
|
Sep 11th |
| 65 |
Sep 17 |
Comment |
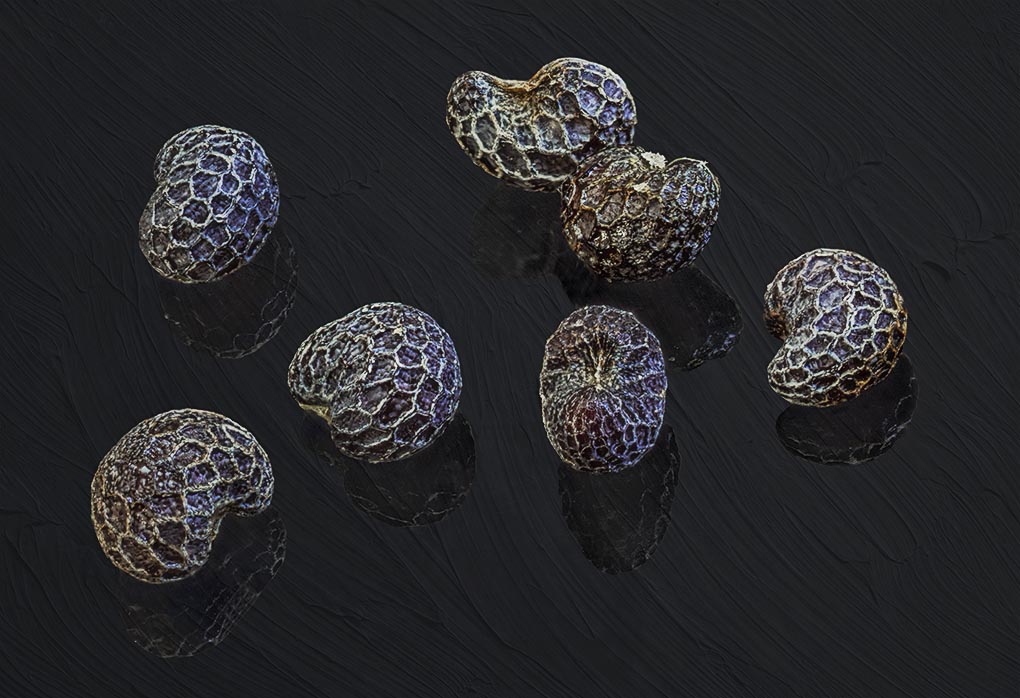
This is one of those classic "Macro Shots", but that in no way detracts from your image. Personally I take great satisfaction when I'm able to pull off a classic shot, and you should as well. In this case, I like the fact that not everything is in focus. There is enough detail to feast your eye on, and the softer areas actually provided a type of vignette, framing your sharp areas.
Could you expand bit more upon how you took the image. Not everyone knows about "reversing" a lens to get a macro shot. How do you do that? Was the reversed 50 mm lens put if front of another lens? What extension tubes did you use? How did you position the subject and the camera. If you used a f/20 instead of a f/10 aperture in this case, would more be in focus ?
|
Sep 11th |
| 65 |
Sep 17 |
Comment |
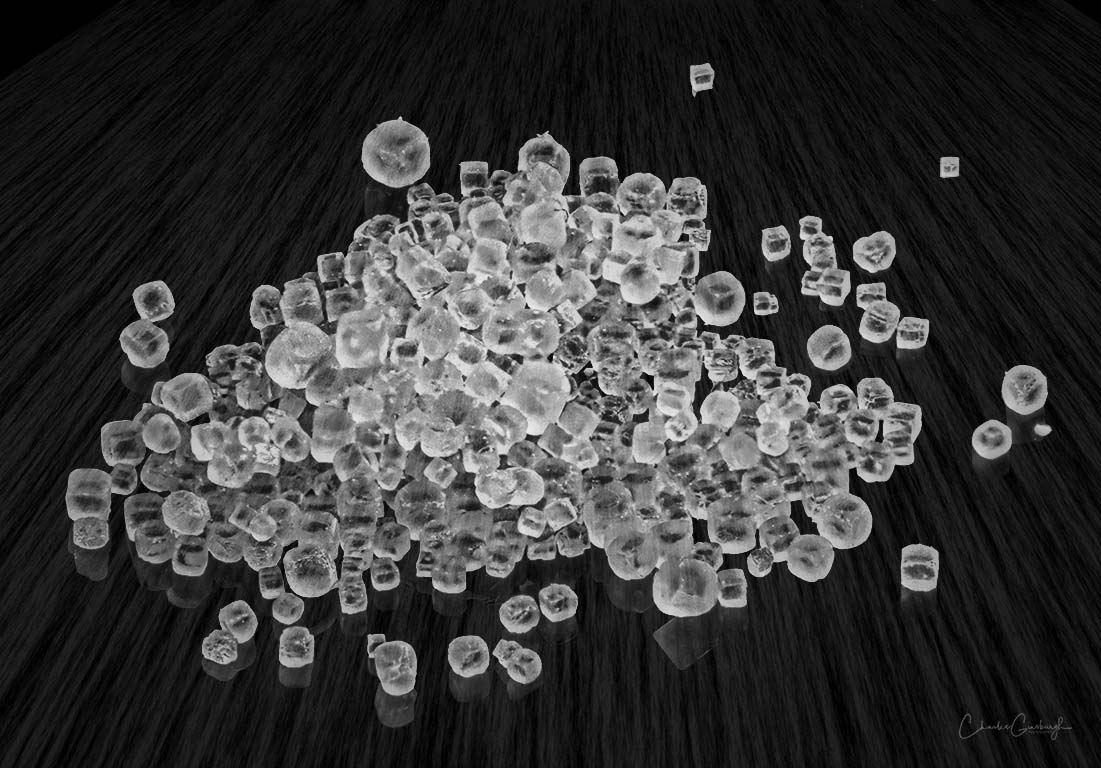
These was no preparation of the subject aside from sprinkling some salt from the kitchen salt shaker on to a piece of black glass. One of the tricks here was to not get the salt grains too close together, so that individual grains stood out some (it's that darn composition thing again ��) The rest of the set-up took a bit of time (camera, lens, rail and light). The camera was positioned somewhat horizontally, pointing down at the table top at a 20-40� angle (not straight down) which is why so many focus slices were required. If I had pointed it straight down I would not have needed so many slices, but the set-up and initial focusing would have been far more difficult. To tell the truth, it did not even occur to me that I could set it up like that, but it's something to think about.
Recently I have been pushing my macro boundaries out a bit, experimenting with hand held focus slices, macro light painting, and/or extreme (for me) magnification like the "salt grains". In these cases I am finding that there is far more movement of the subject between slice shots that I was used to. In a recent seminar I attended (where hand-head stacking was discussed) it was noted that the auto-align function within Photoshop is more robust (forgiving) than that in Zerene Stacker or Heil. Focus), so I have been reacquainting myself with the Photoshop stacking process. To tell the truth, I have been presently surprised how well it has done, and it is a bit faster (since I can go directly from RAW files in Camera Raw into the stacking process without saving an intermediate tiff file). The down side is that with 30 - 50 RAW image slices, you really need a fair amount of computer processing power to pull this off in a reasonable time (something we are not all blessed with). I have been thinking about doing a ZS vs. PS CC comparison with a few shots (I have the images to do this with), so I perhaps I will in the next month or so. But to answer your question, No I have not made this comparison (yet).
|
Sep 11th |
6 comments - 3 replies for Group 65
|
6 comments - 3 replies Total
|