|
| Group |
Round |
C/R |
Comment |
Date |
Image |
| 5 |
Jul 19 |
Comment |
Oh wow! I can't pass up making a comment on this image.
In no particular order you have really great directional light that highlights the horse and the girl. The light draws the viewer toward the expressions. You have peak action on two fronts: the girl intent on the event and the horse on the camera. The humor is extraordinary.
I would suggest two possible changes. The general background does not bother me, but the green vehicle on the right does. It is simply too bright. I see two possible (unless you clone) fixes. One would be to tone it done considerably or more easily just crop it out. This however creates an unbalanced image with too much space on the right. You could partially fix this by cropping from the left on as far in as the "A" in the sign. This would save the very valuable flying dirt.
But whatever you do or don't do--it is a brilliant image. |
Jul 25th |
1 comment - 0 replies for Group 5
|
| 6 |
Jul 19 |
Comment |
Once again you amaze me with these little guys. How much did you crop. With a 105 just how close were you. I know the flash helped with the clarity. |
Jul 16th |
1 comment - 0 replies for Group 6
|
| 9 |
Jul 19 |
Comment |
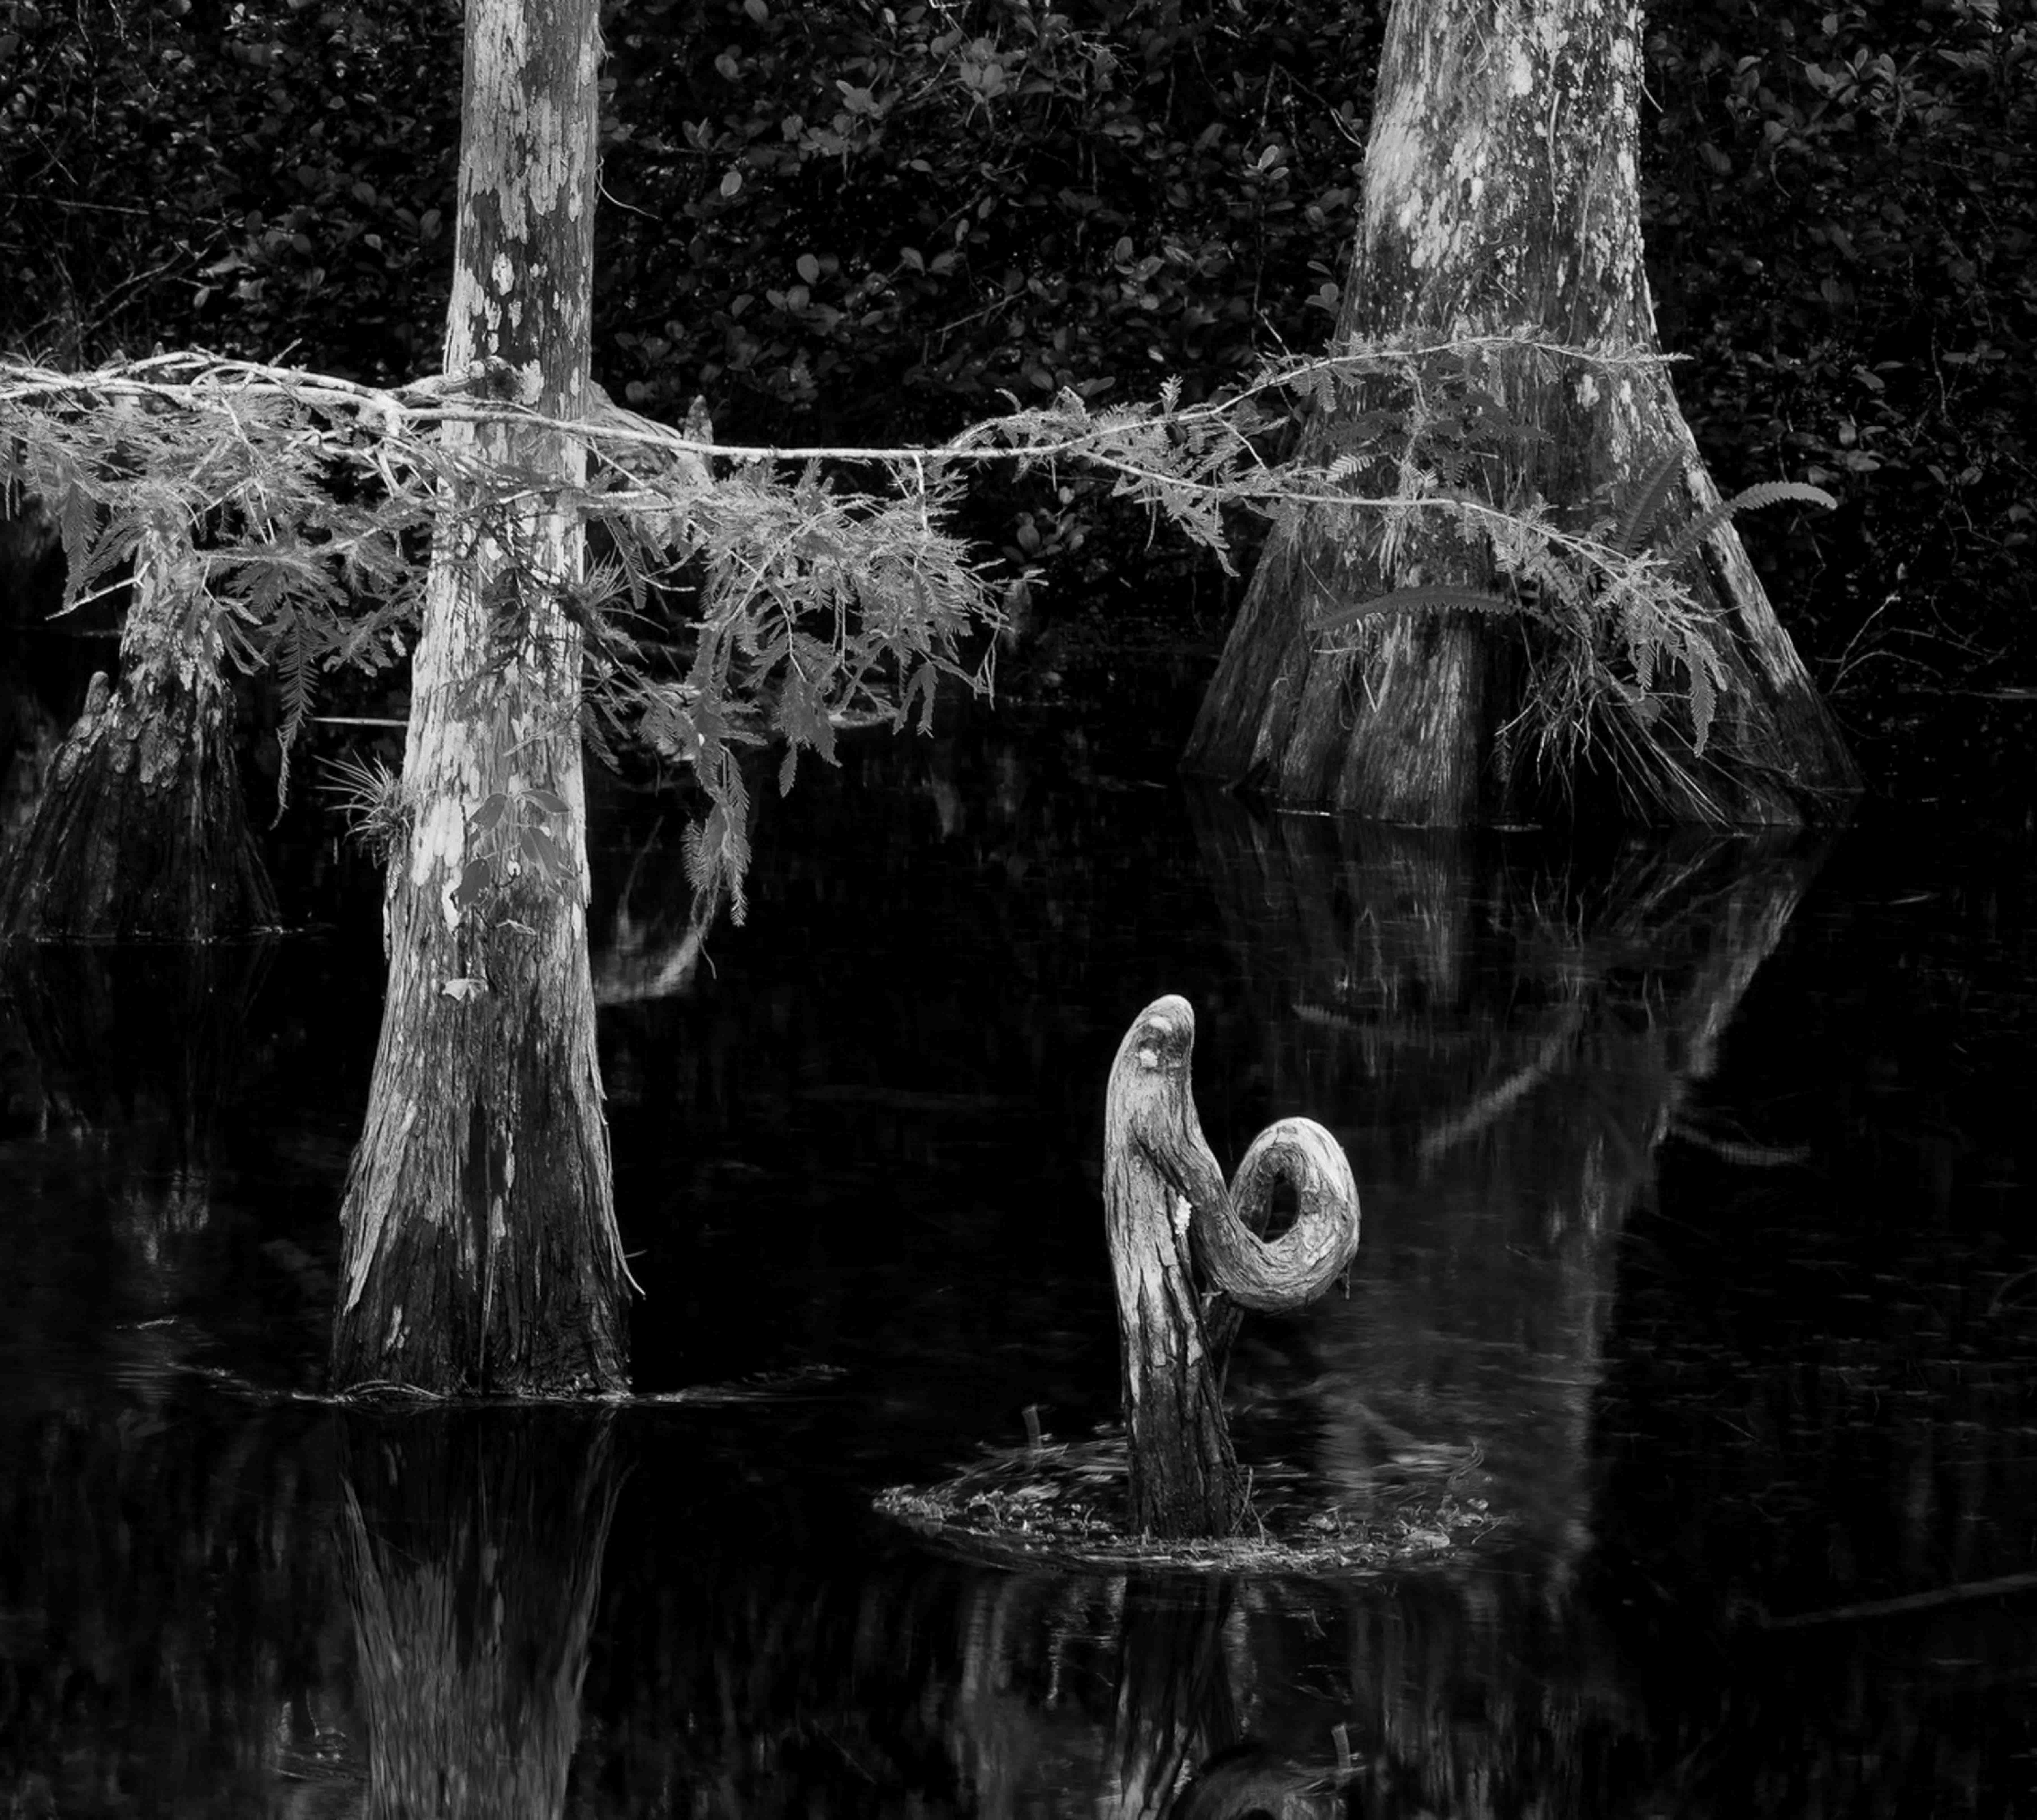
Good thinking with the tripod. I use the technique in the Florida Everglades. Is your tripod mounted on the kayak? I've tried that a few times.
You have a beautiful scene and I like the angle of view you chose. |
Jul 16th |
1 comment - 0 replies for Group 9
|
| 32 |
Jul 19 |
Comment |
Hi Stephen
I like the happy expressions of the biker riders as it helps to engage the viewer. As someone else noted, I would have like a bit more space especially since the bike's front wheel is clipped on the left and the bottom and some space to move into would help. The exposure looks good as you do not seem to have any blown highlights. The B/W conversion looks good with the use of the full range. I like the photo as it is but I wonder what it would look like is shot with a longer lens and a more shallow aperture to separate the girls from the background. |
Jul 22nd |
1 comment - 0 replies for Group 32
|
| 67 |
Jul 19 |
Reply |
Madhu
When I added the gloss it was a several step process.
All of these steps were done using the adjustment brush in Lightroom. I generally start by setting both the flow and the feather to about 75% and I always turn on the auto mask.
Since this bird was in really deep shadow I started by reducing noise across the feathers. I then reduced highlights to get rid of glare.
Then I closed the adjustment brush and went to the HSL panel and used the spot adjustment to add Luminance to each of the colors of the feathers.
Then back to the adjustment brush and added vibrance to the feathers. You just have to play with how much you move the sliders---often a little goes a long way.
I finished with adjusting clarity and sharpness with the AB on the feathers.
Hope that helps.
|
Jul 22nd |
| 67 |
Jul 19 |
Reply |
Wayne
Ive finished my Smoky images--at least for now. You can see them on my website using this link:
https://reminisces.smugmug.com/RECENT-ADDITIONS-1/Smoky-Mountains-2019/
Some of these I'll use for future posts on this forum. |
Jul 22nd |
| 67 |
Jul 19 |
Comment |
Thanks for visiting Stephen. I look forward to your comments. Glad you like the story telling and the images. I've made a living as a speaker of one type or another. And I've found that when doing photo exhibits that the visitors enjoy the story behind the image. This sort of personal touch keeps them coming back. |
Jul 17th |
| 67 |
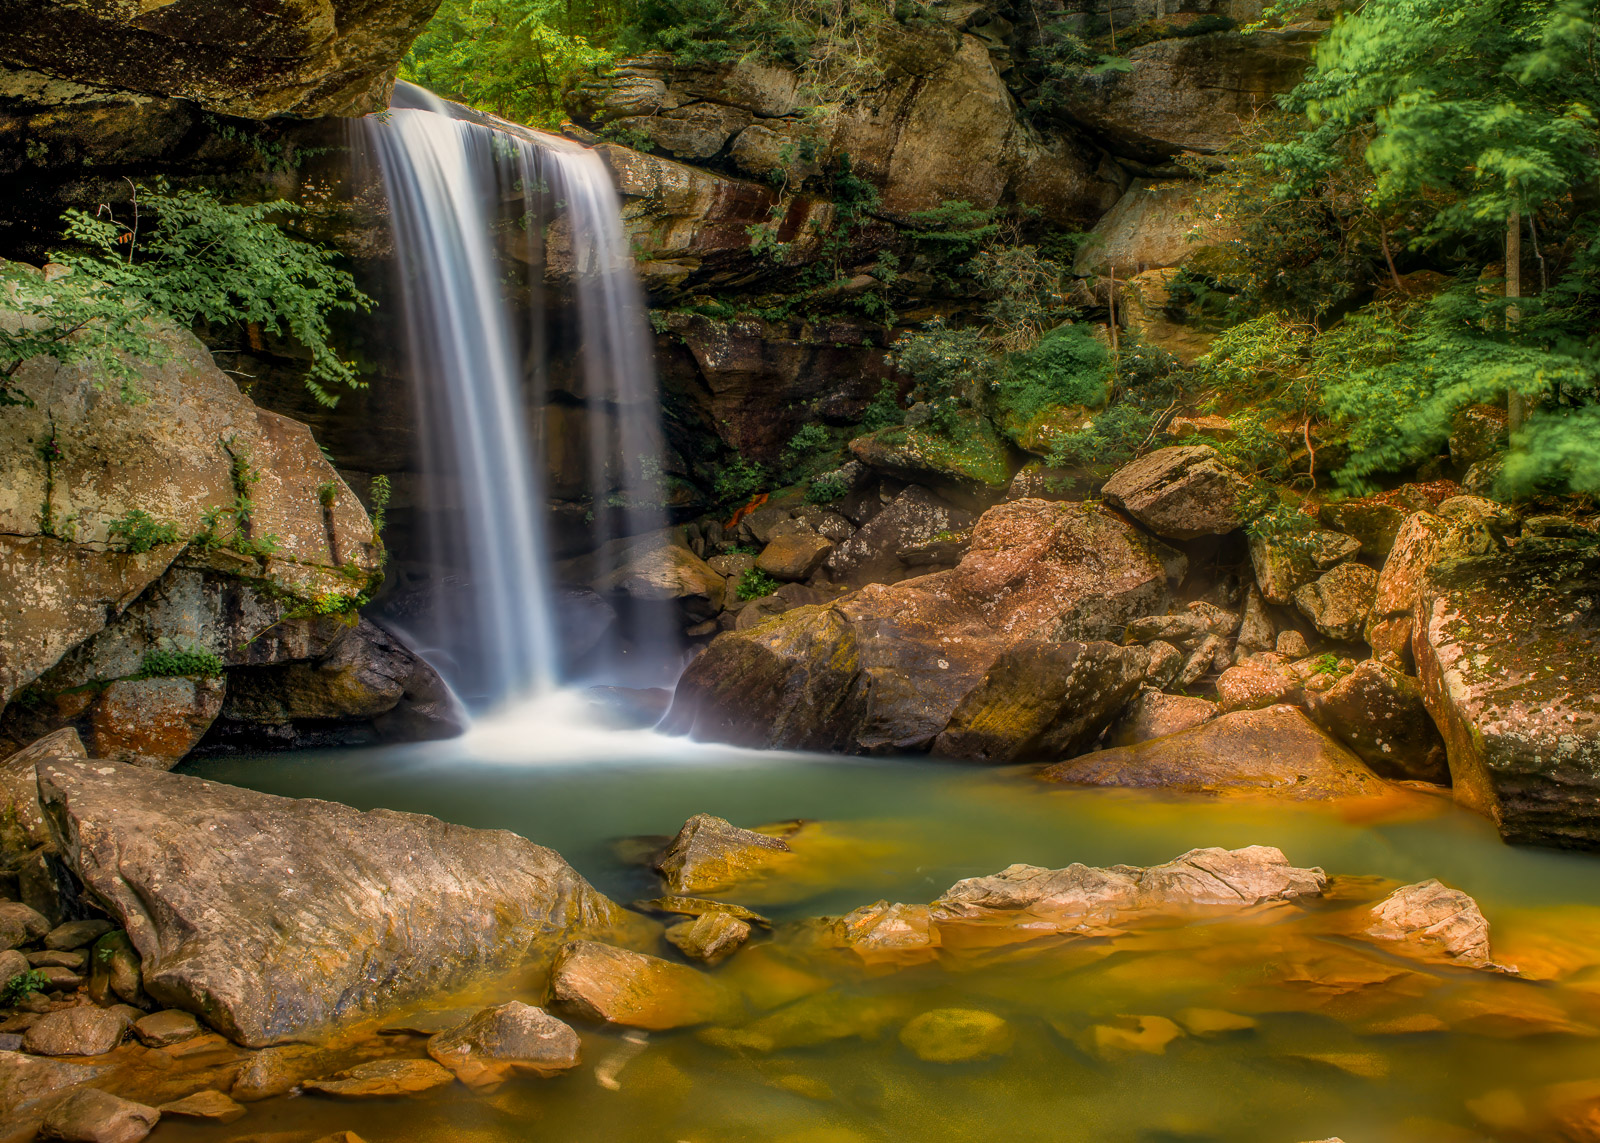
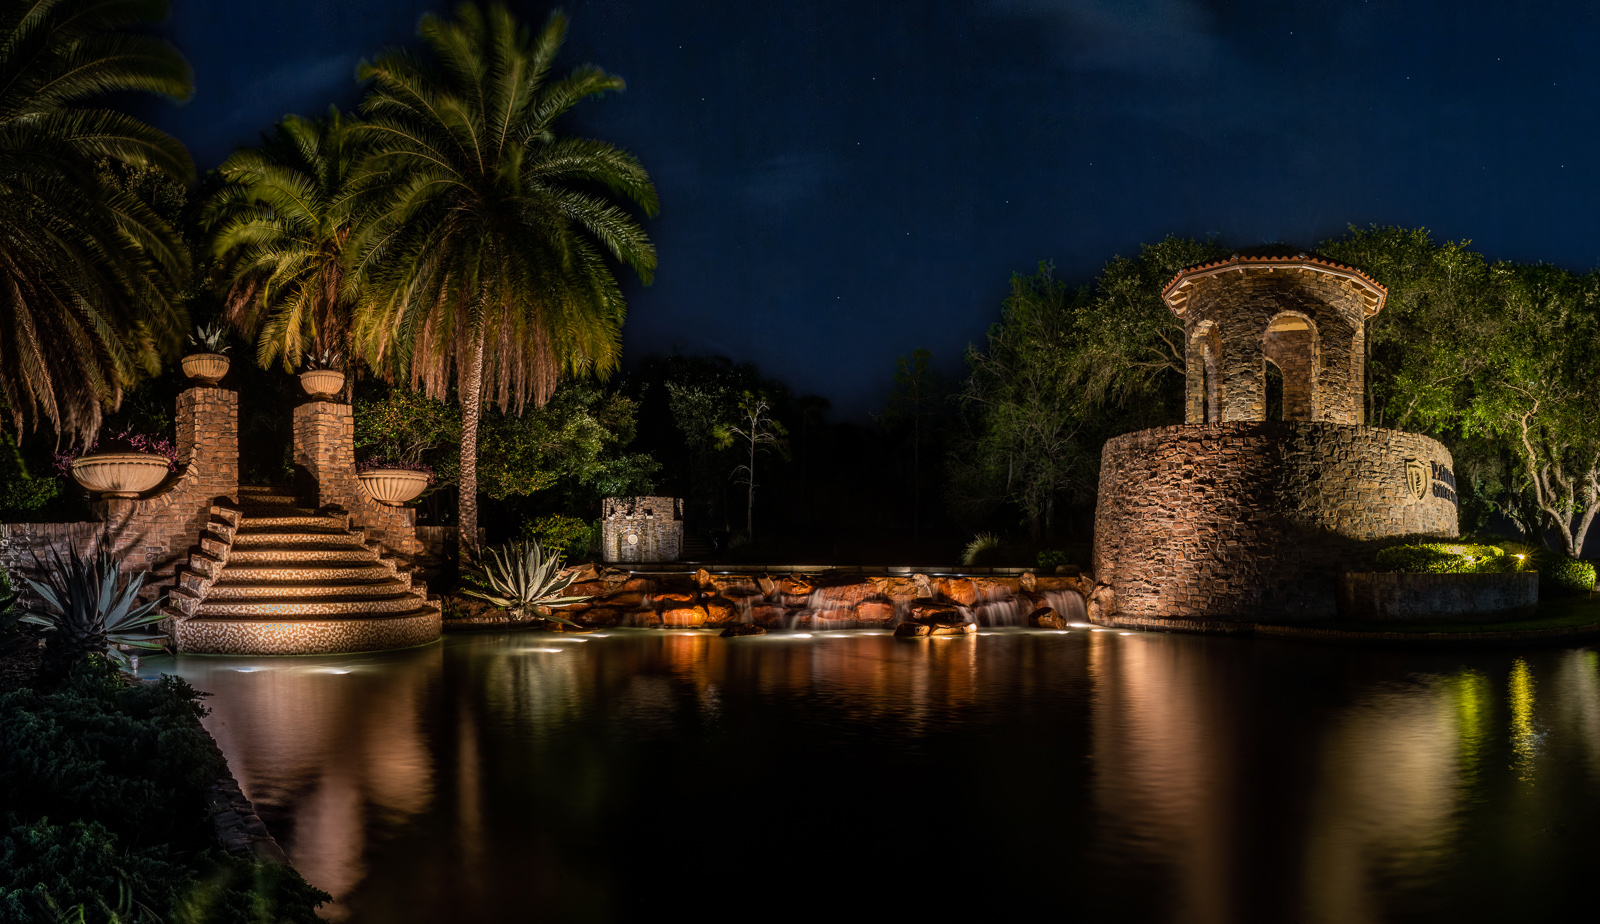
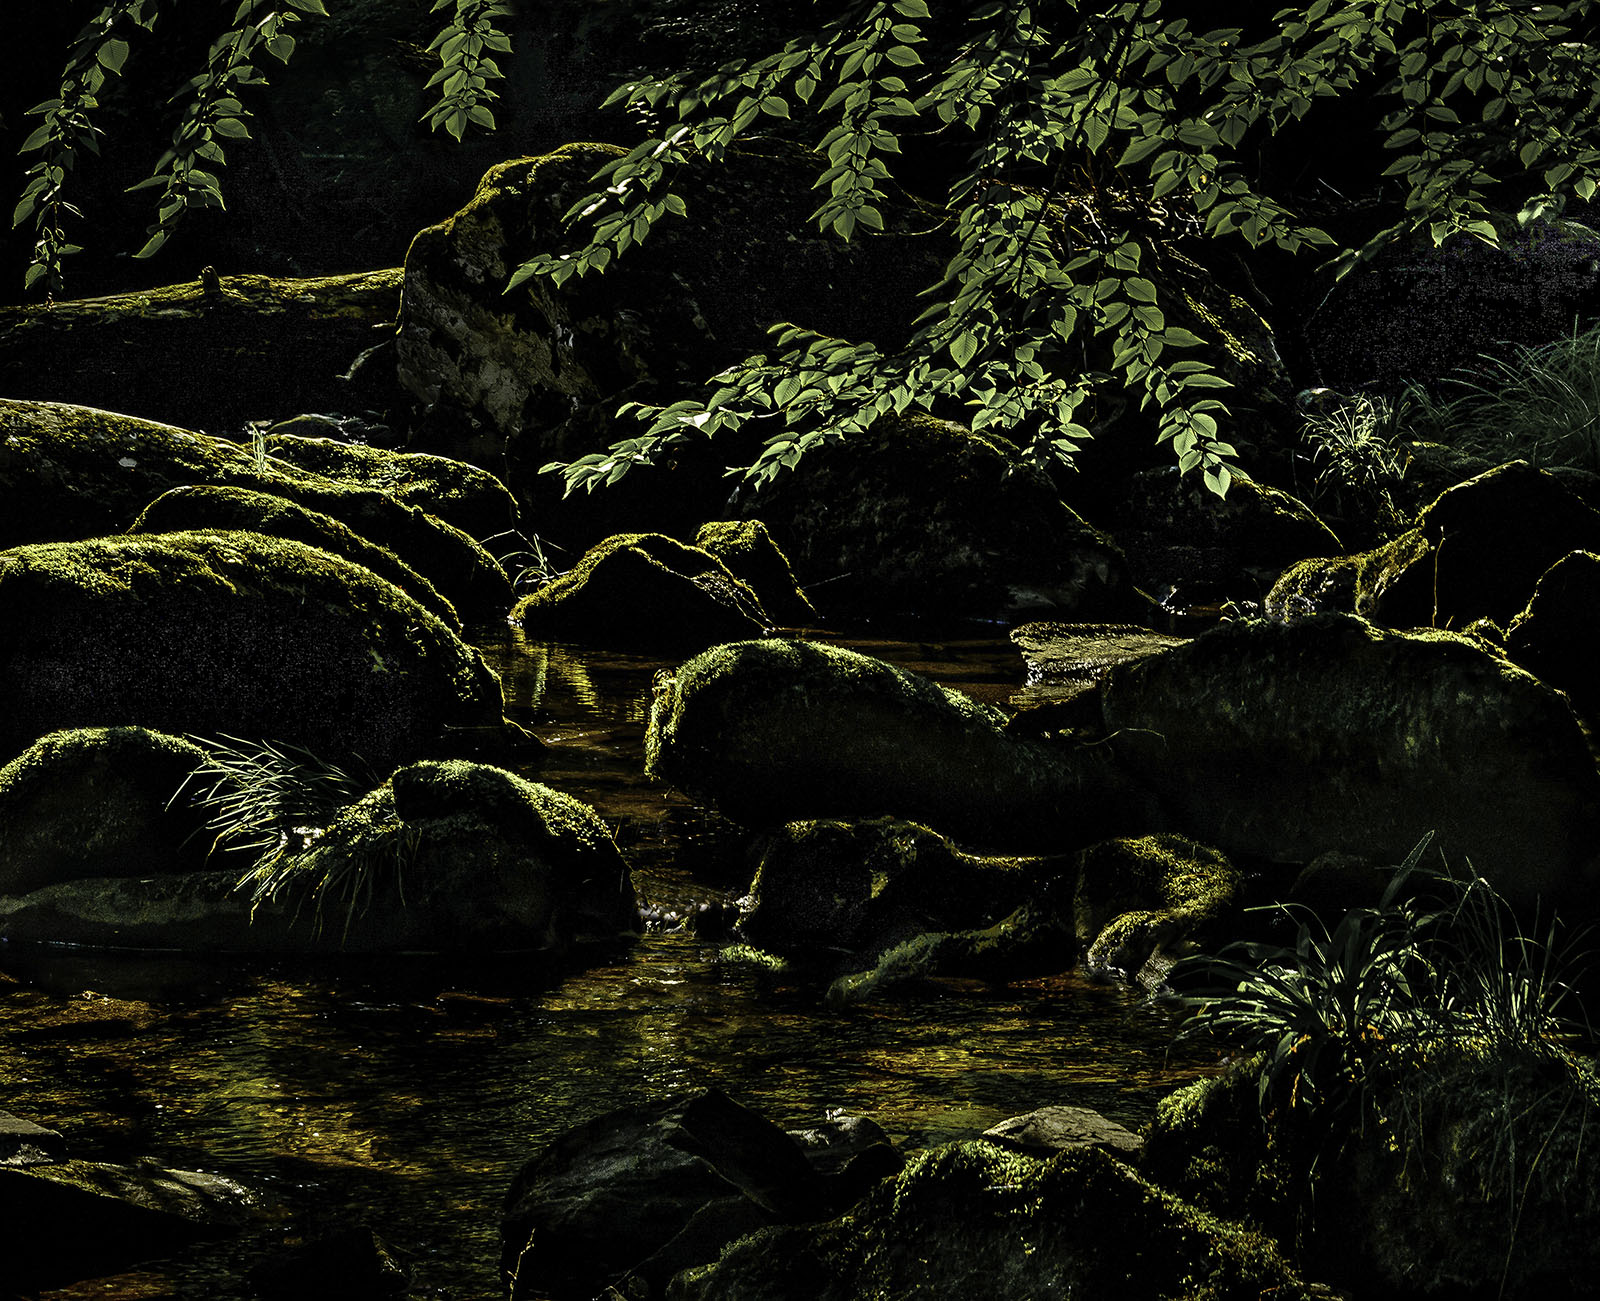
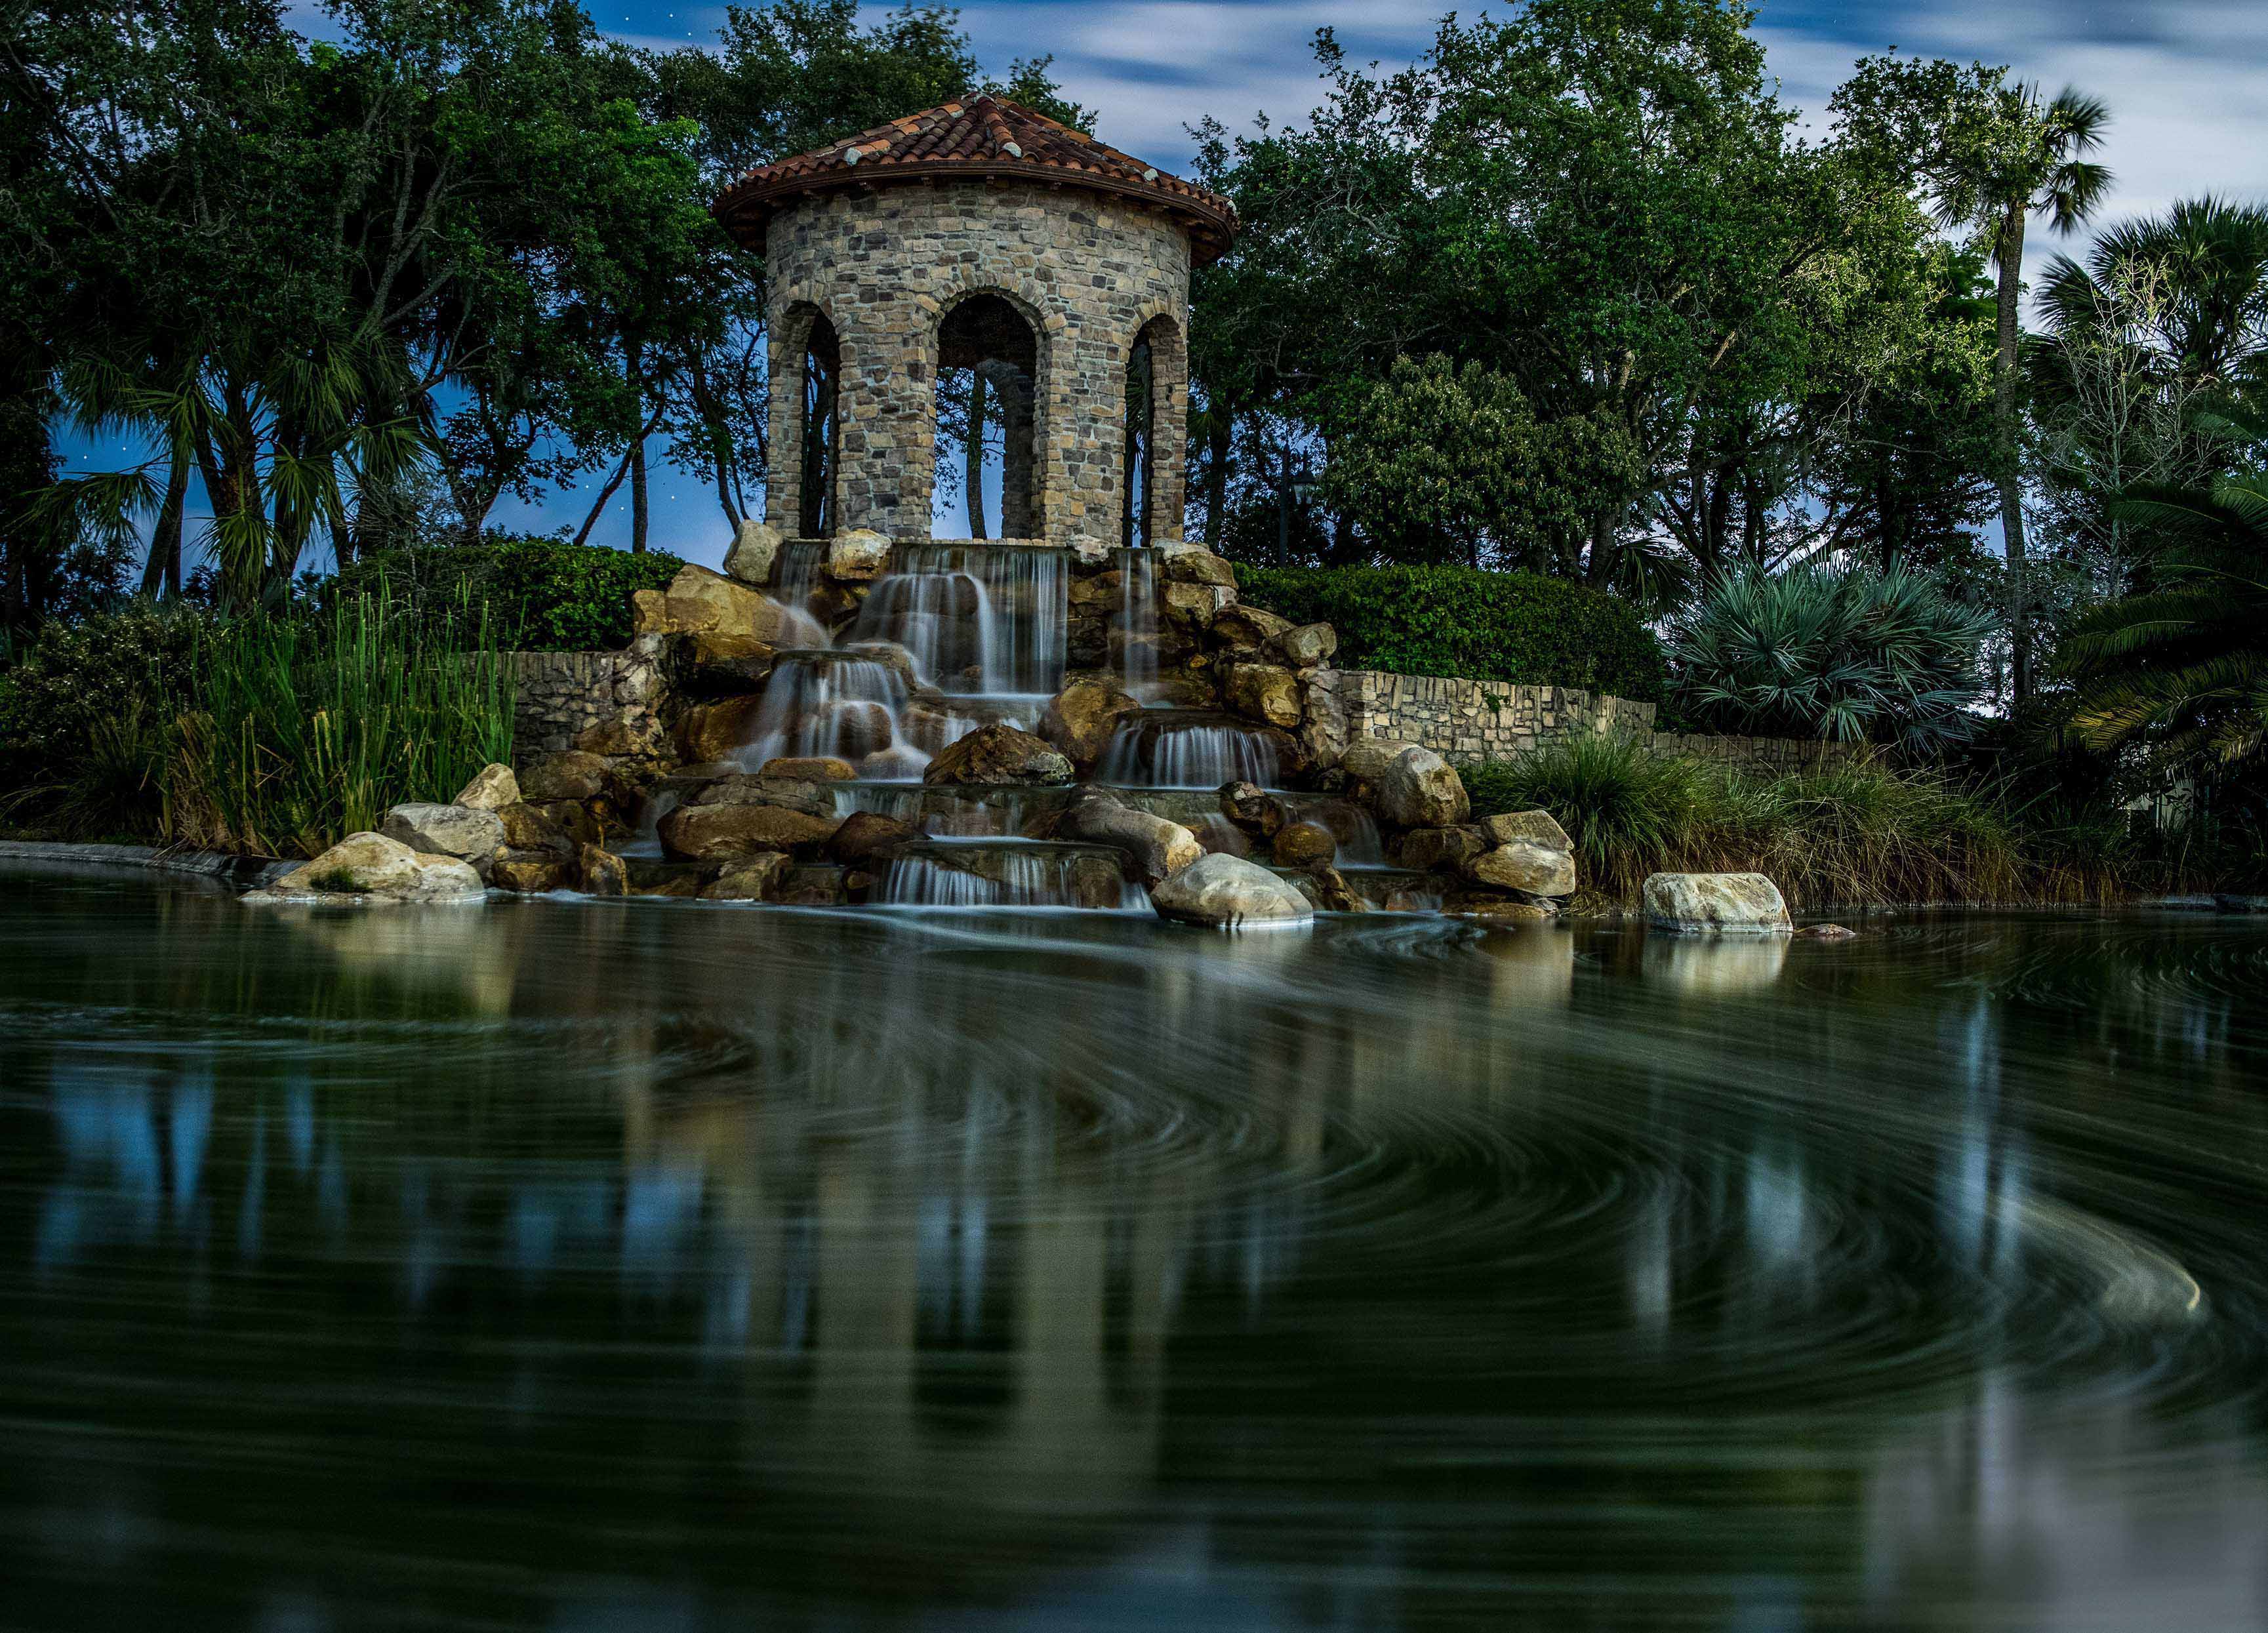
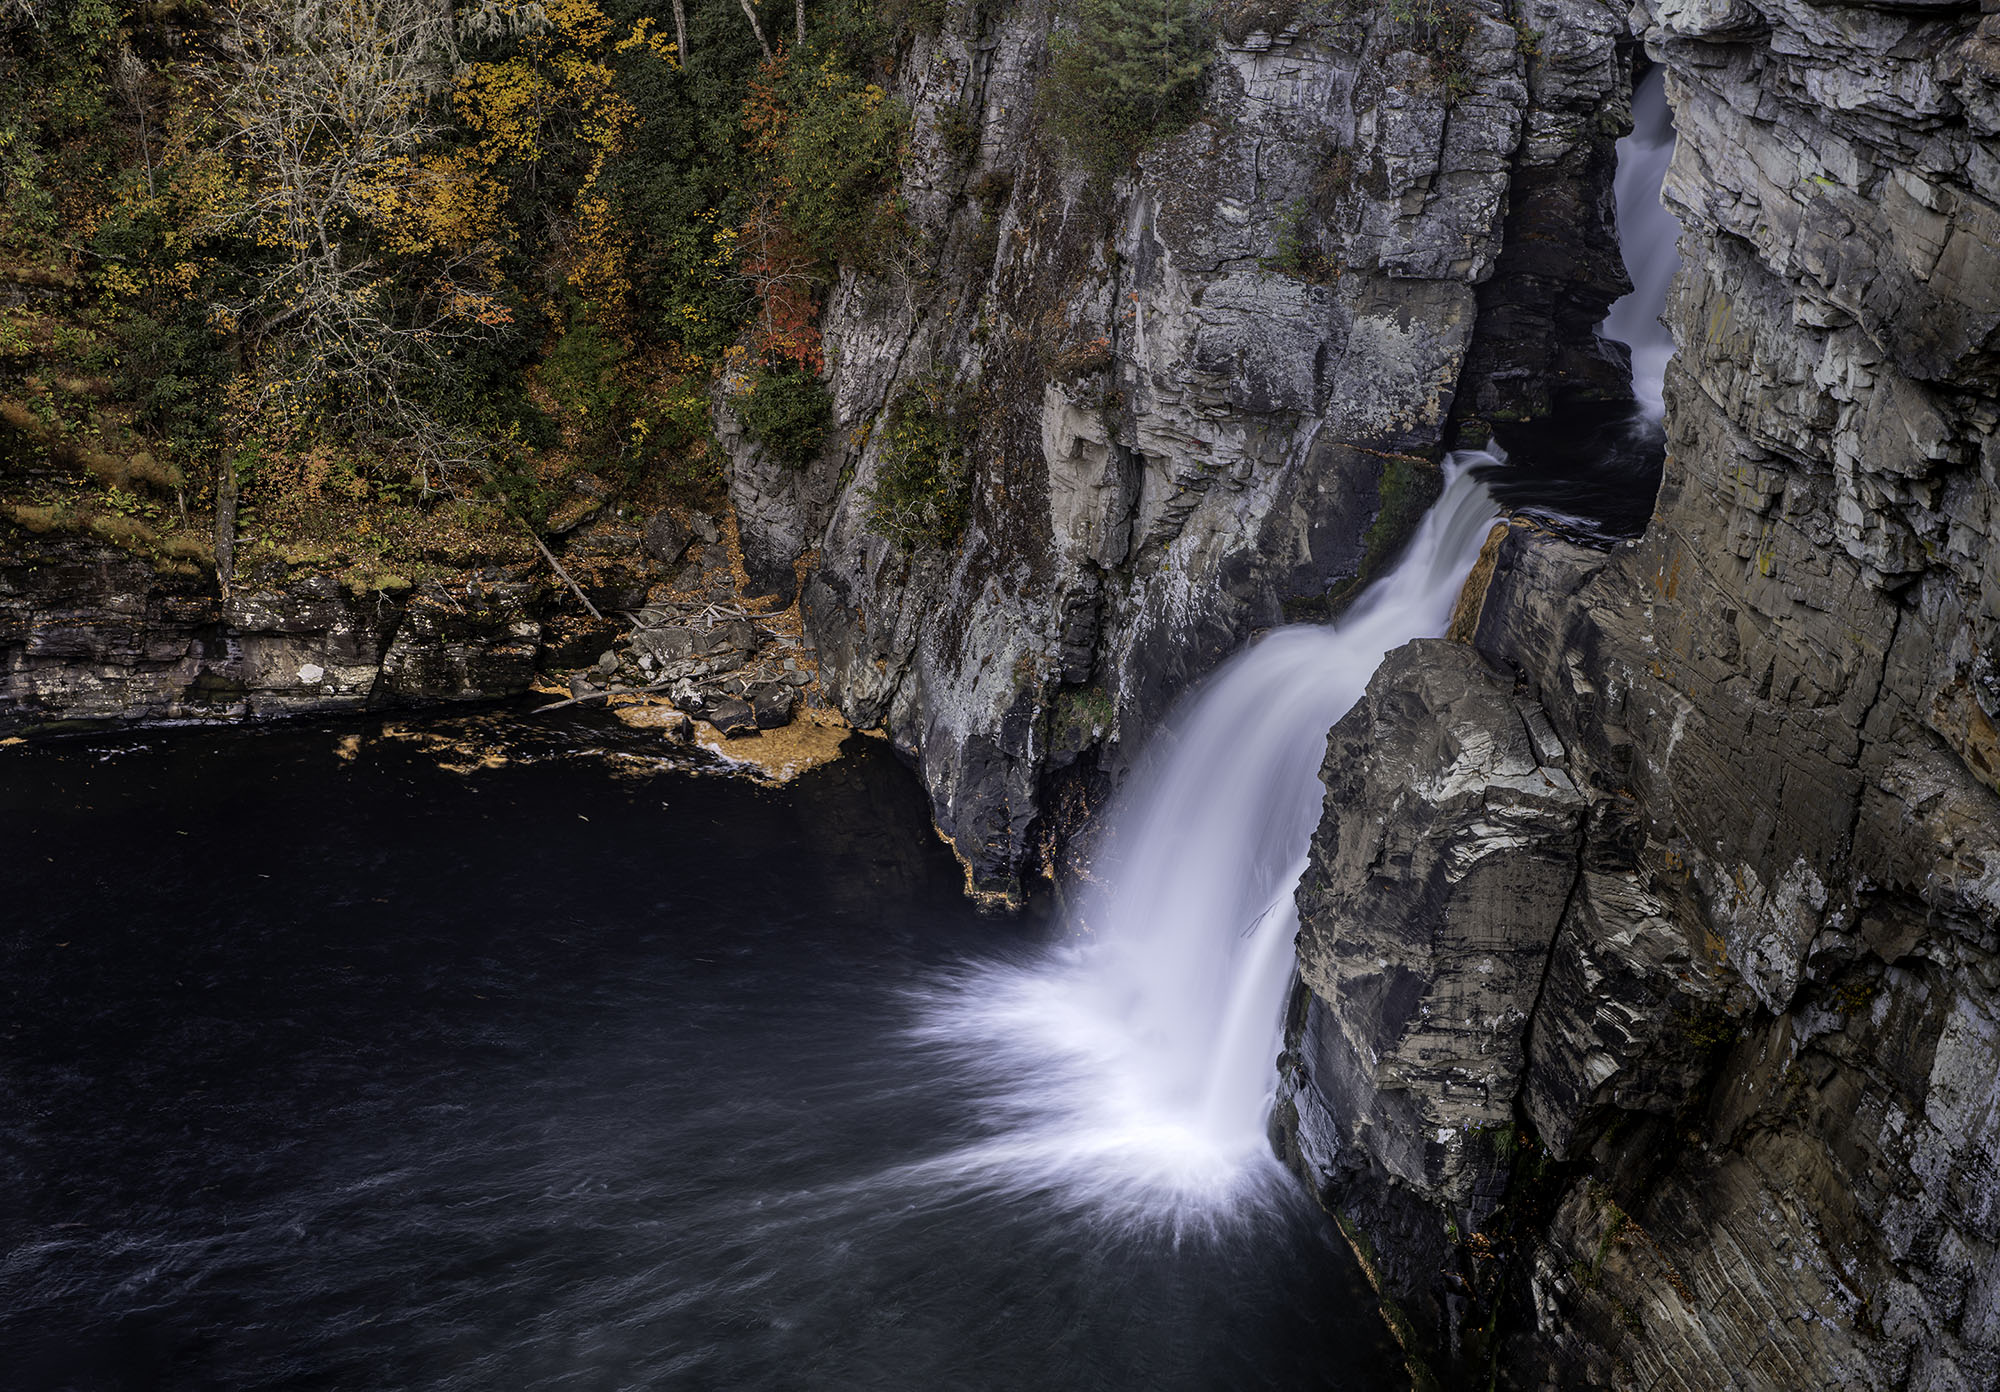
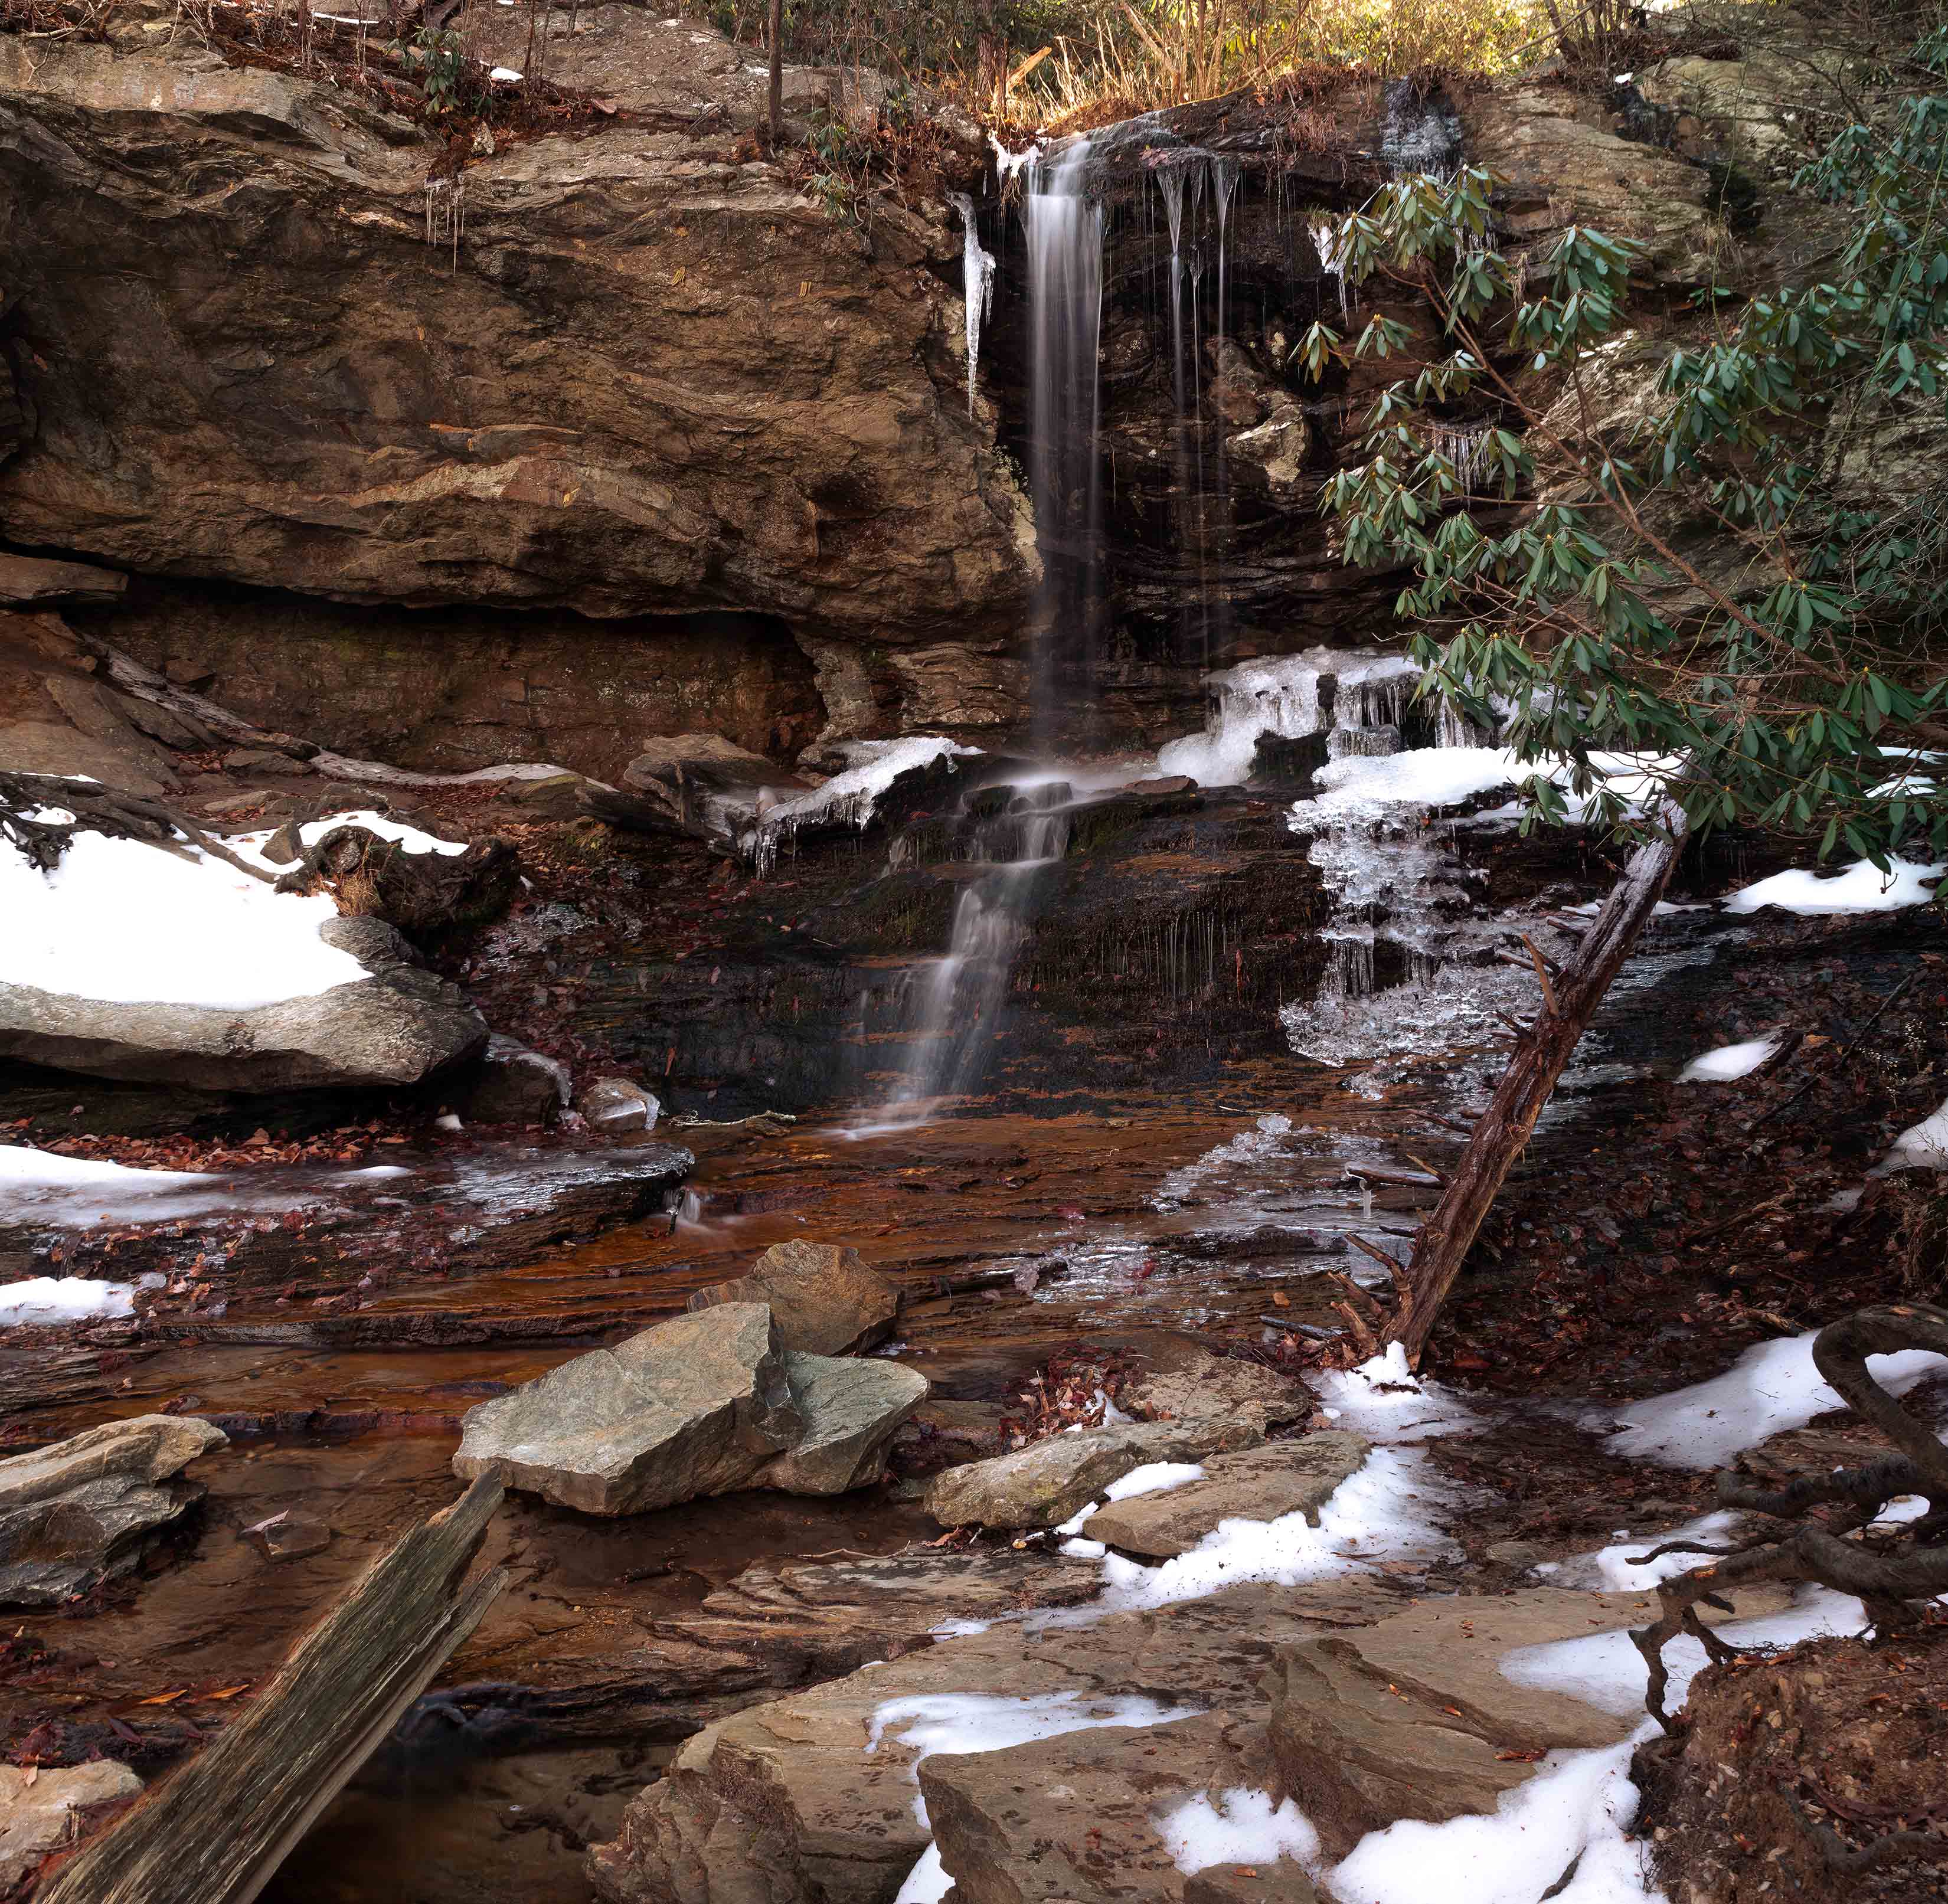
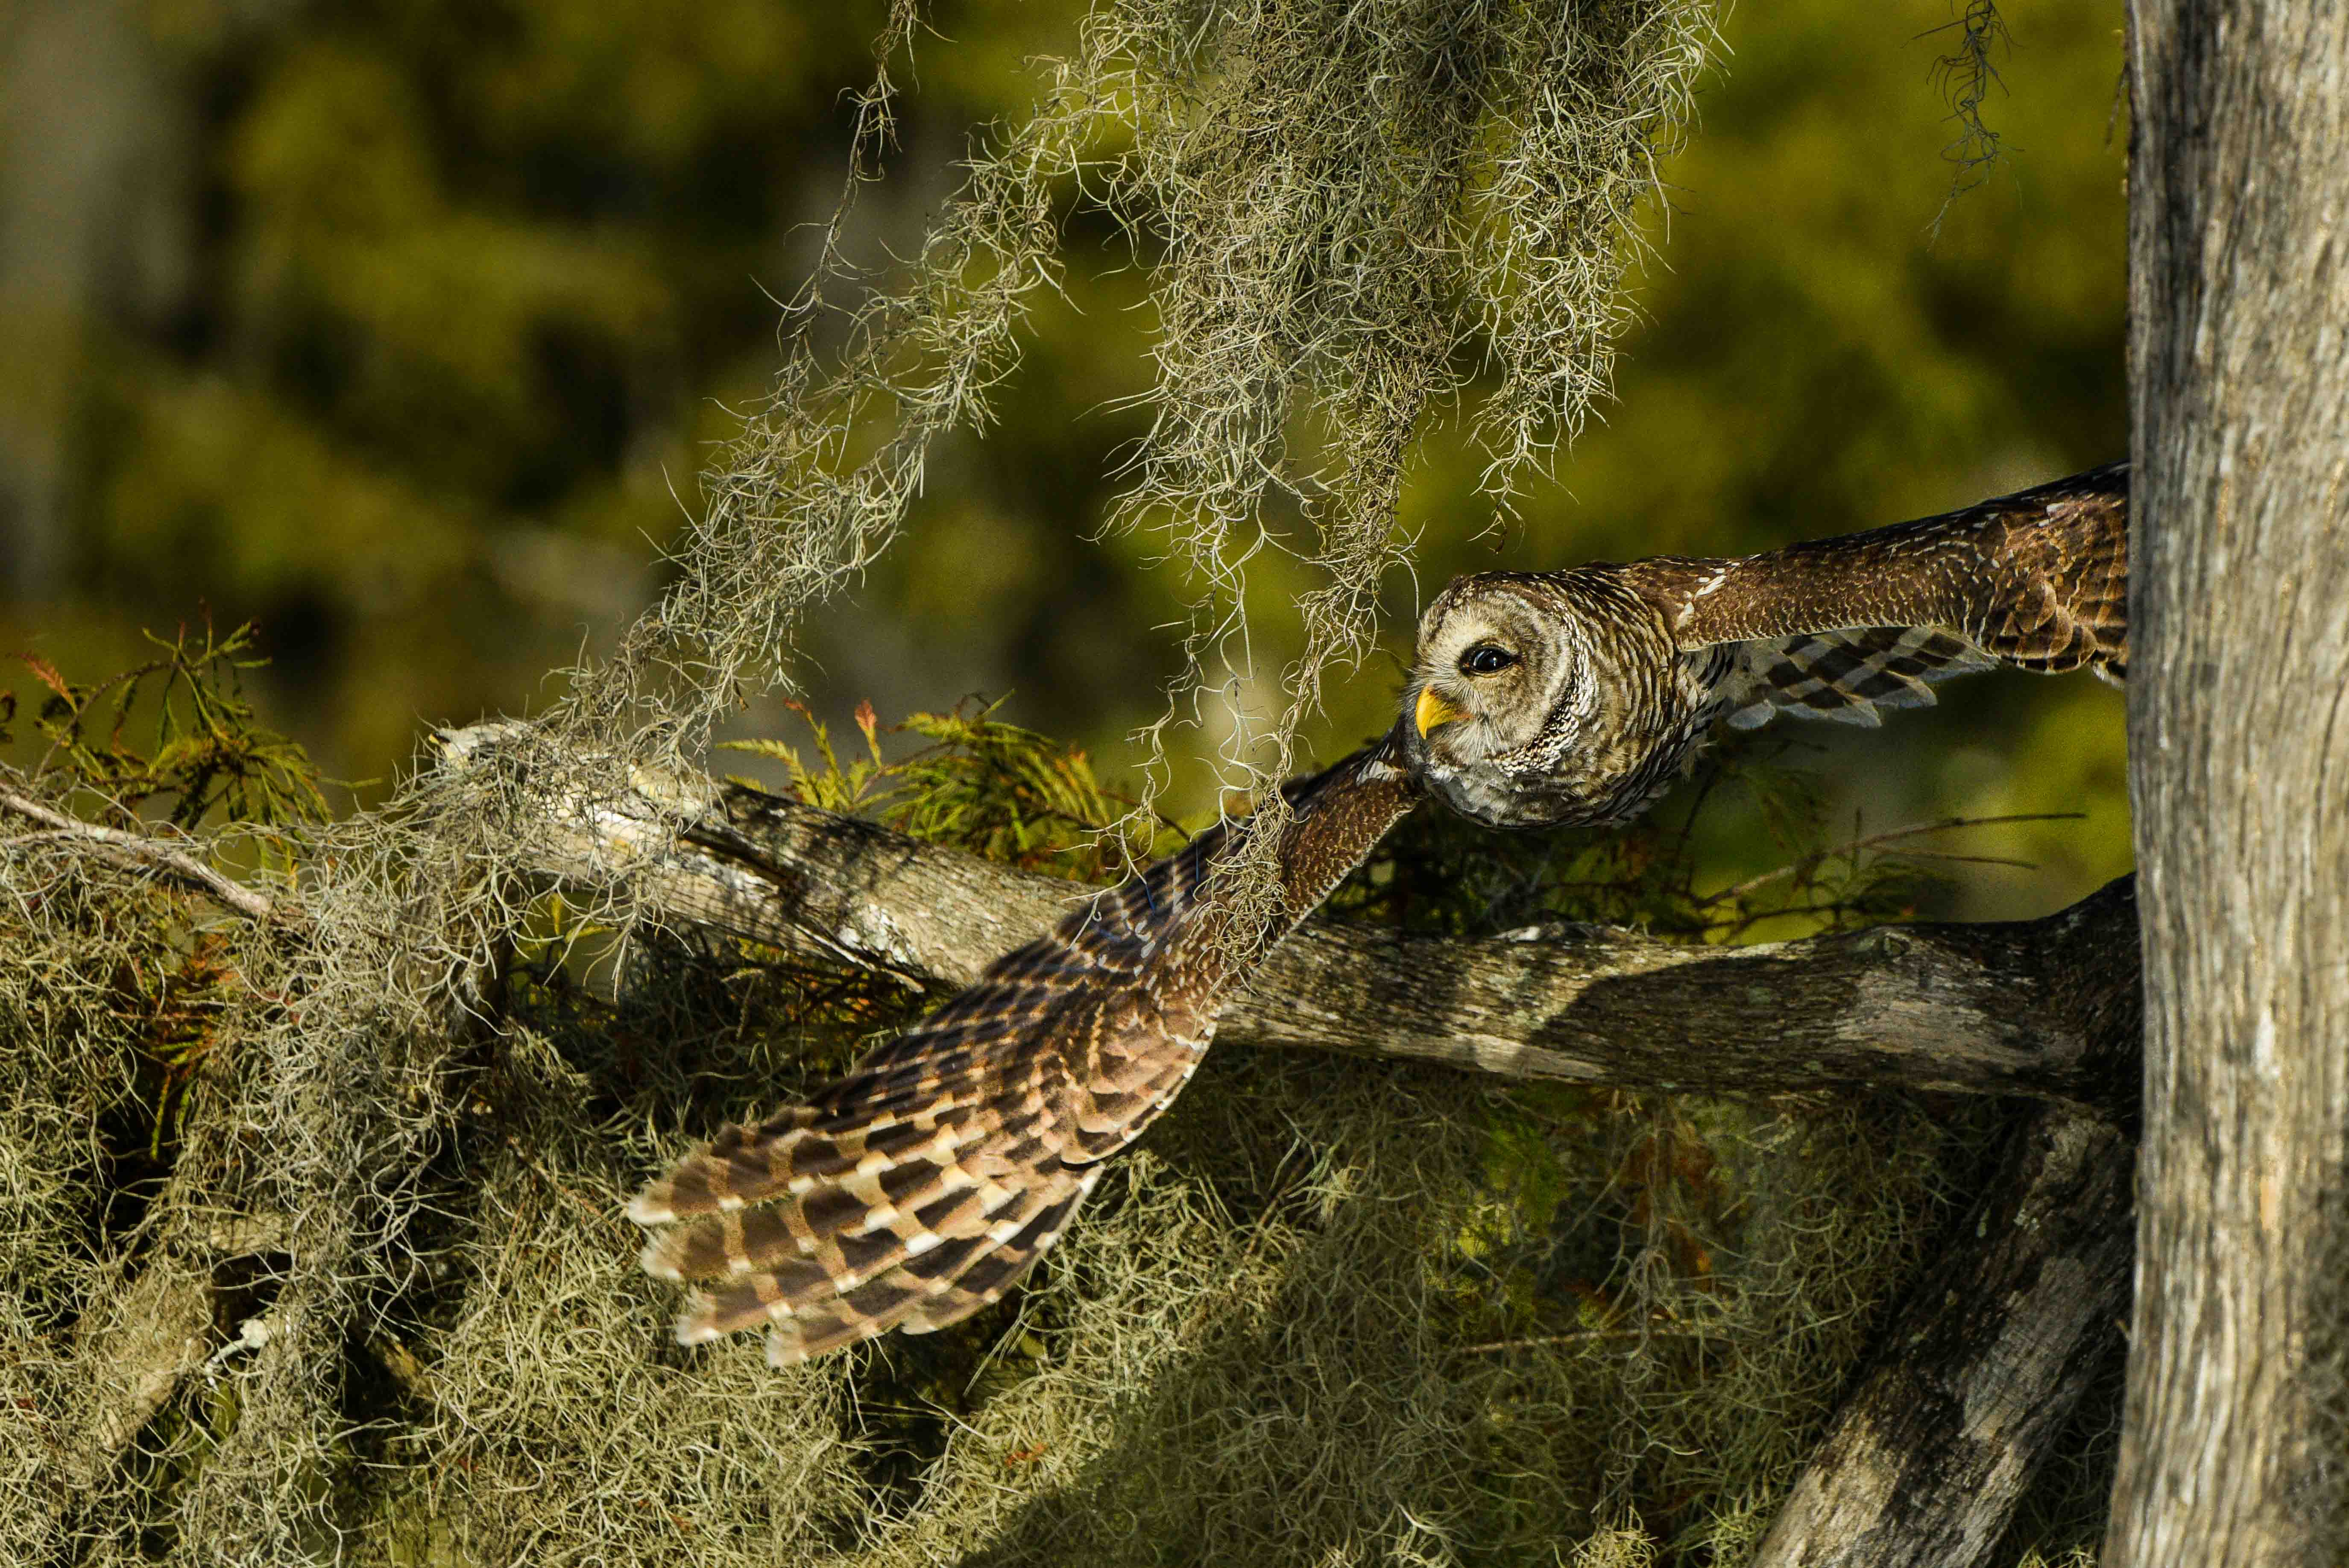
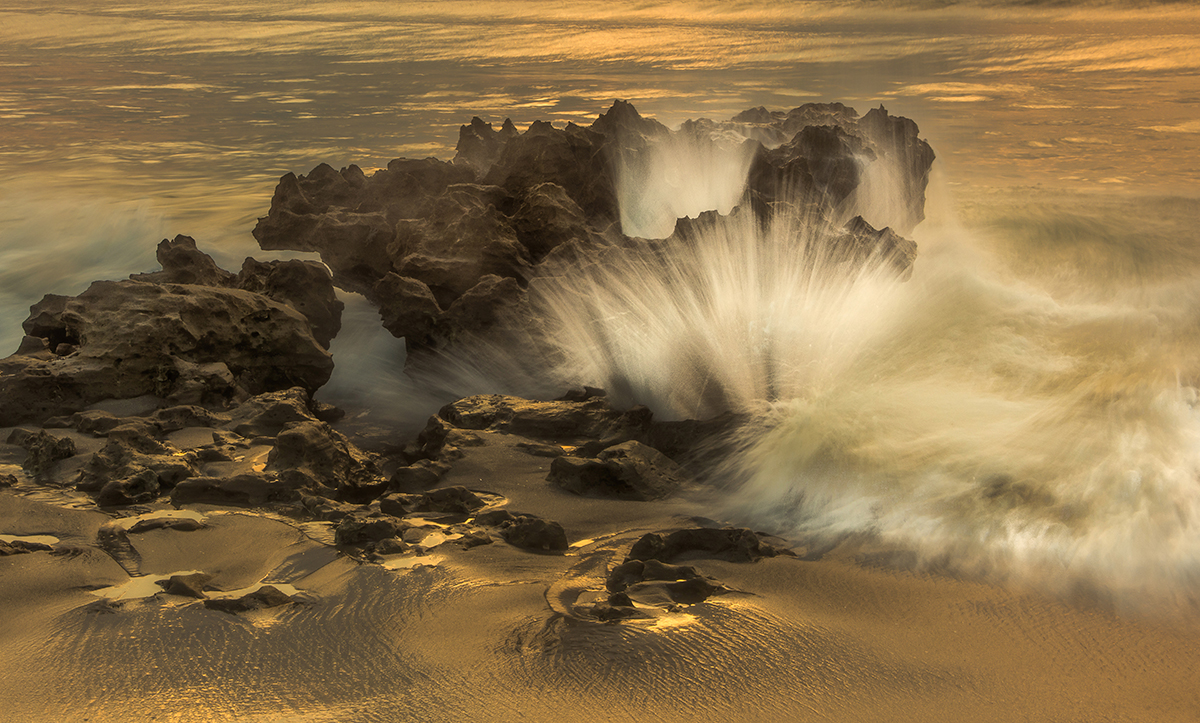
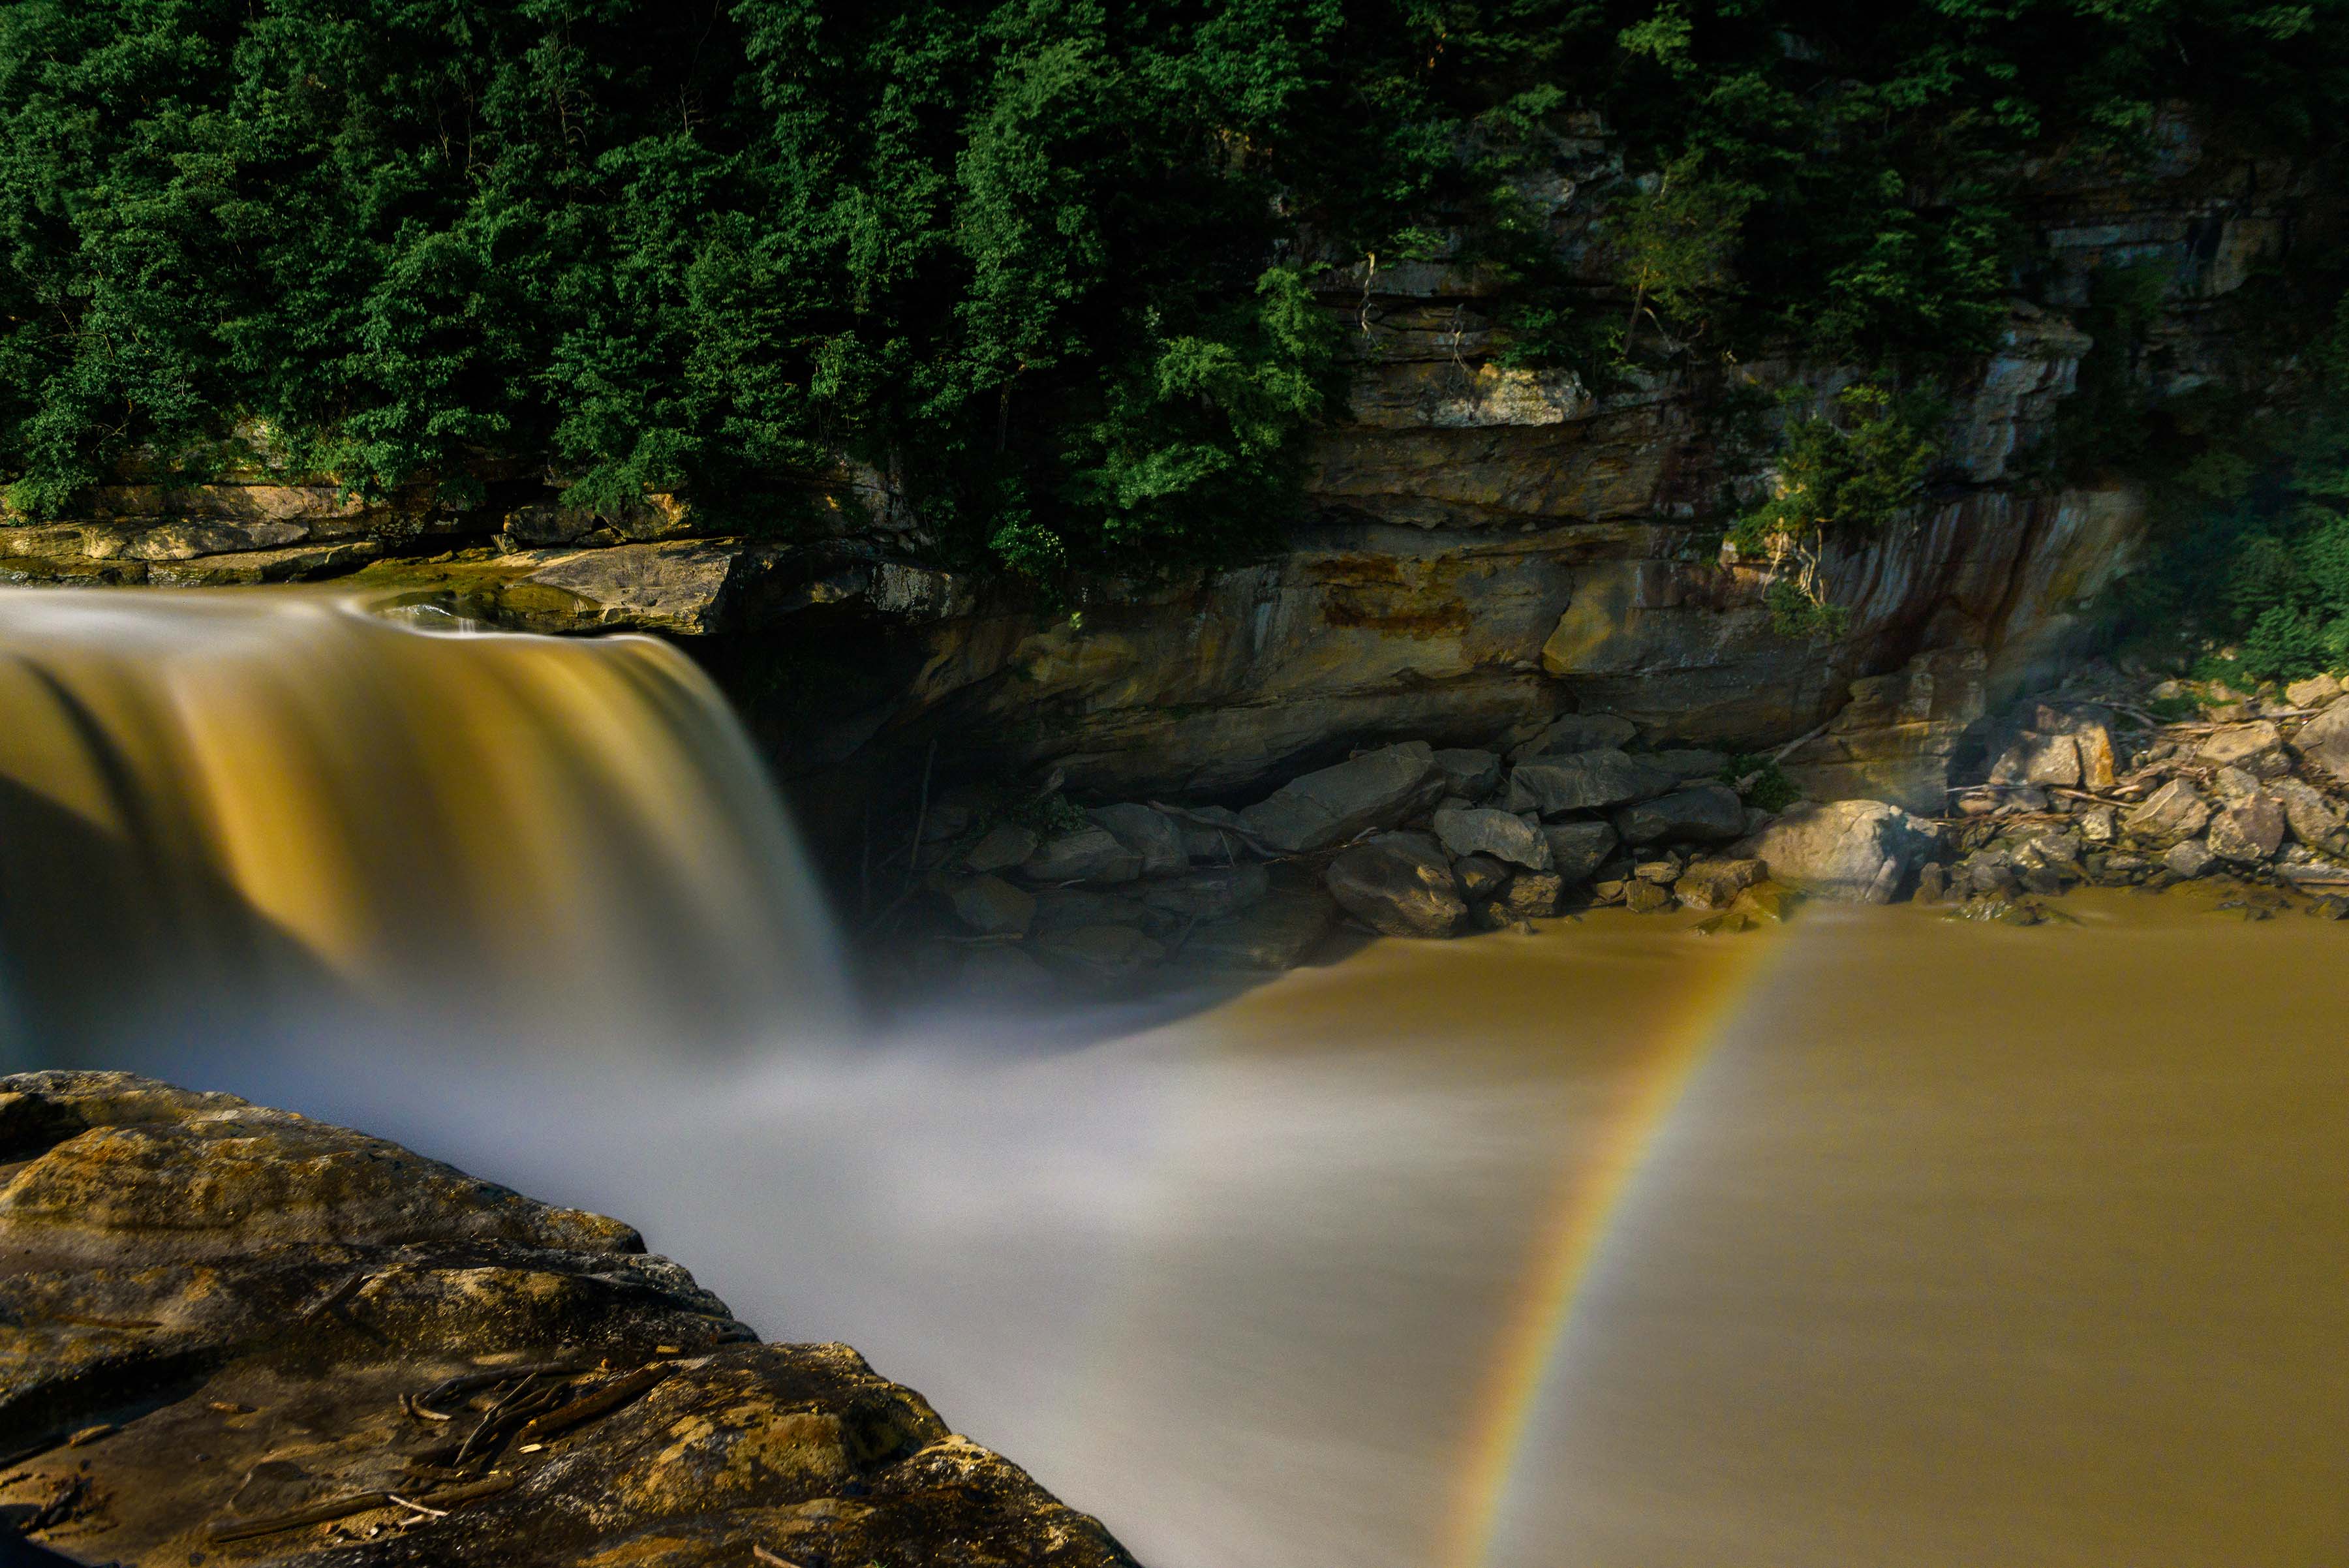
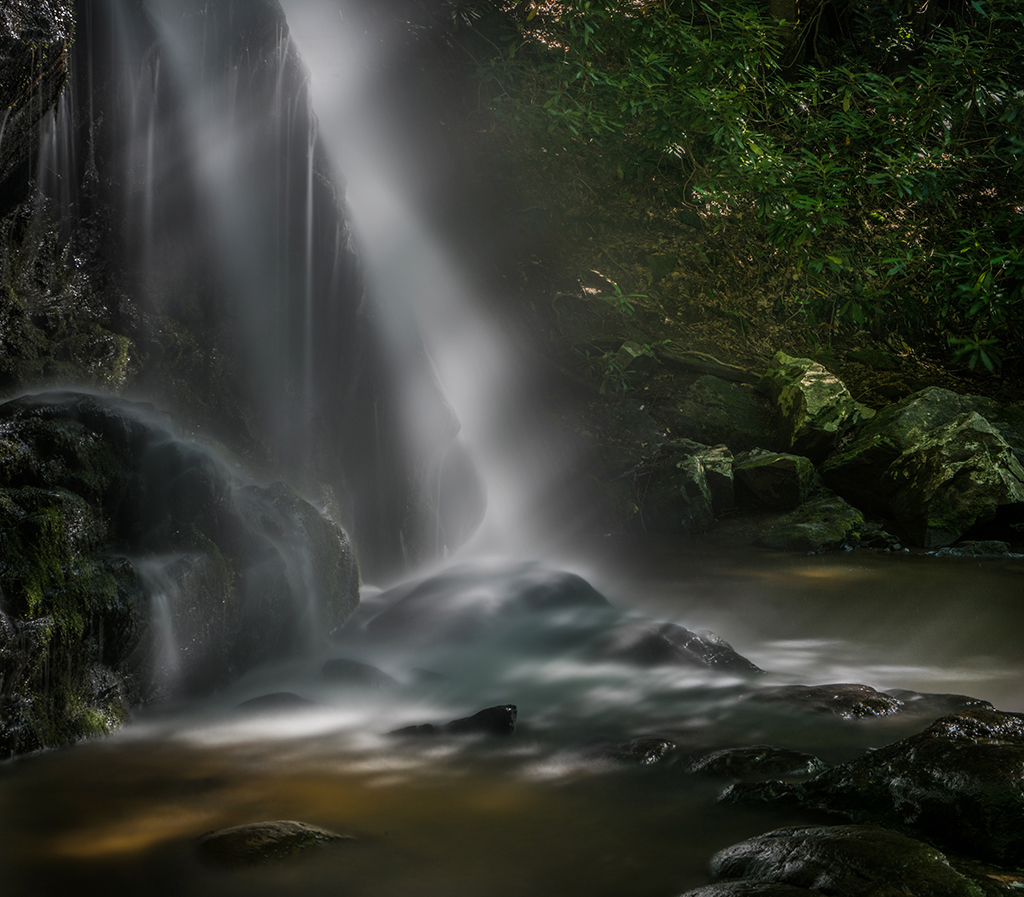
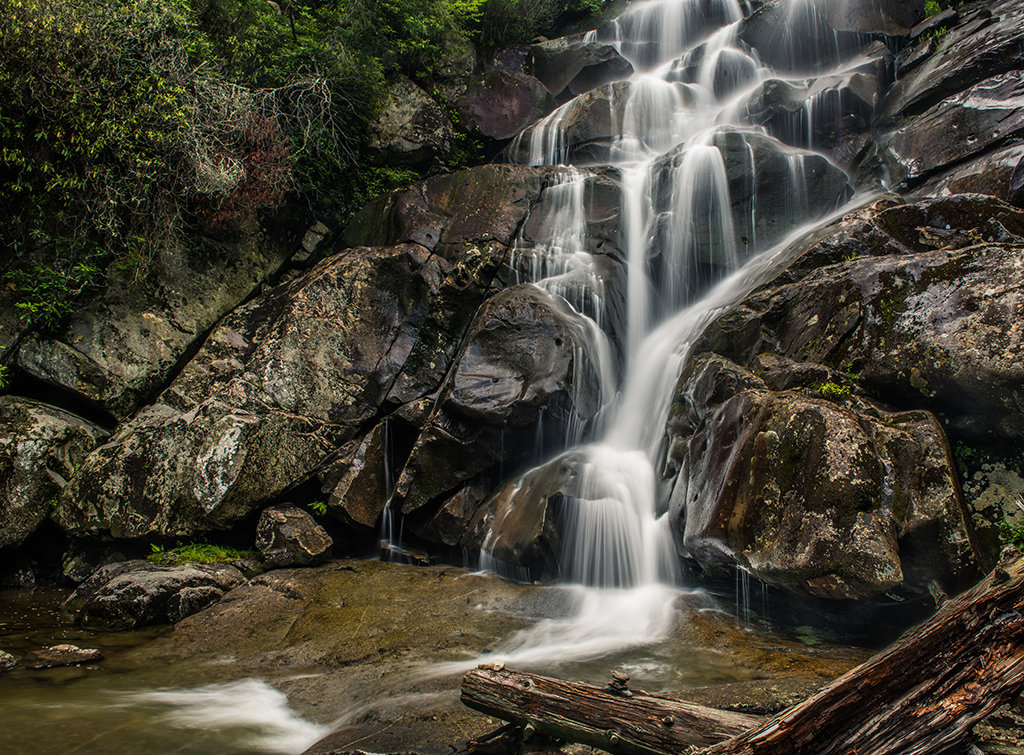
Jul 19 |
Reply |
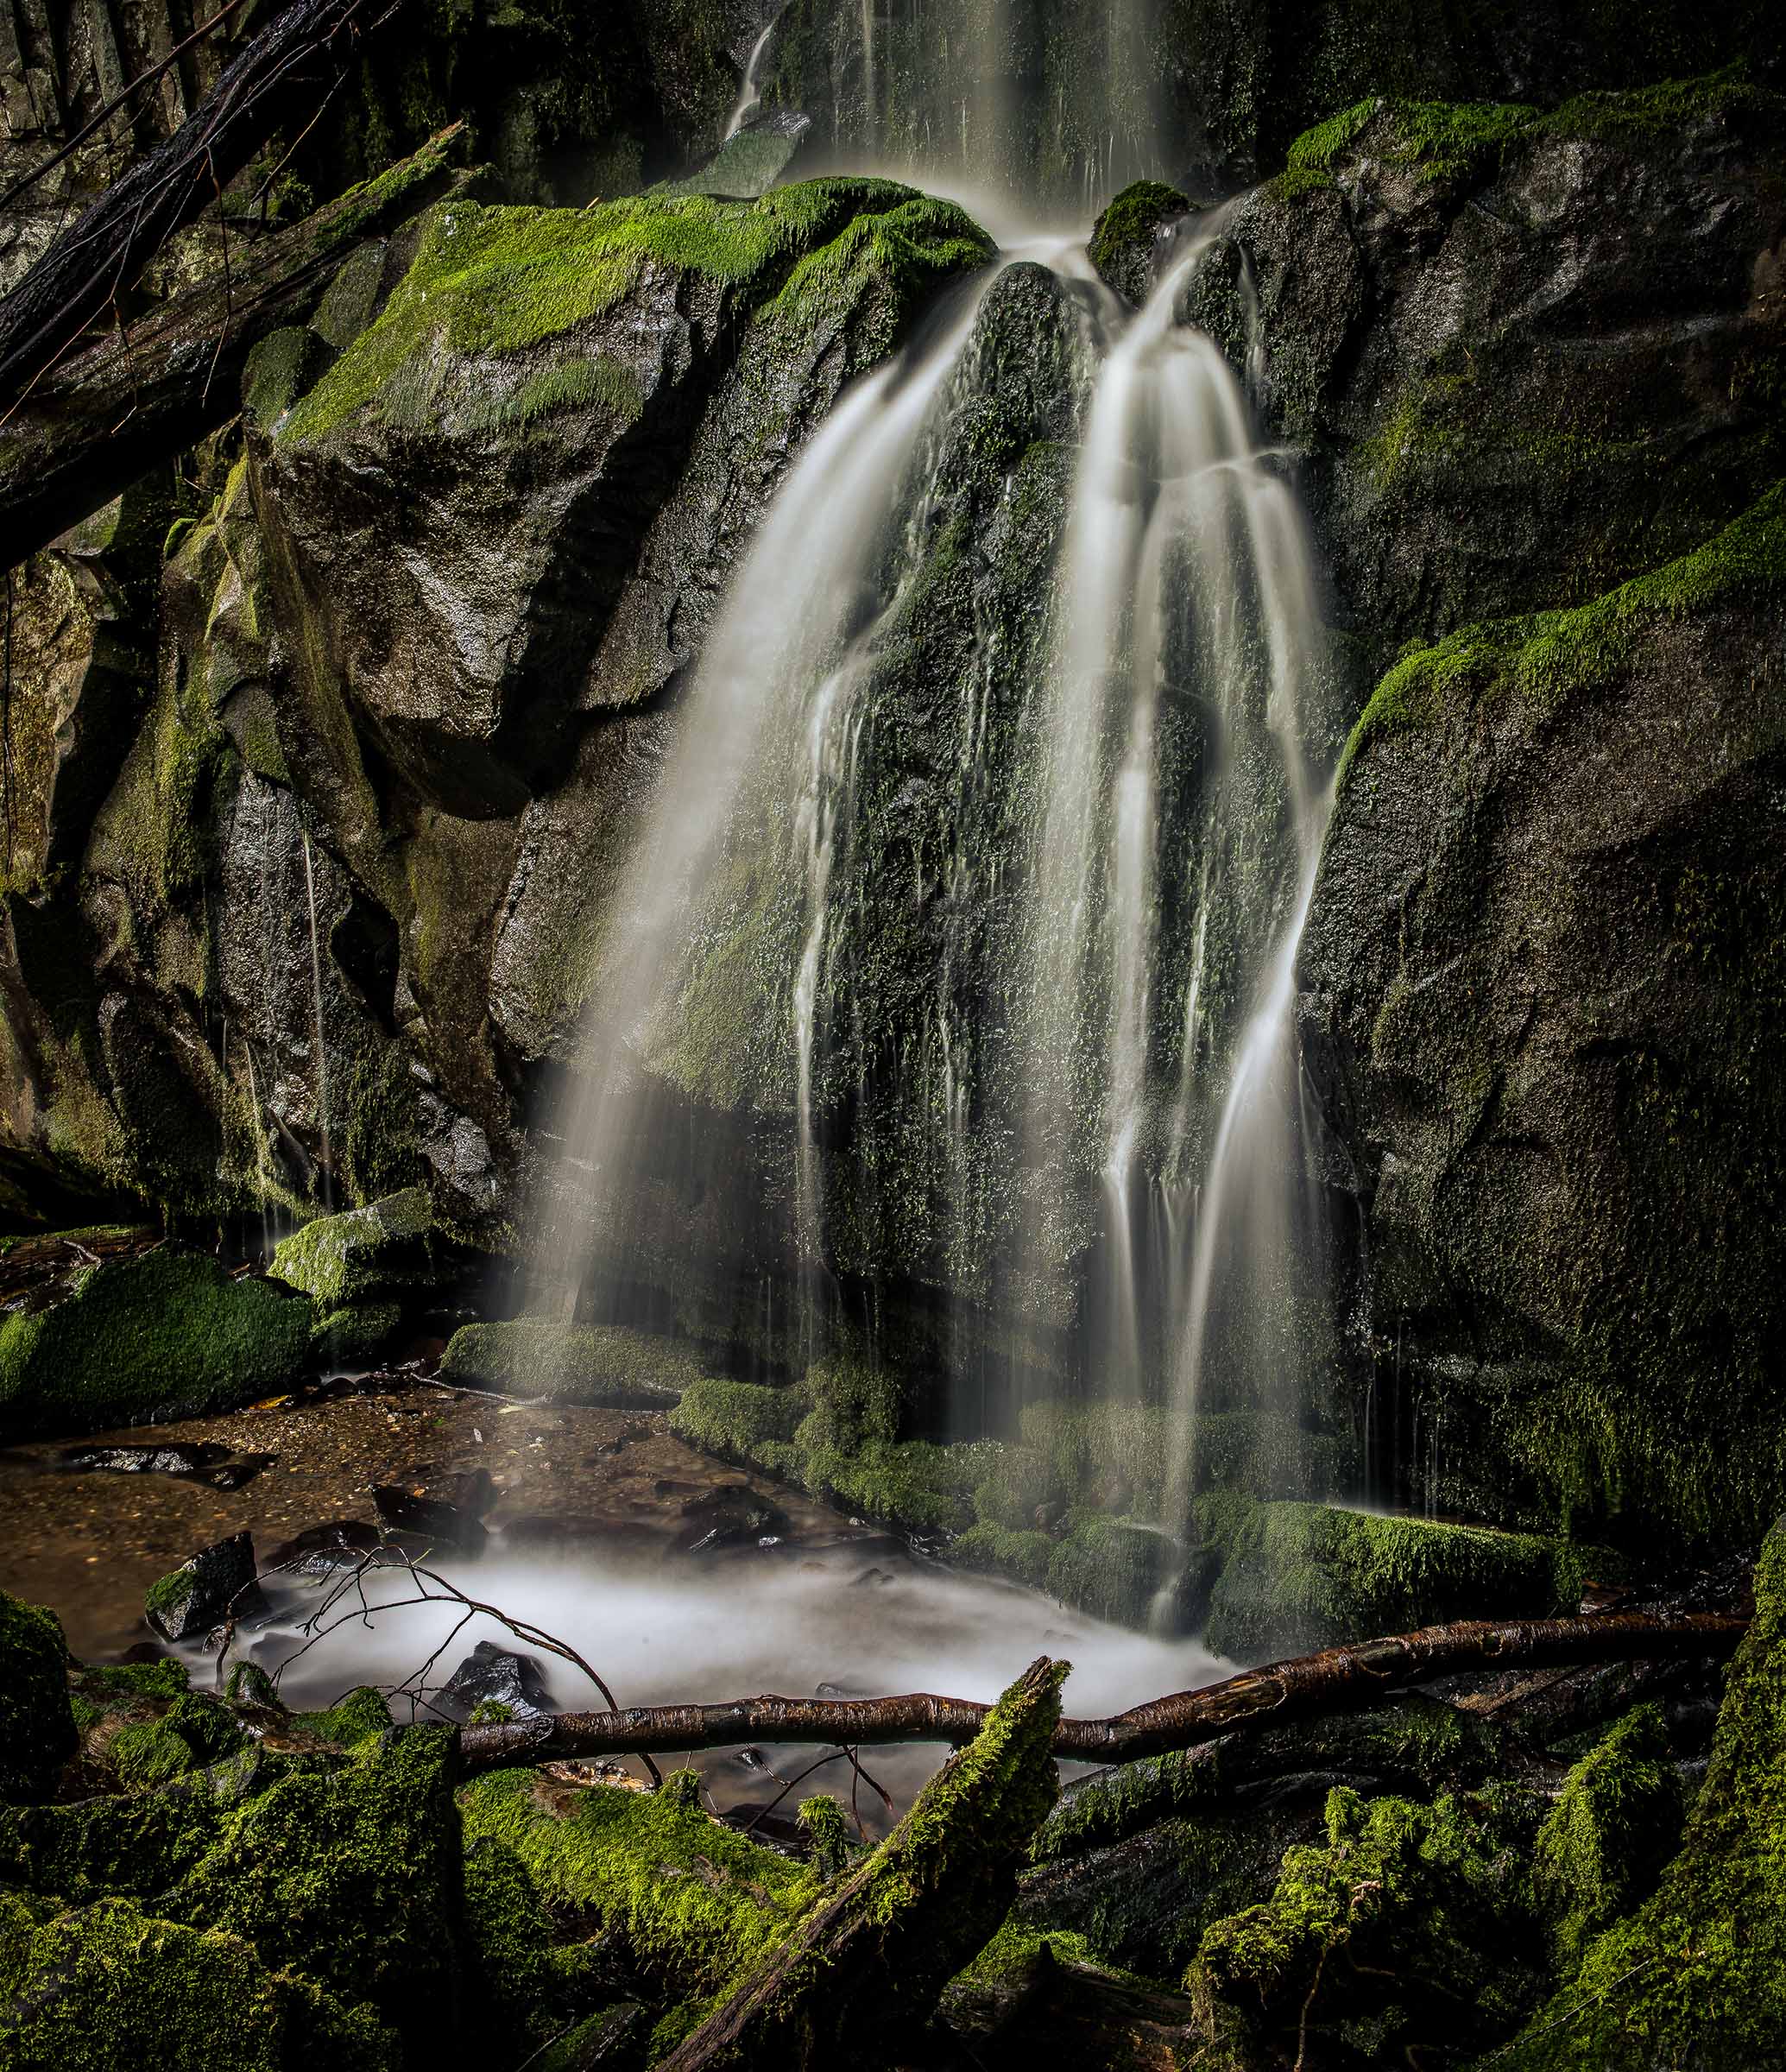
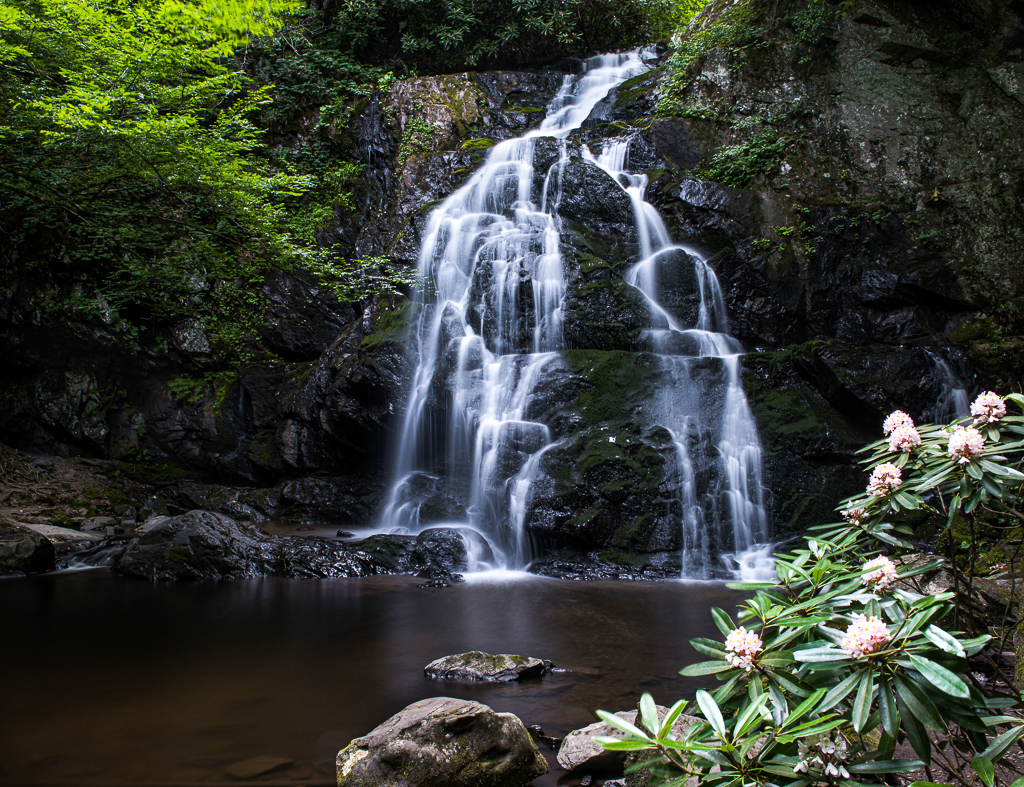
Thanks for the compliment. I like waterfalls, maybe because Florida doesn't have any real ones. I don't mind the long, I found some interesting scenes along the trail to photograph and pass the time. Below is an example: |
Jul 17th |
 |
| 67 |
Jul 19 |
Reply |
I actually found the lakes to be distracting and felt they took my eye from the primary subject. They were just a bright spot that I saw as a distraction. I agree that cropping them and about half of the foreground off would make it more of a pano and direct the eye to the sky. |
Jul 16th |
| 67 |
Jul 19 |
Reply |
You are so right. Keep that histogram off the right edge. It works wonders. |
Jul 16th |
| 67 |
Jul 19 |
Comment |
I agree with you, I'm not very good at macro either but Madhusudhan is VERY good at it. He has inspired me to work more at it and I've put so me time into it. Maybe some day I'll figure it out. I've been playing around in my garden for the last couple of months or so. |
Jul 16th |
| 67 |
Jul 19 |
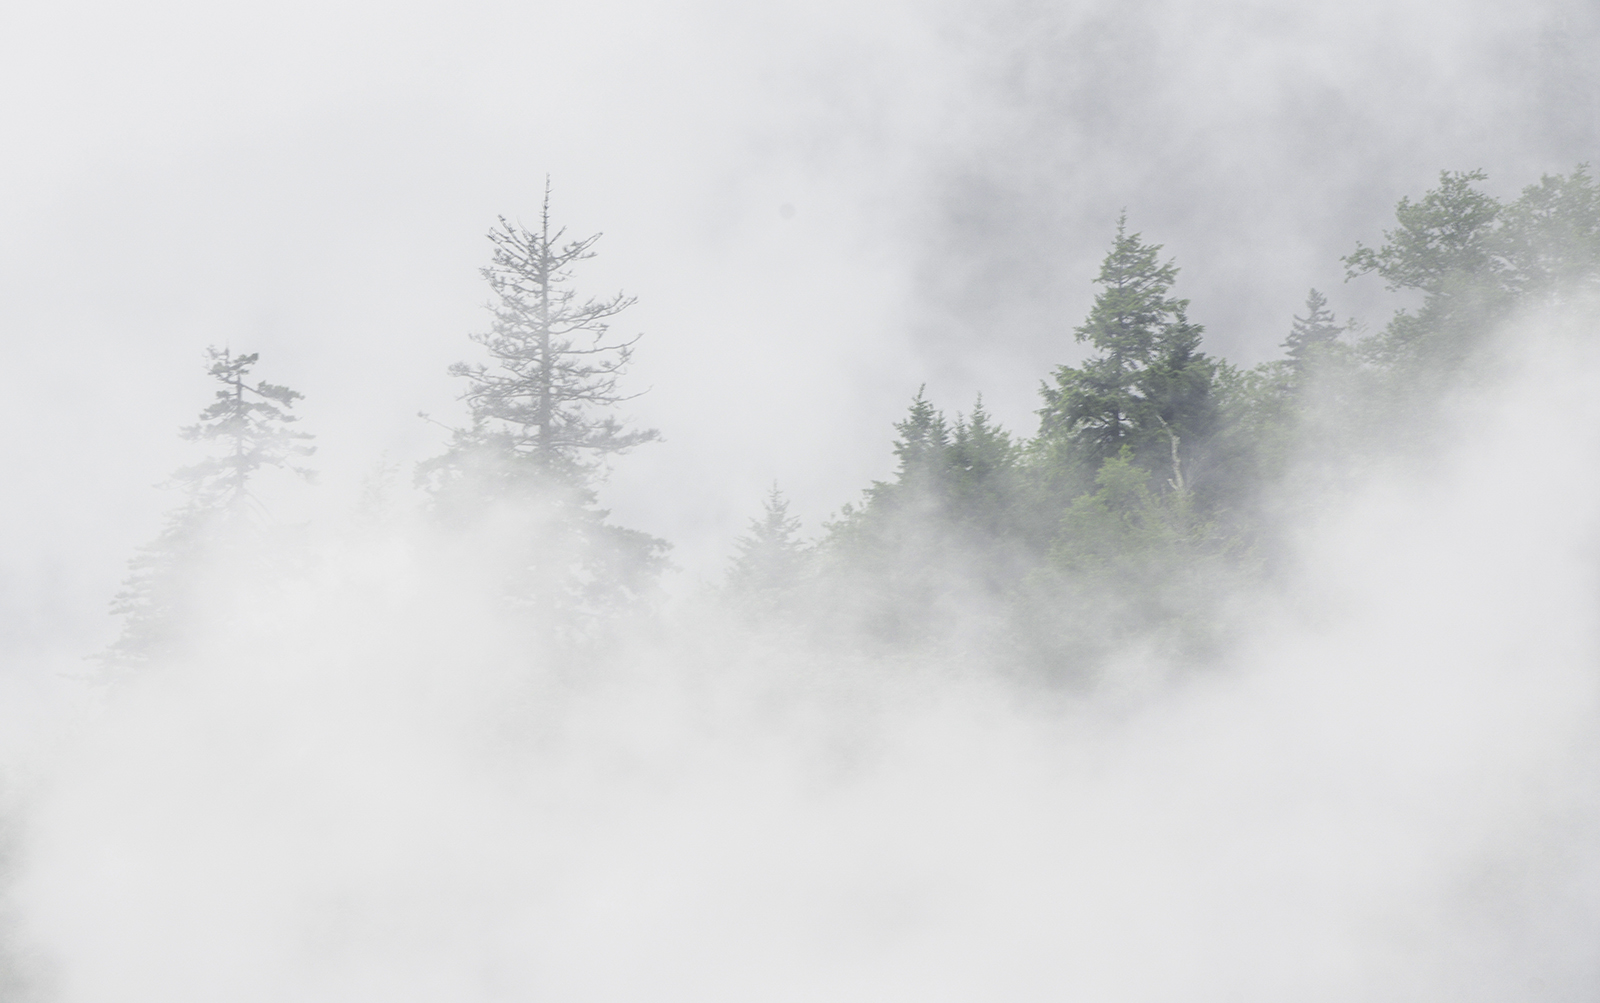
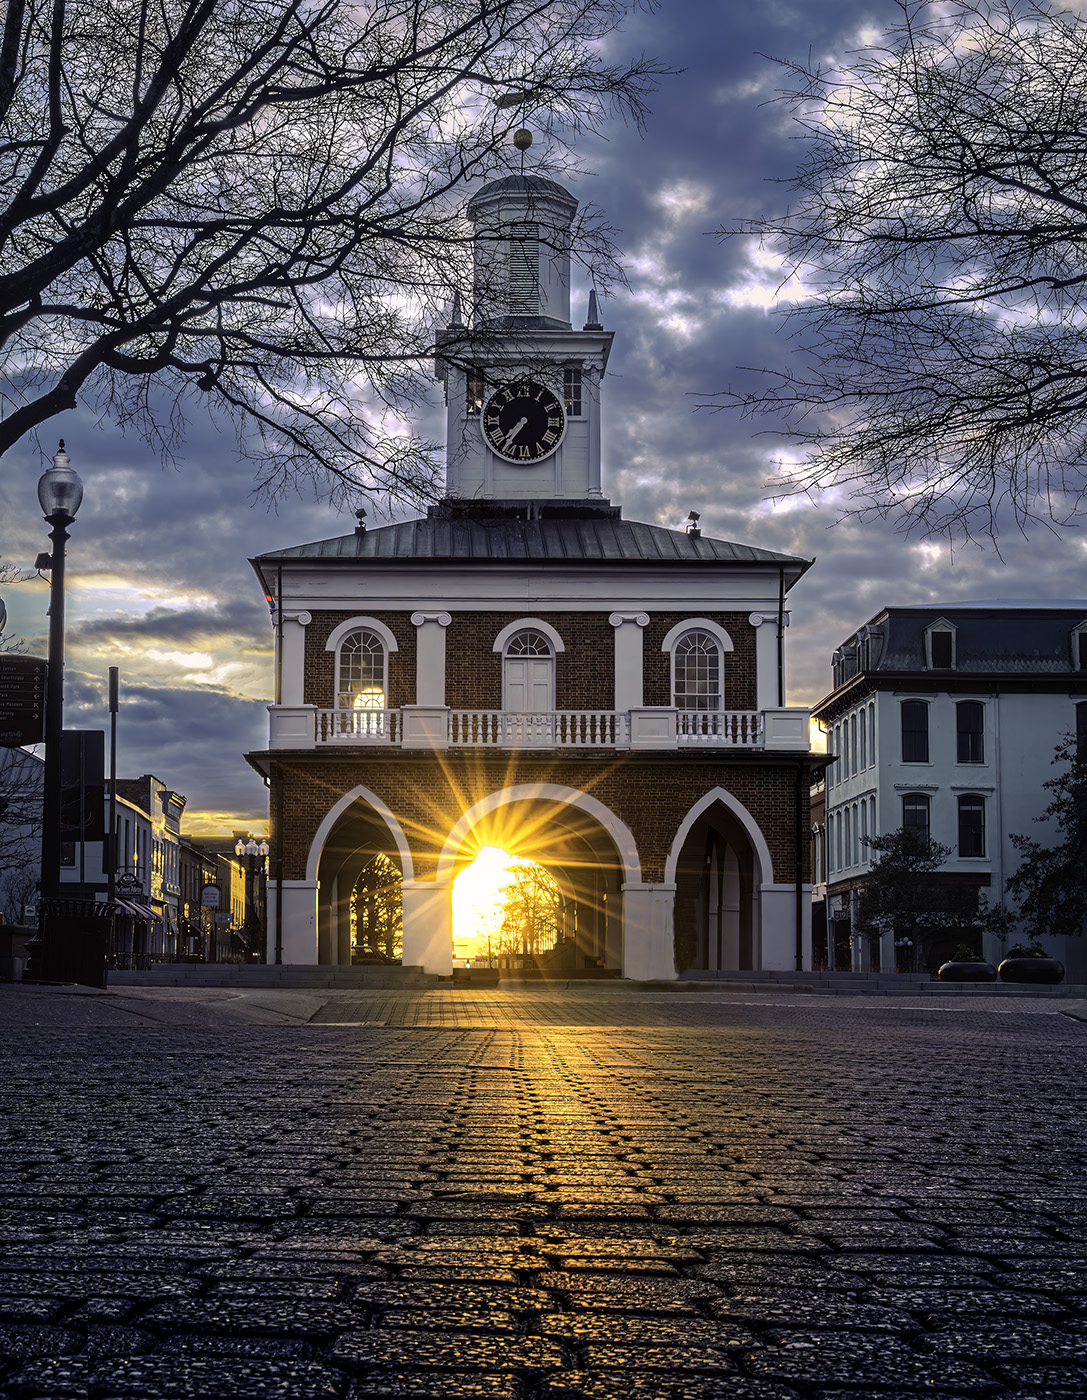
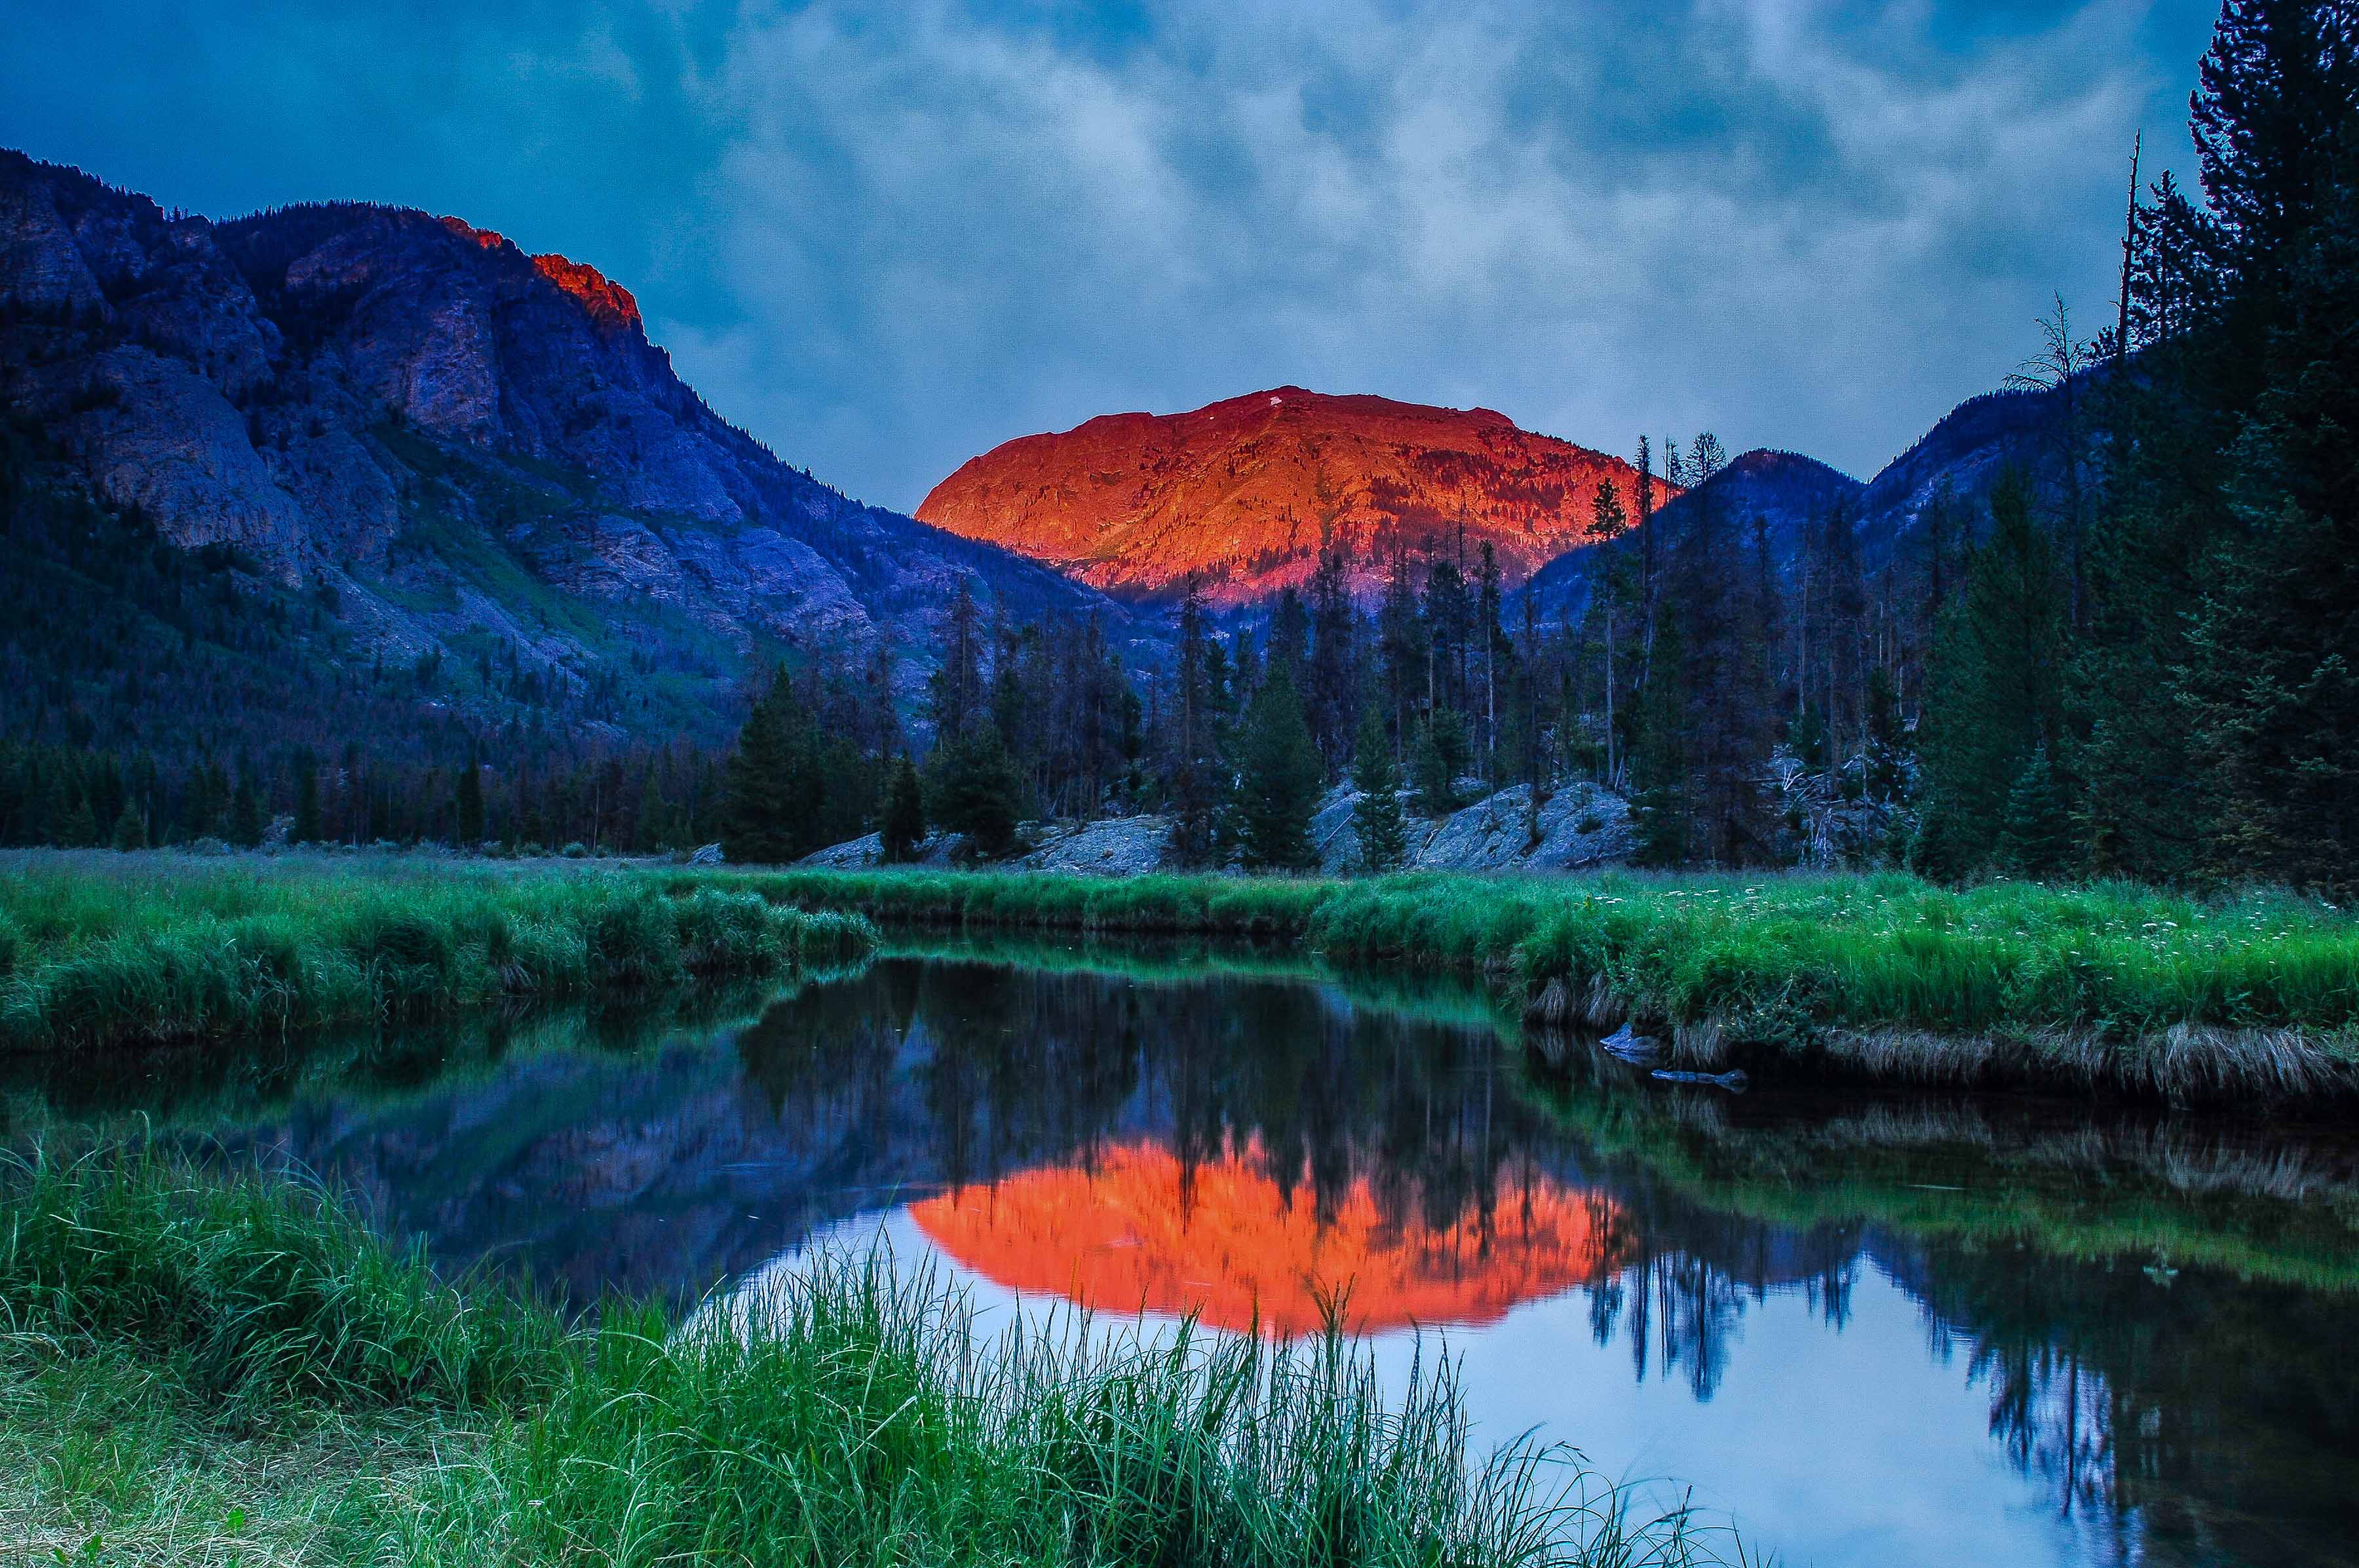
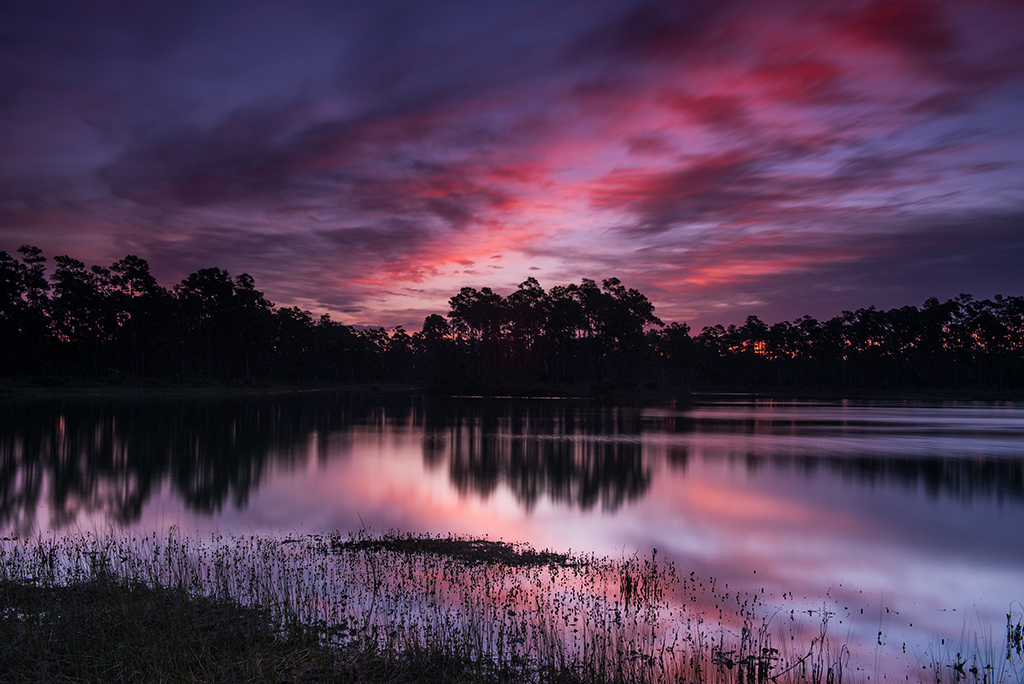
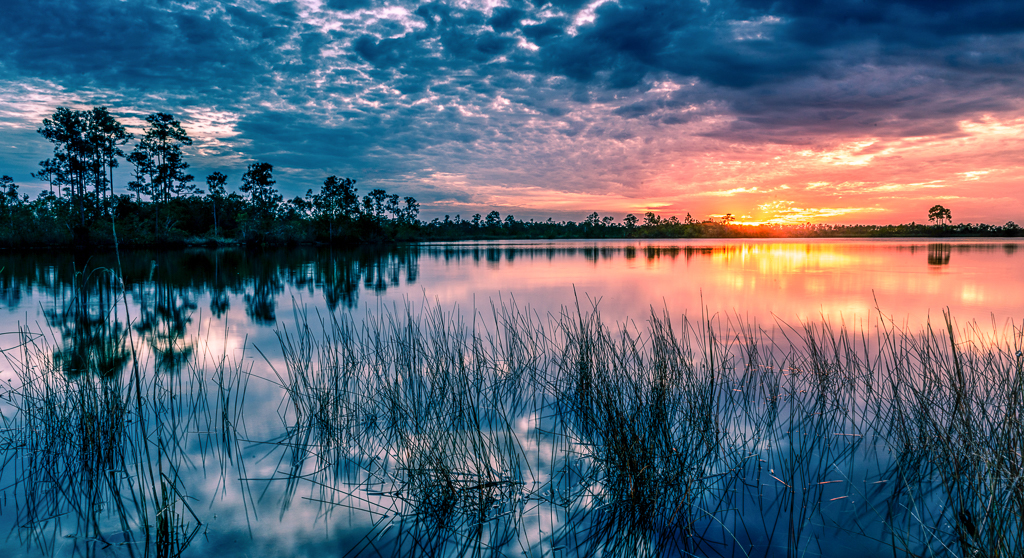
Comment |
Larry Treadwell
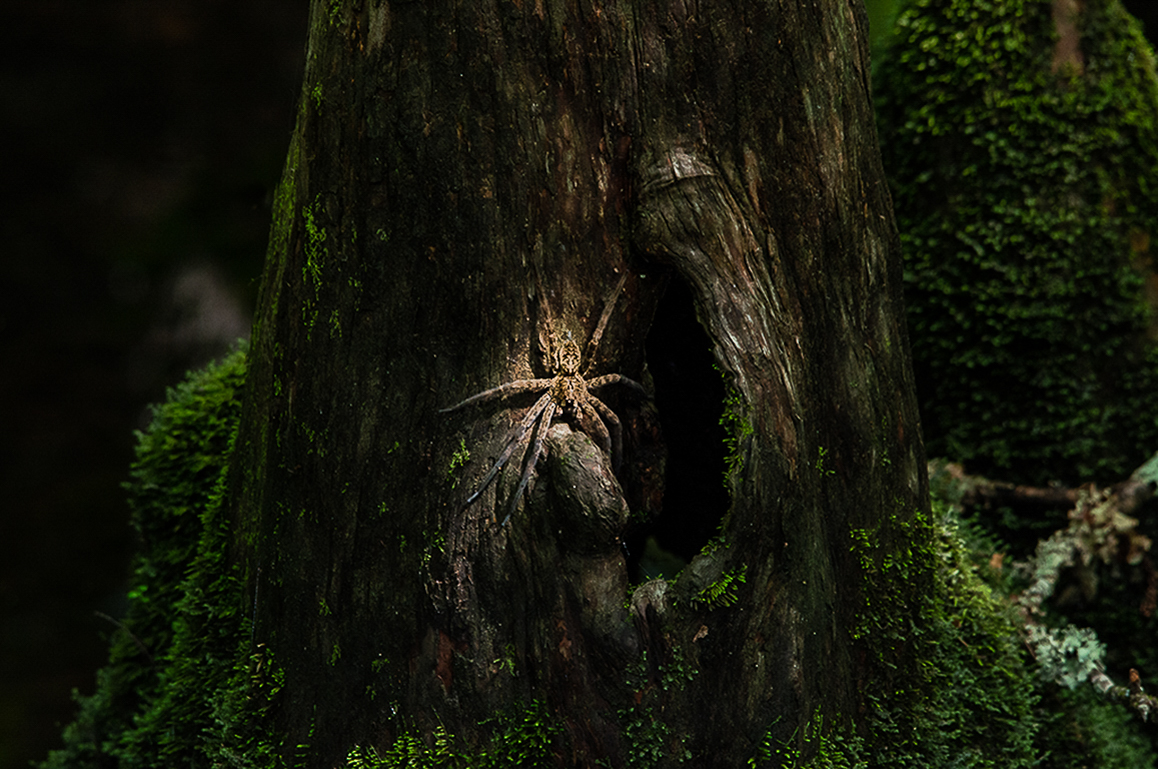
I think the best part of the image is the light. With all the darks of the environment that ray of light makes the spider just jump out of the image. The original is darker overall and that adds to the pop of the spider that is in the light. |
Jul 16th |
| 67 |
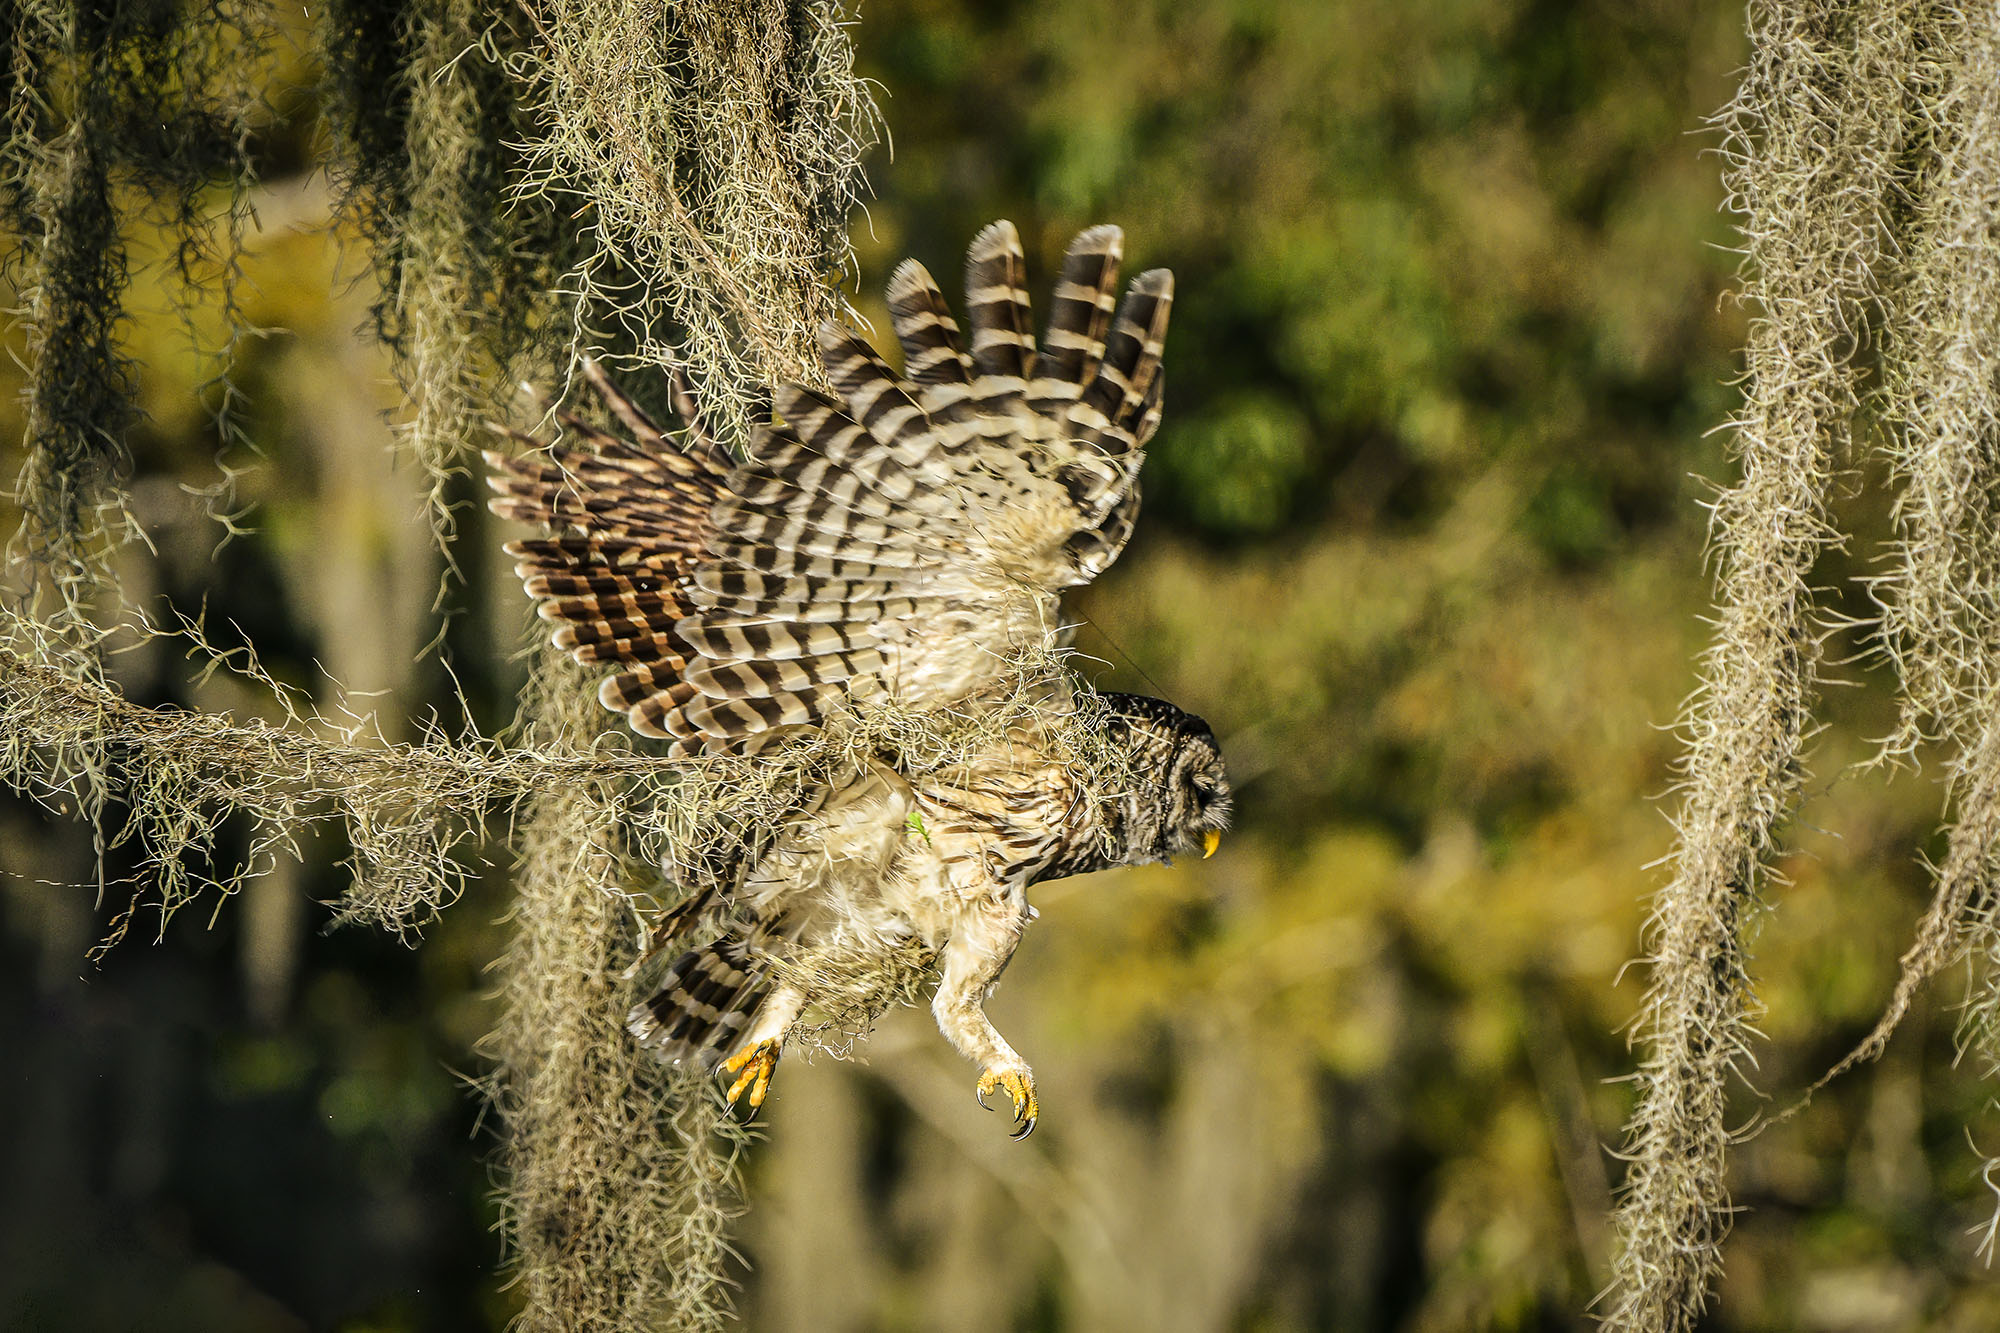
Jul 19 |
Reply |
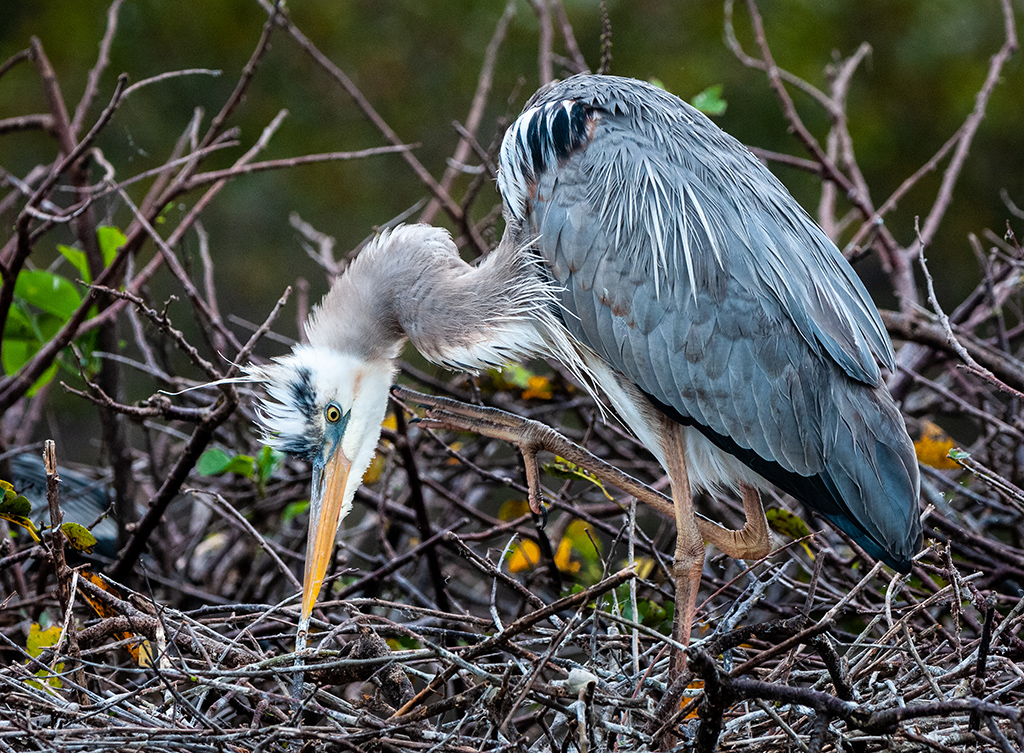
I also think that the reason the bottom feel cramped (I thought it was at first) is because of the twig between the bird's toes. That twig almost looks like a toe and thus the cramped feeling. You might try using the adjustment brush and making that twig a bit darker to hide it more. |
Jul 16th |
| 67 |
Jul 19 |
Comment |
Be careful about applying vignettes to nature images, if applied to much they make the image look fake. PSA frowns on their use in Nature Images. I have been dinged several times in compositions so I quite using them unless very lightly. |
Jul 16th |
| 67 |
Jul 19 |
Reply |
What a treat to get all three. I still think the original is the best shot and like Cheryl I think that massive paw really adds to the image. The other great part about the first image is the sharpness of the sow's eye. Having that eye, the paw and the turning motion are all giant plus factors that make the image. |
Jul 16th |
| 67 |
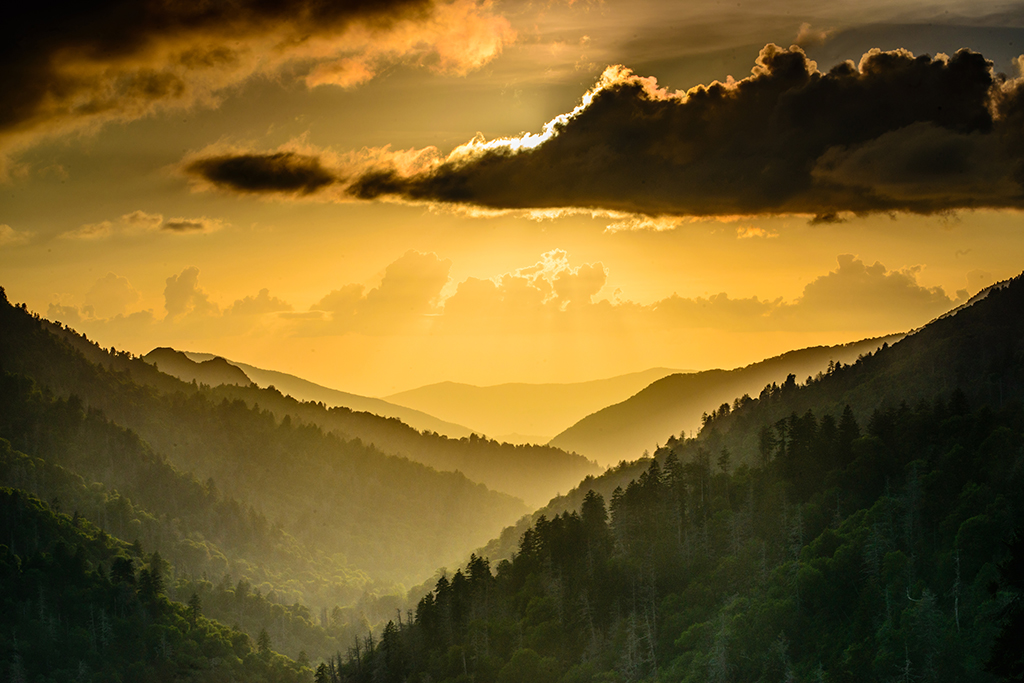
Jul 19 |
Reply |
Oh yeah!!! This is just soooo much better on so many levels.
You have good detail in the brush and there are no distracting highlights in the sky. The color pallet is excellent. Now the attention is focused on the sky and the peaks where it should be. Great job.
This is what the discussion group is for. We can make suggestions and the original maker can correct and improve the image and gain some skills.
|
Jul 16th |
| 67 |
Jul 19 |
Comment |
Todd
My Nikon D810 when matched with my 24-70 f2.8 lens is just wickedly sharp. It is the one thing I really love about the camera. When used correctly you feel like you can almost walk into the image. For me it is worth every penny I paid for it. |
Jul 16th |
| 67 |
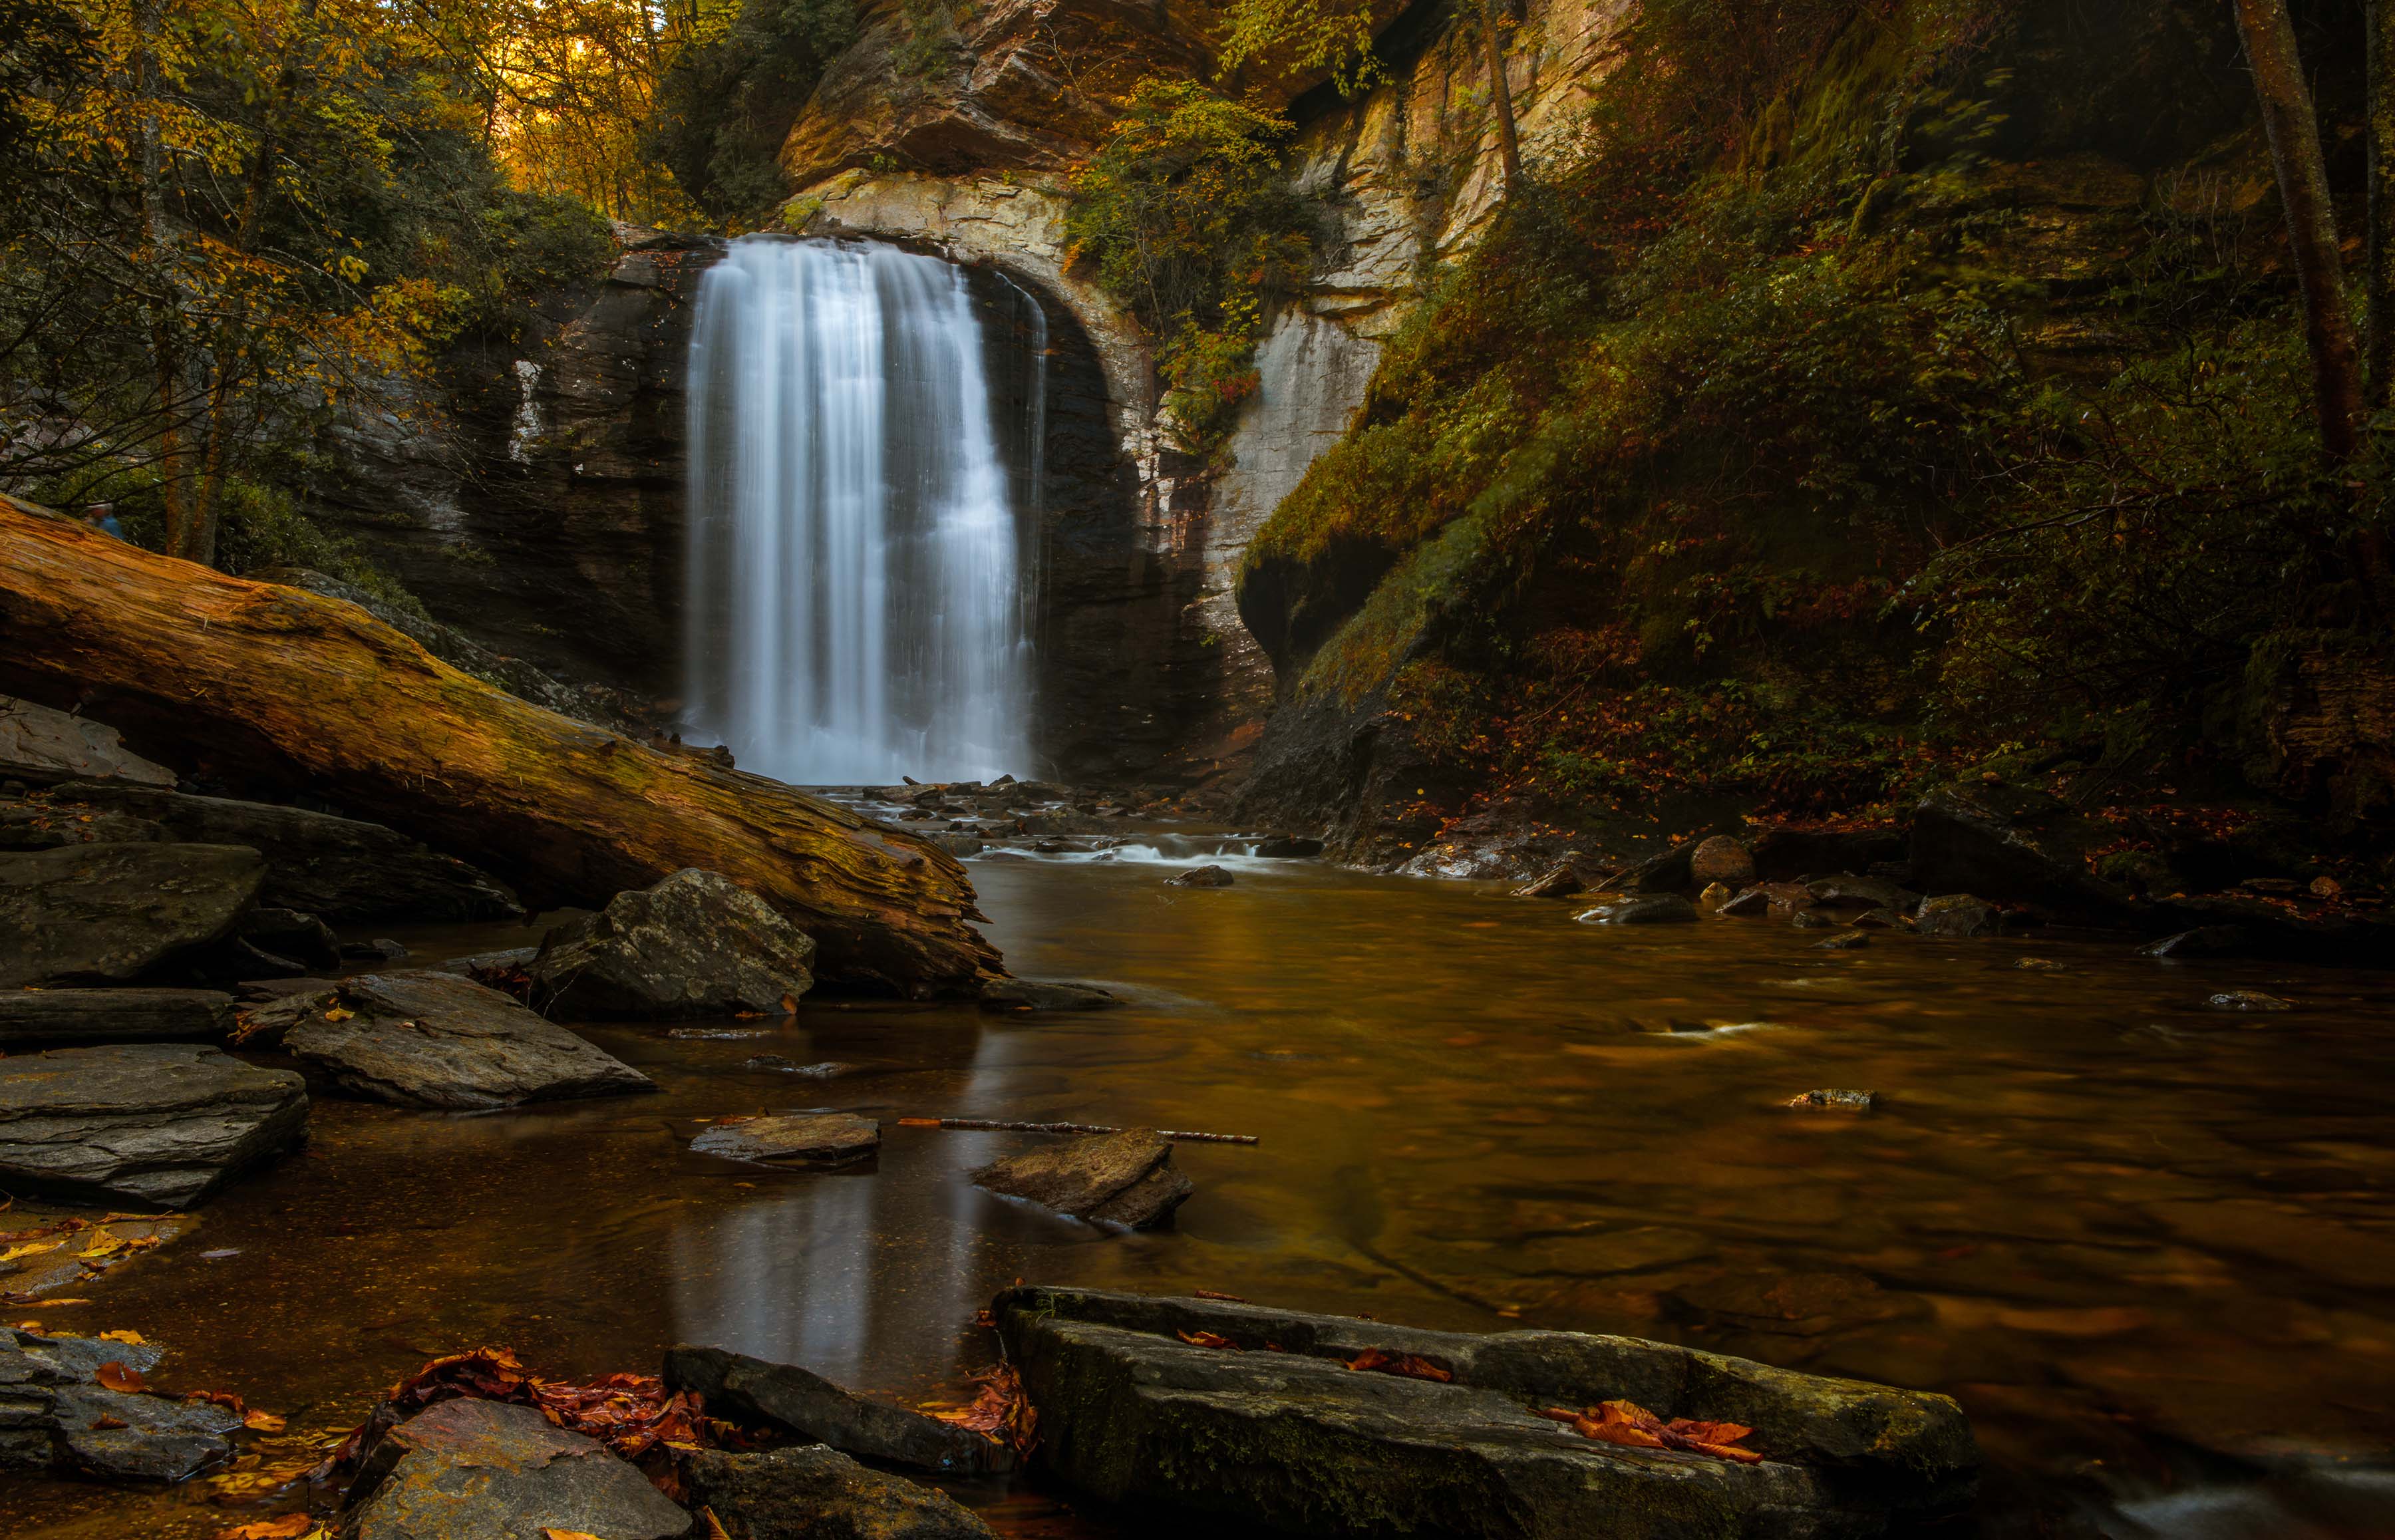
Jul 19 |
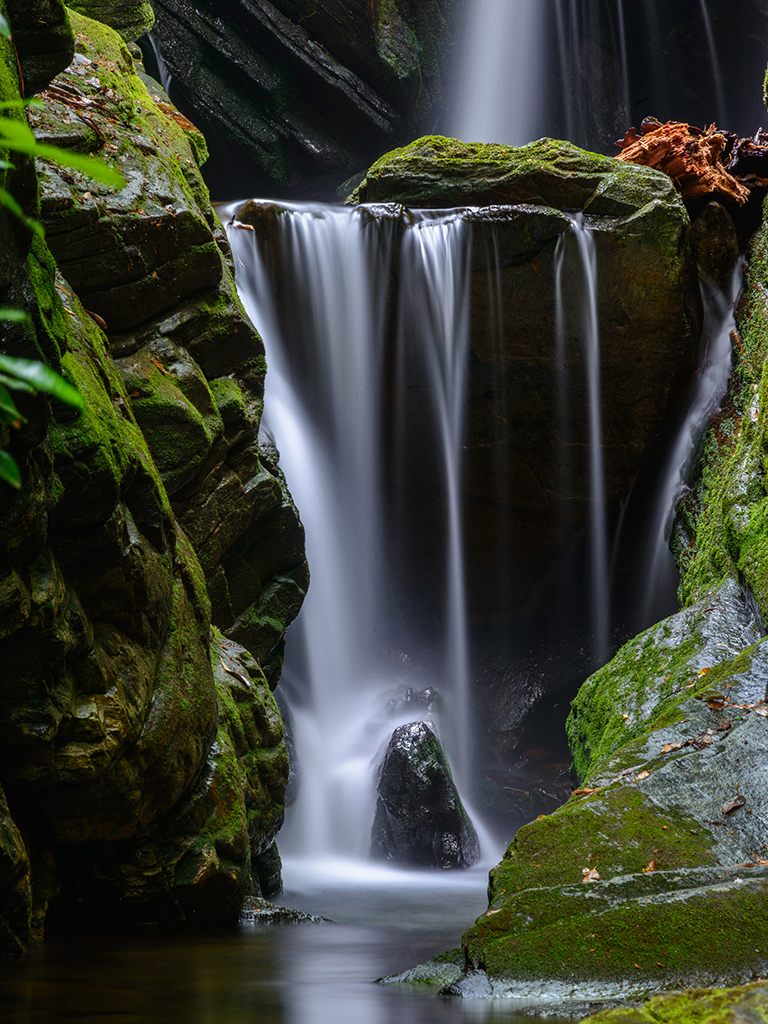
Reply |
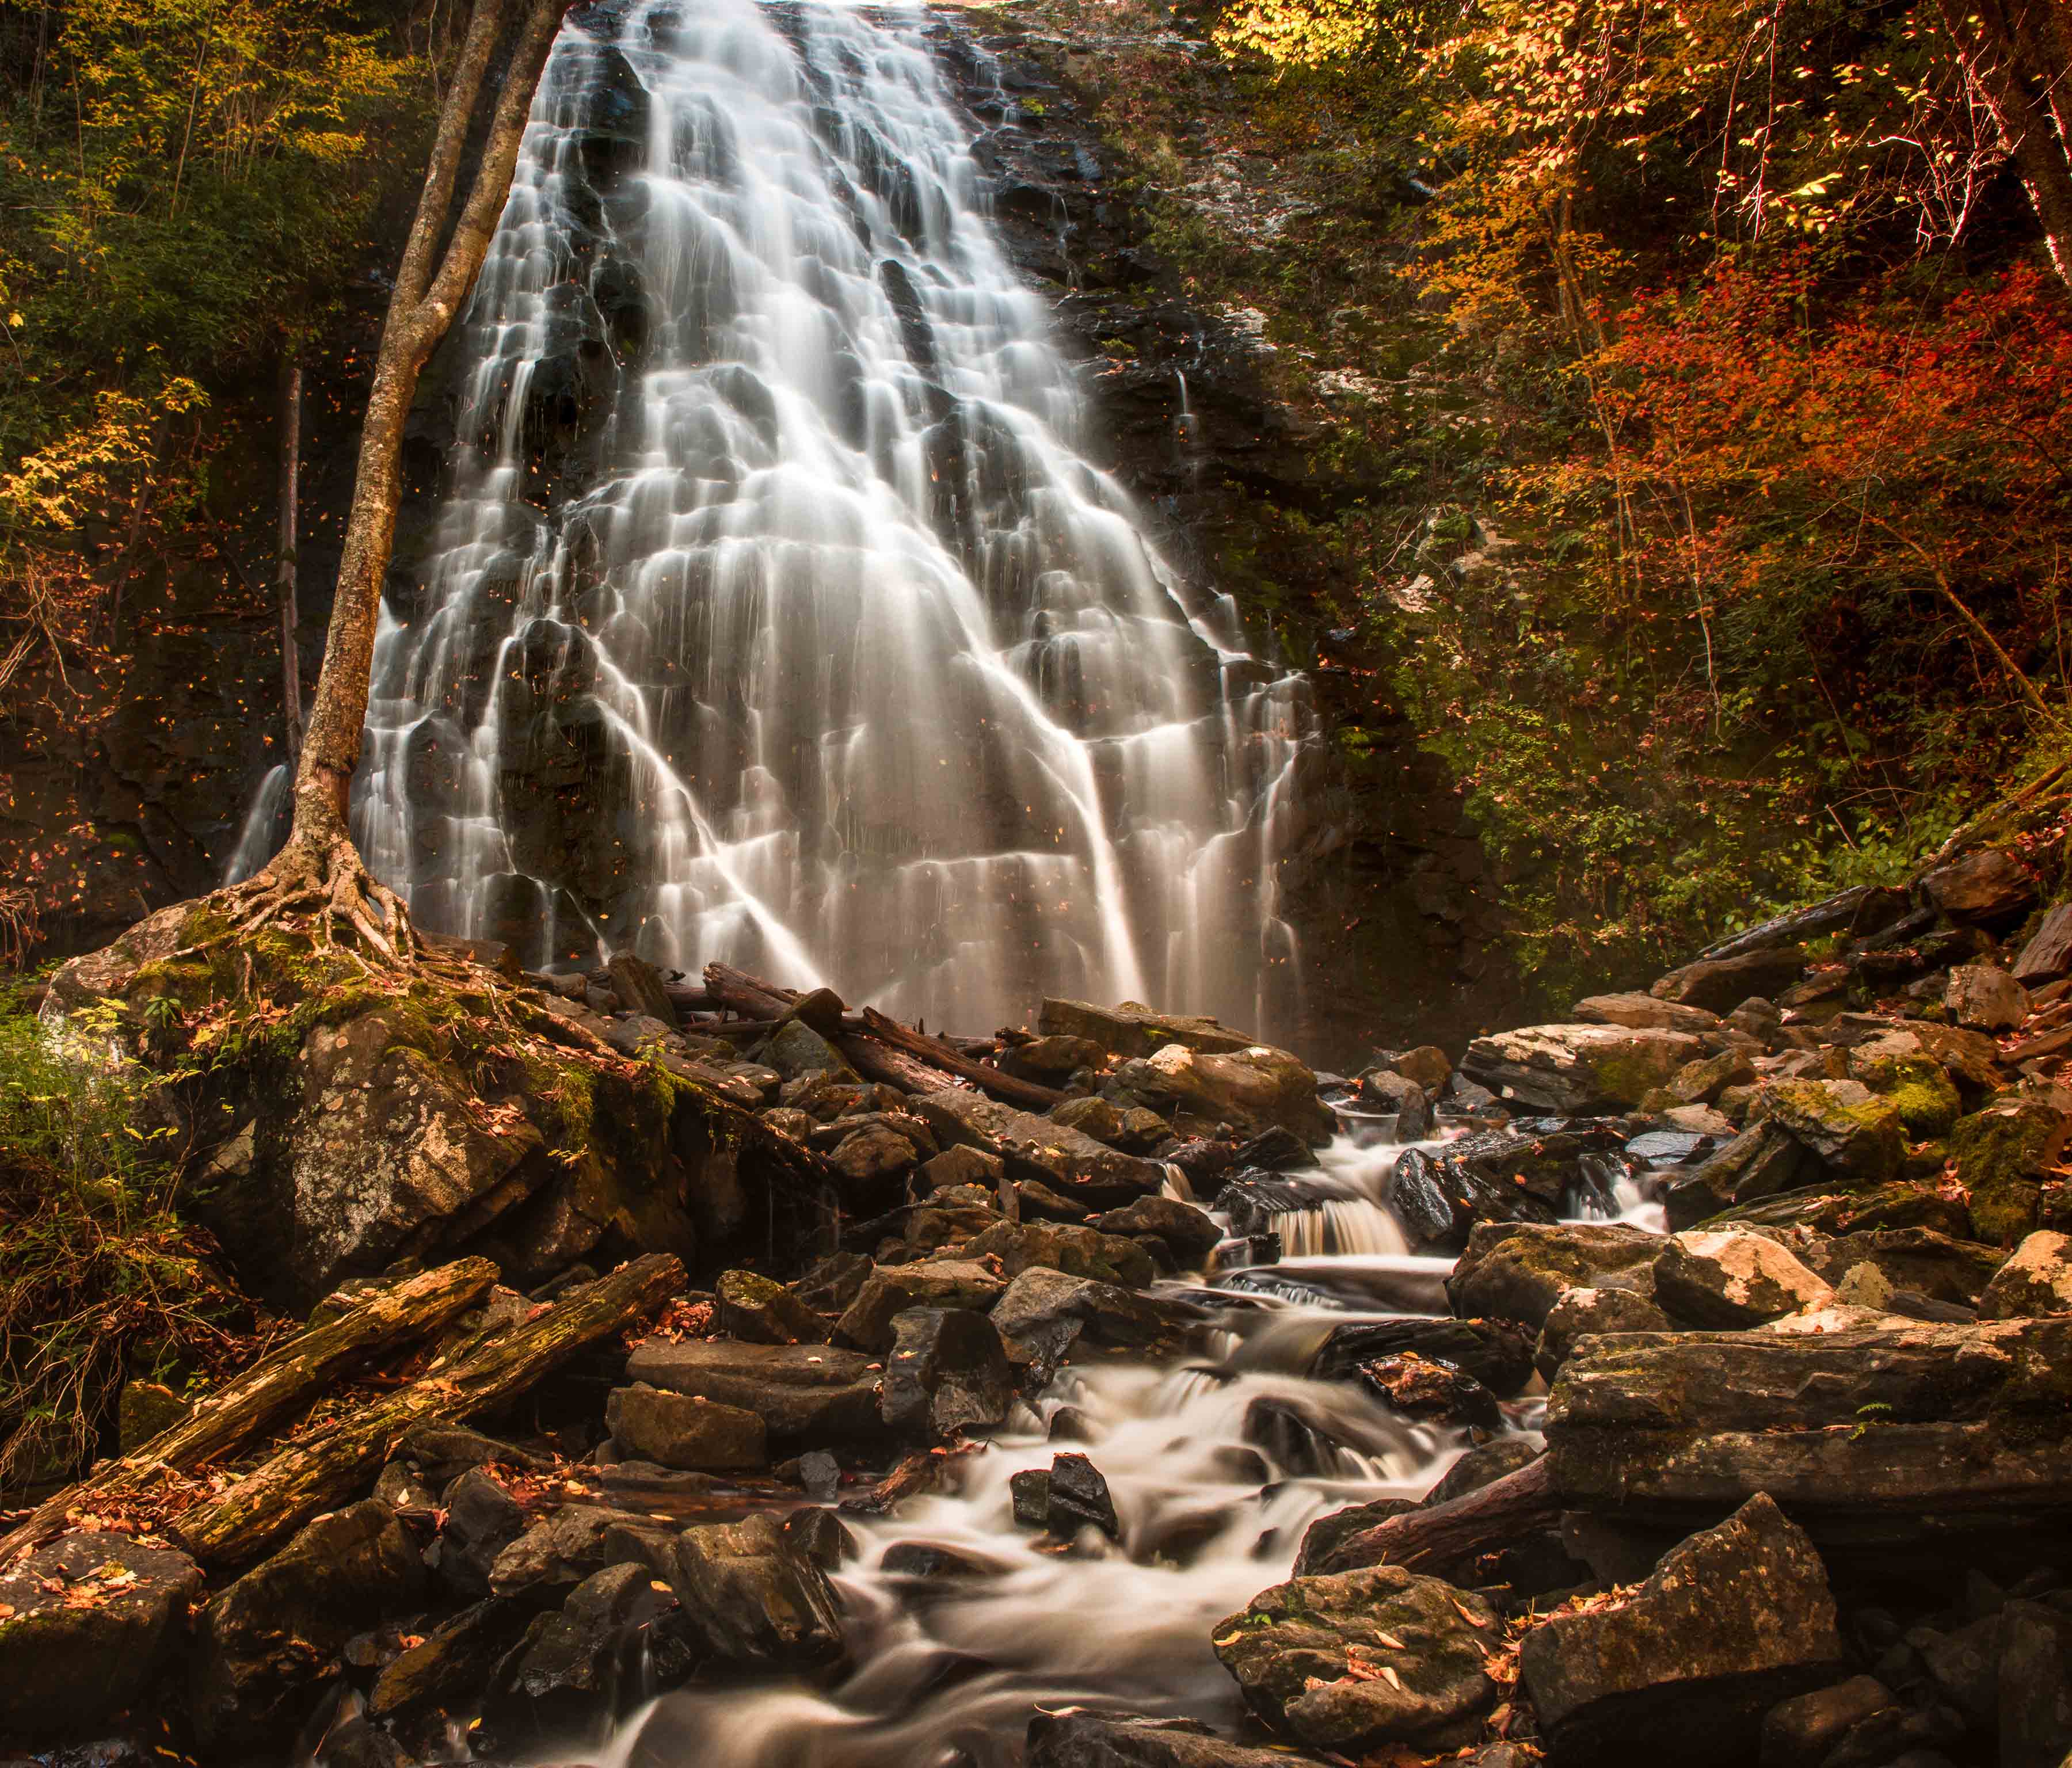
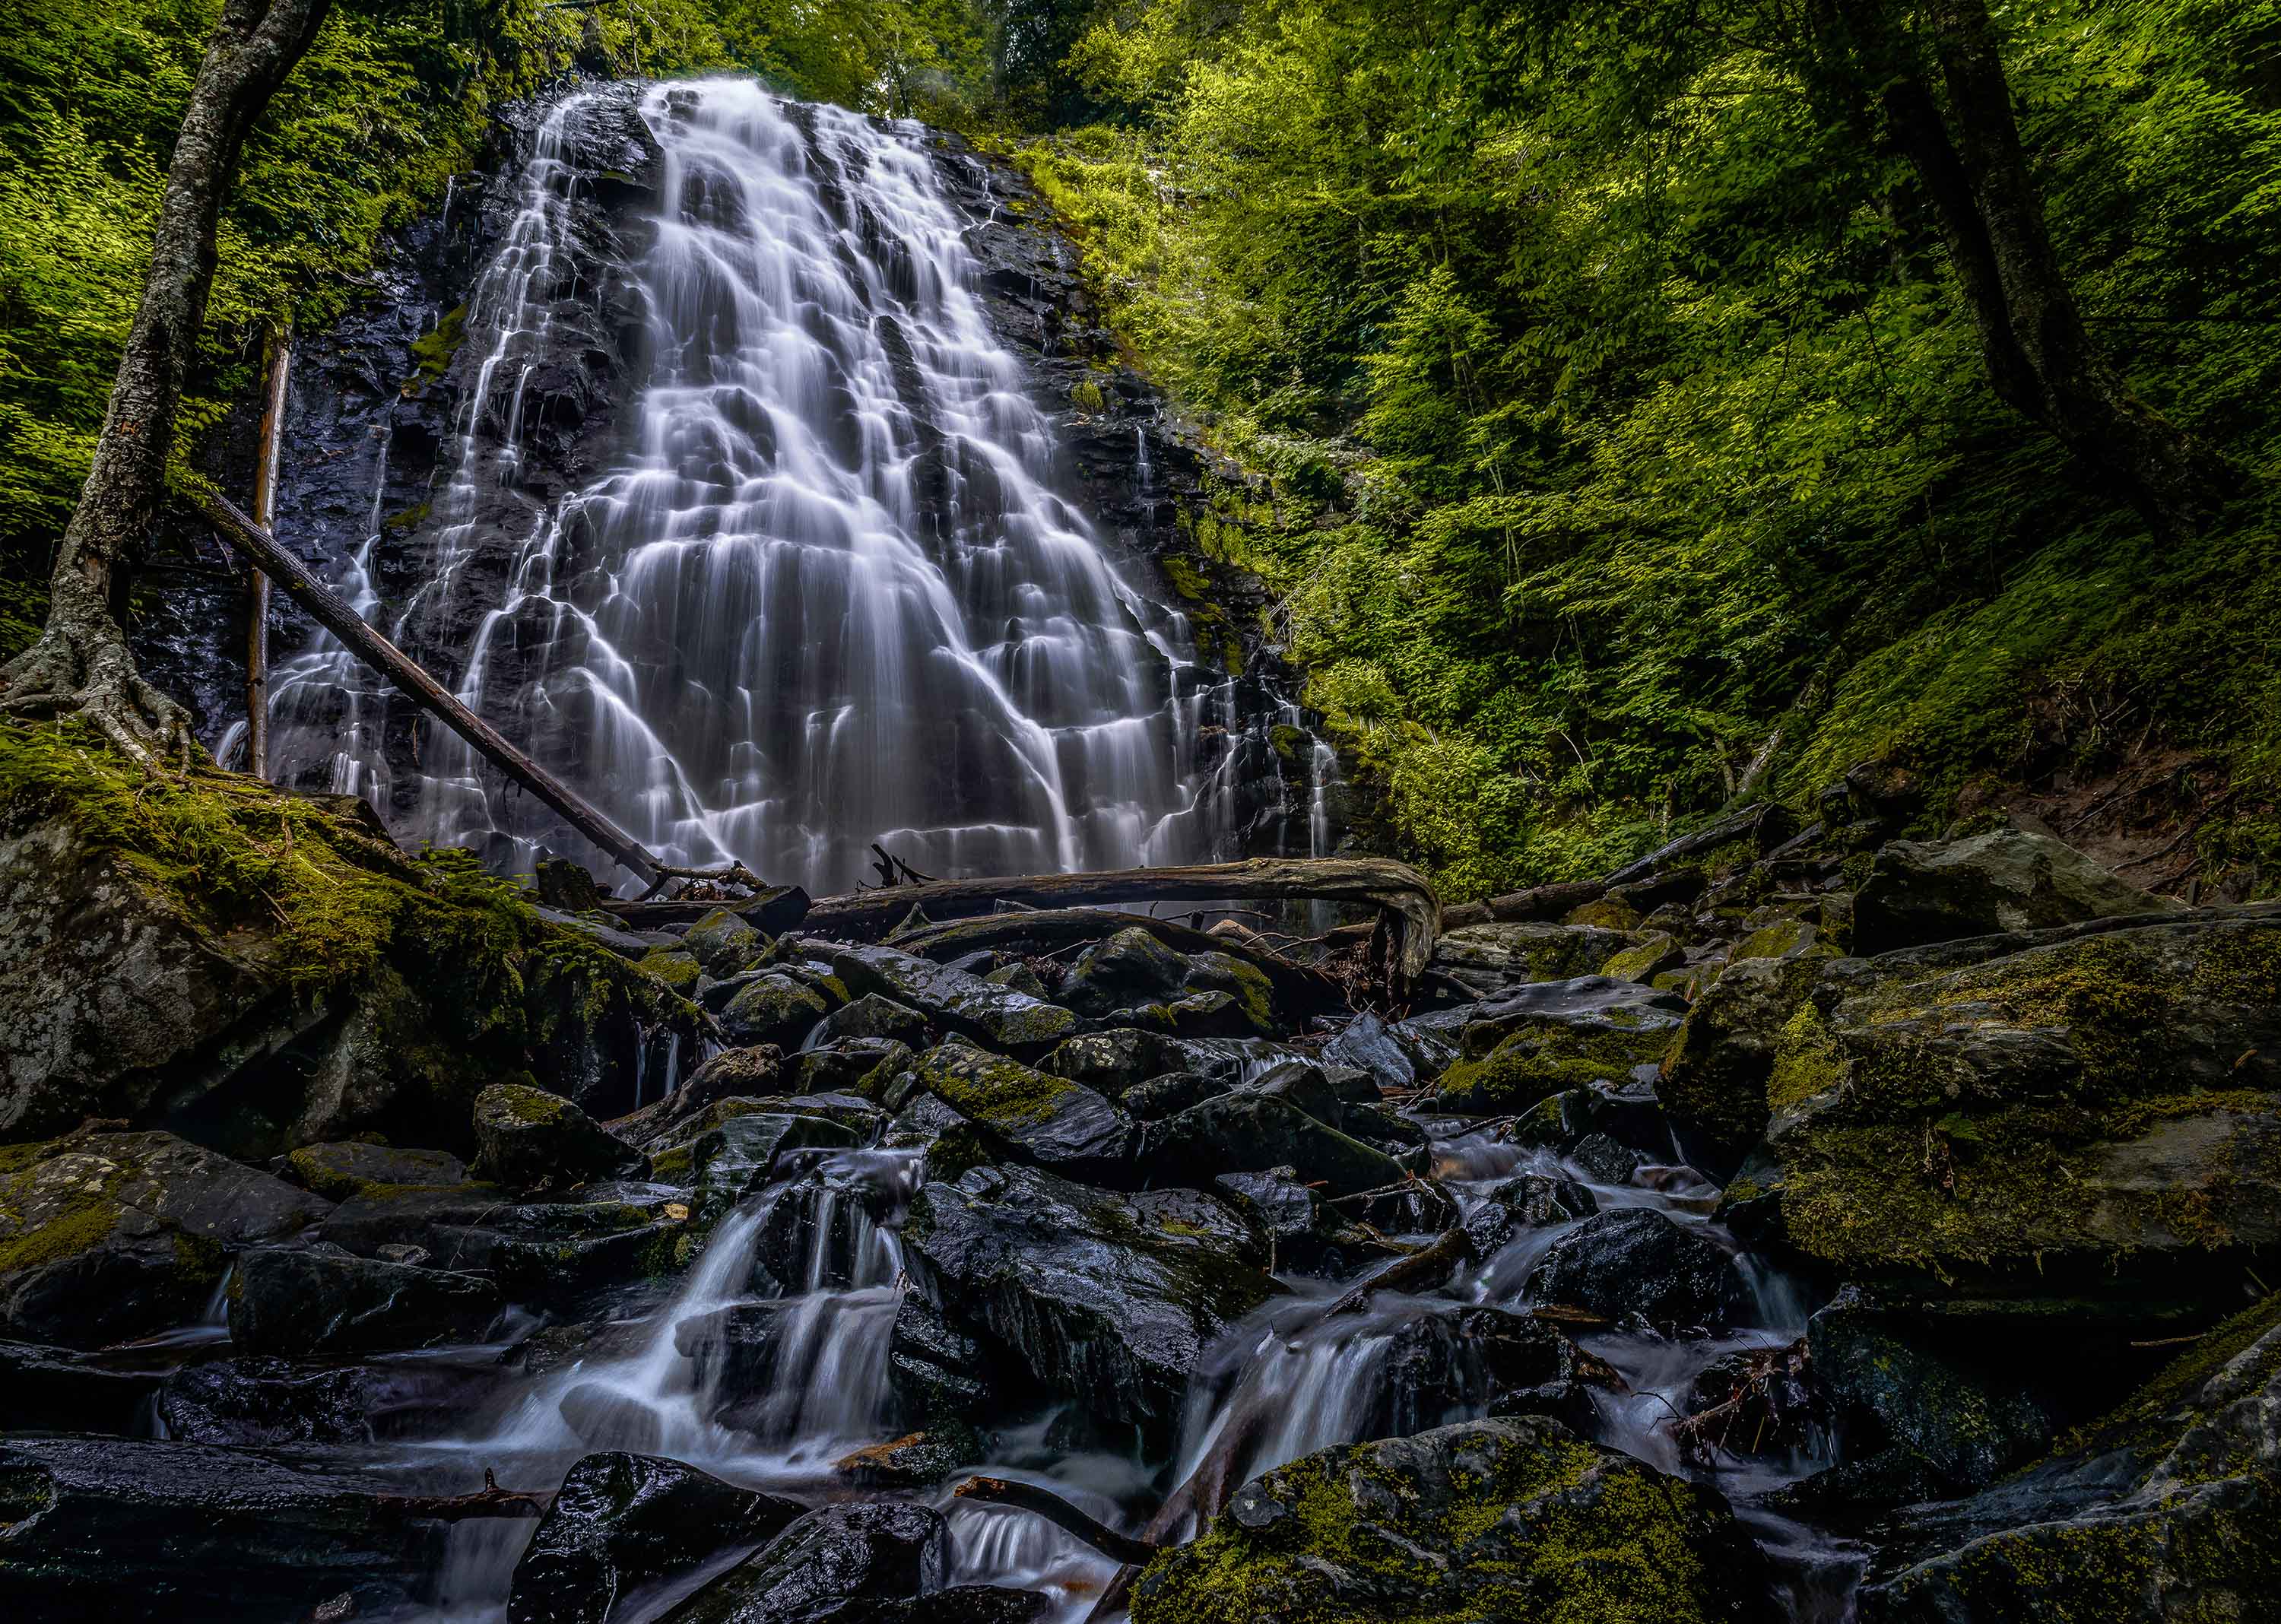
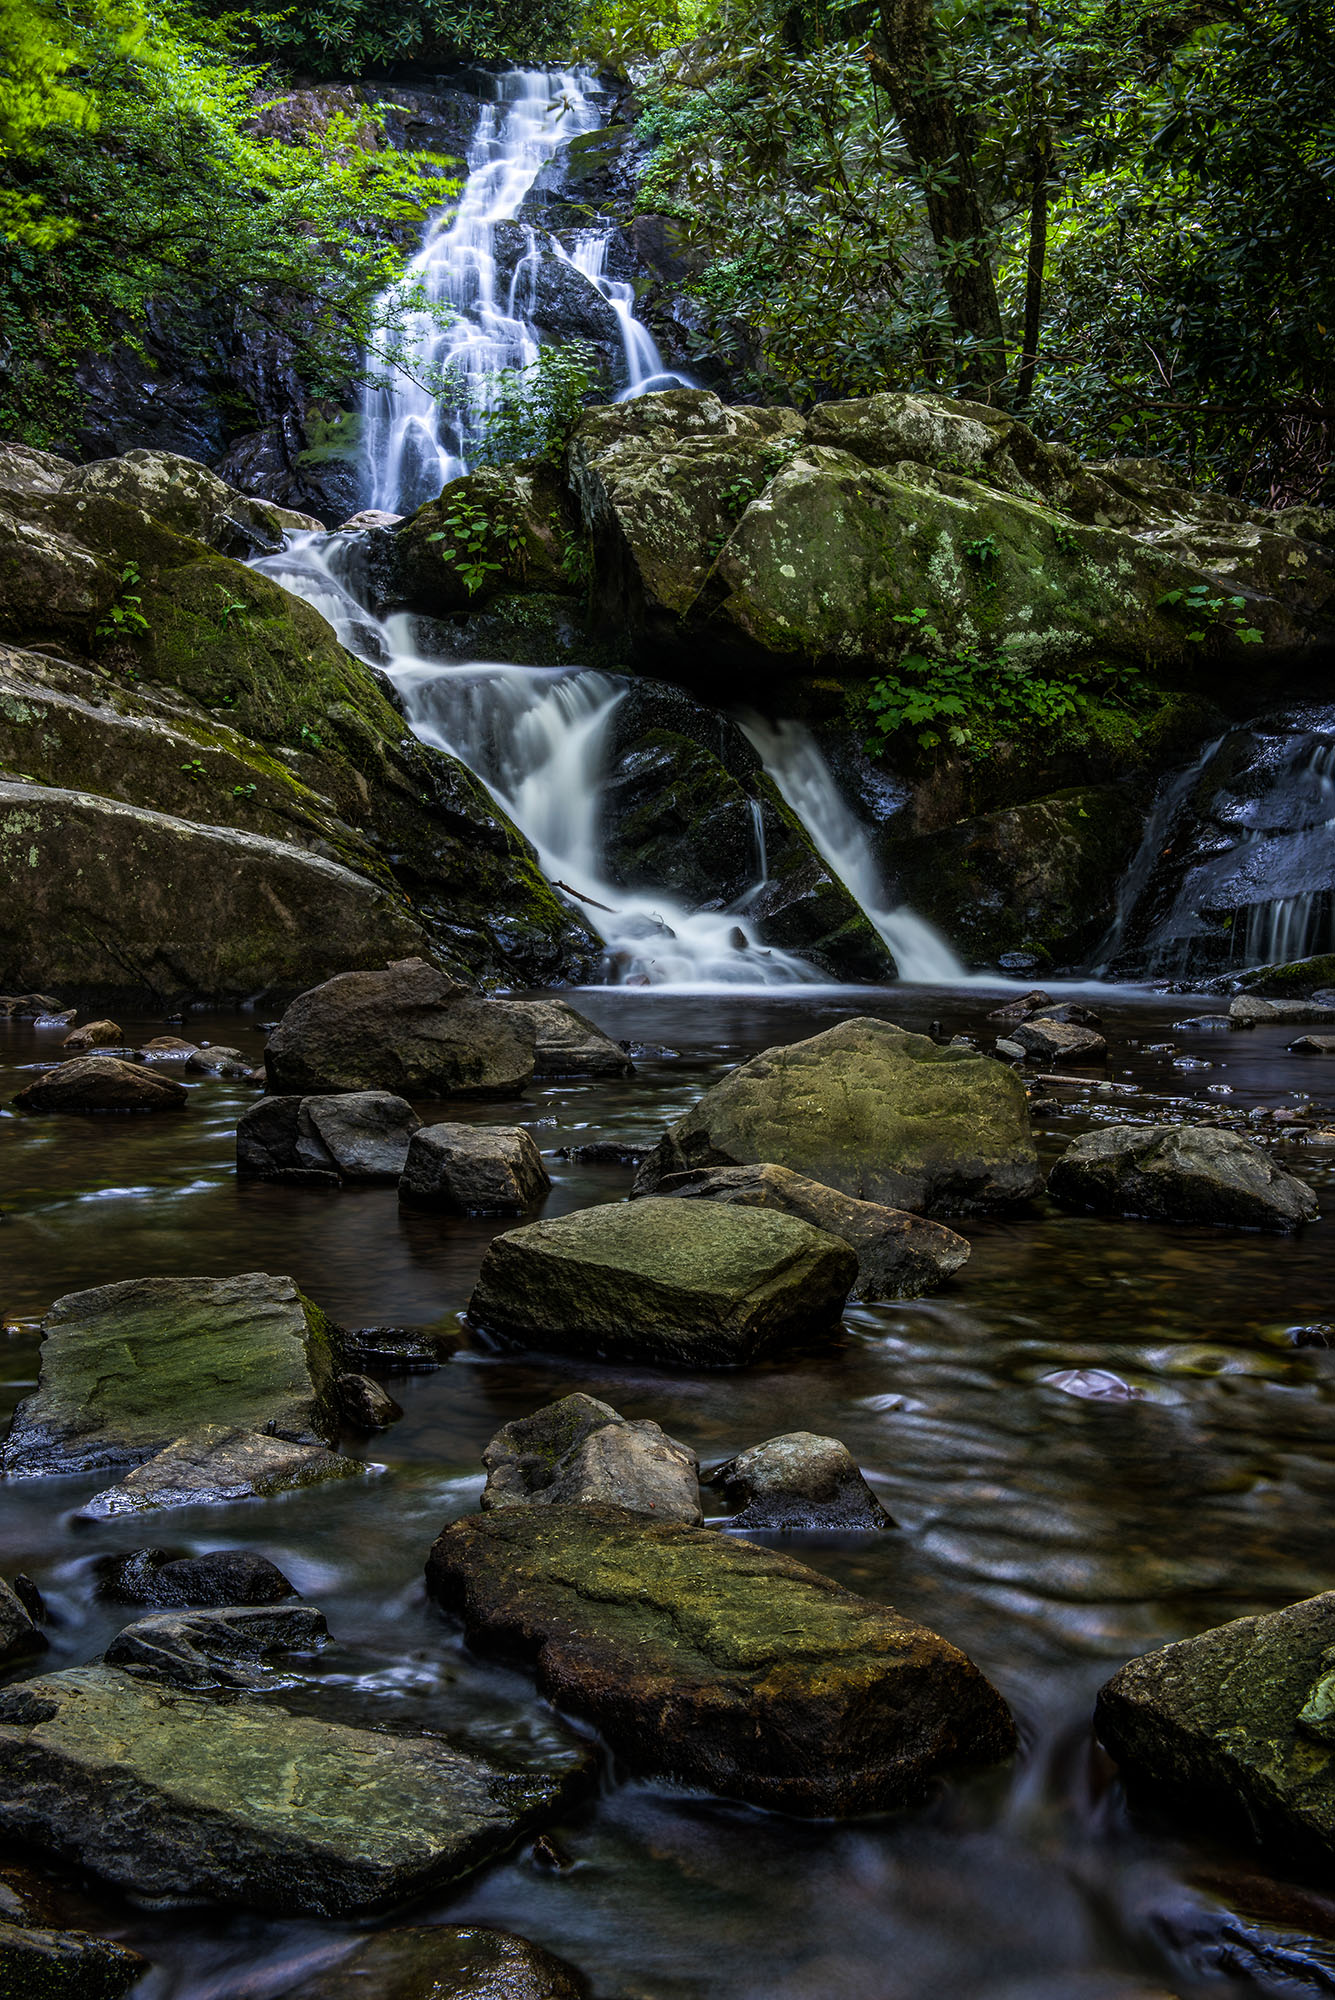
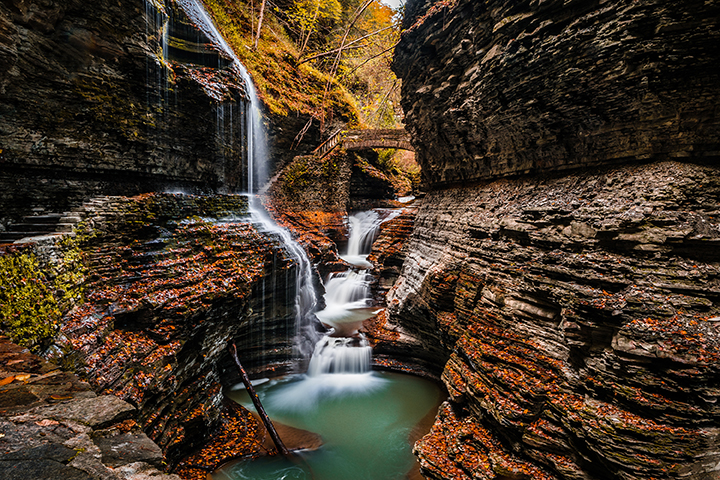
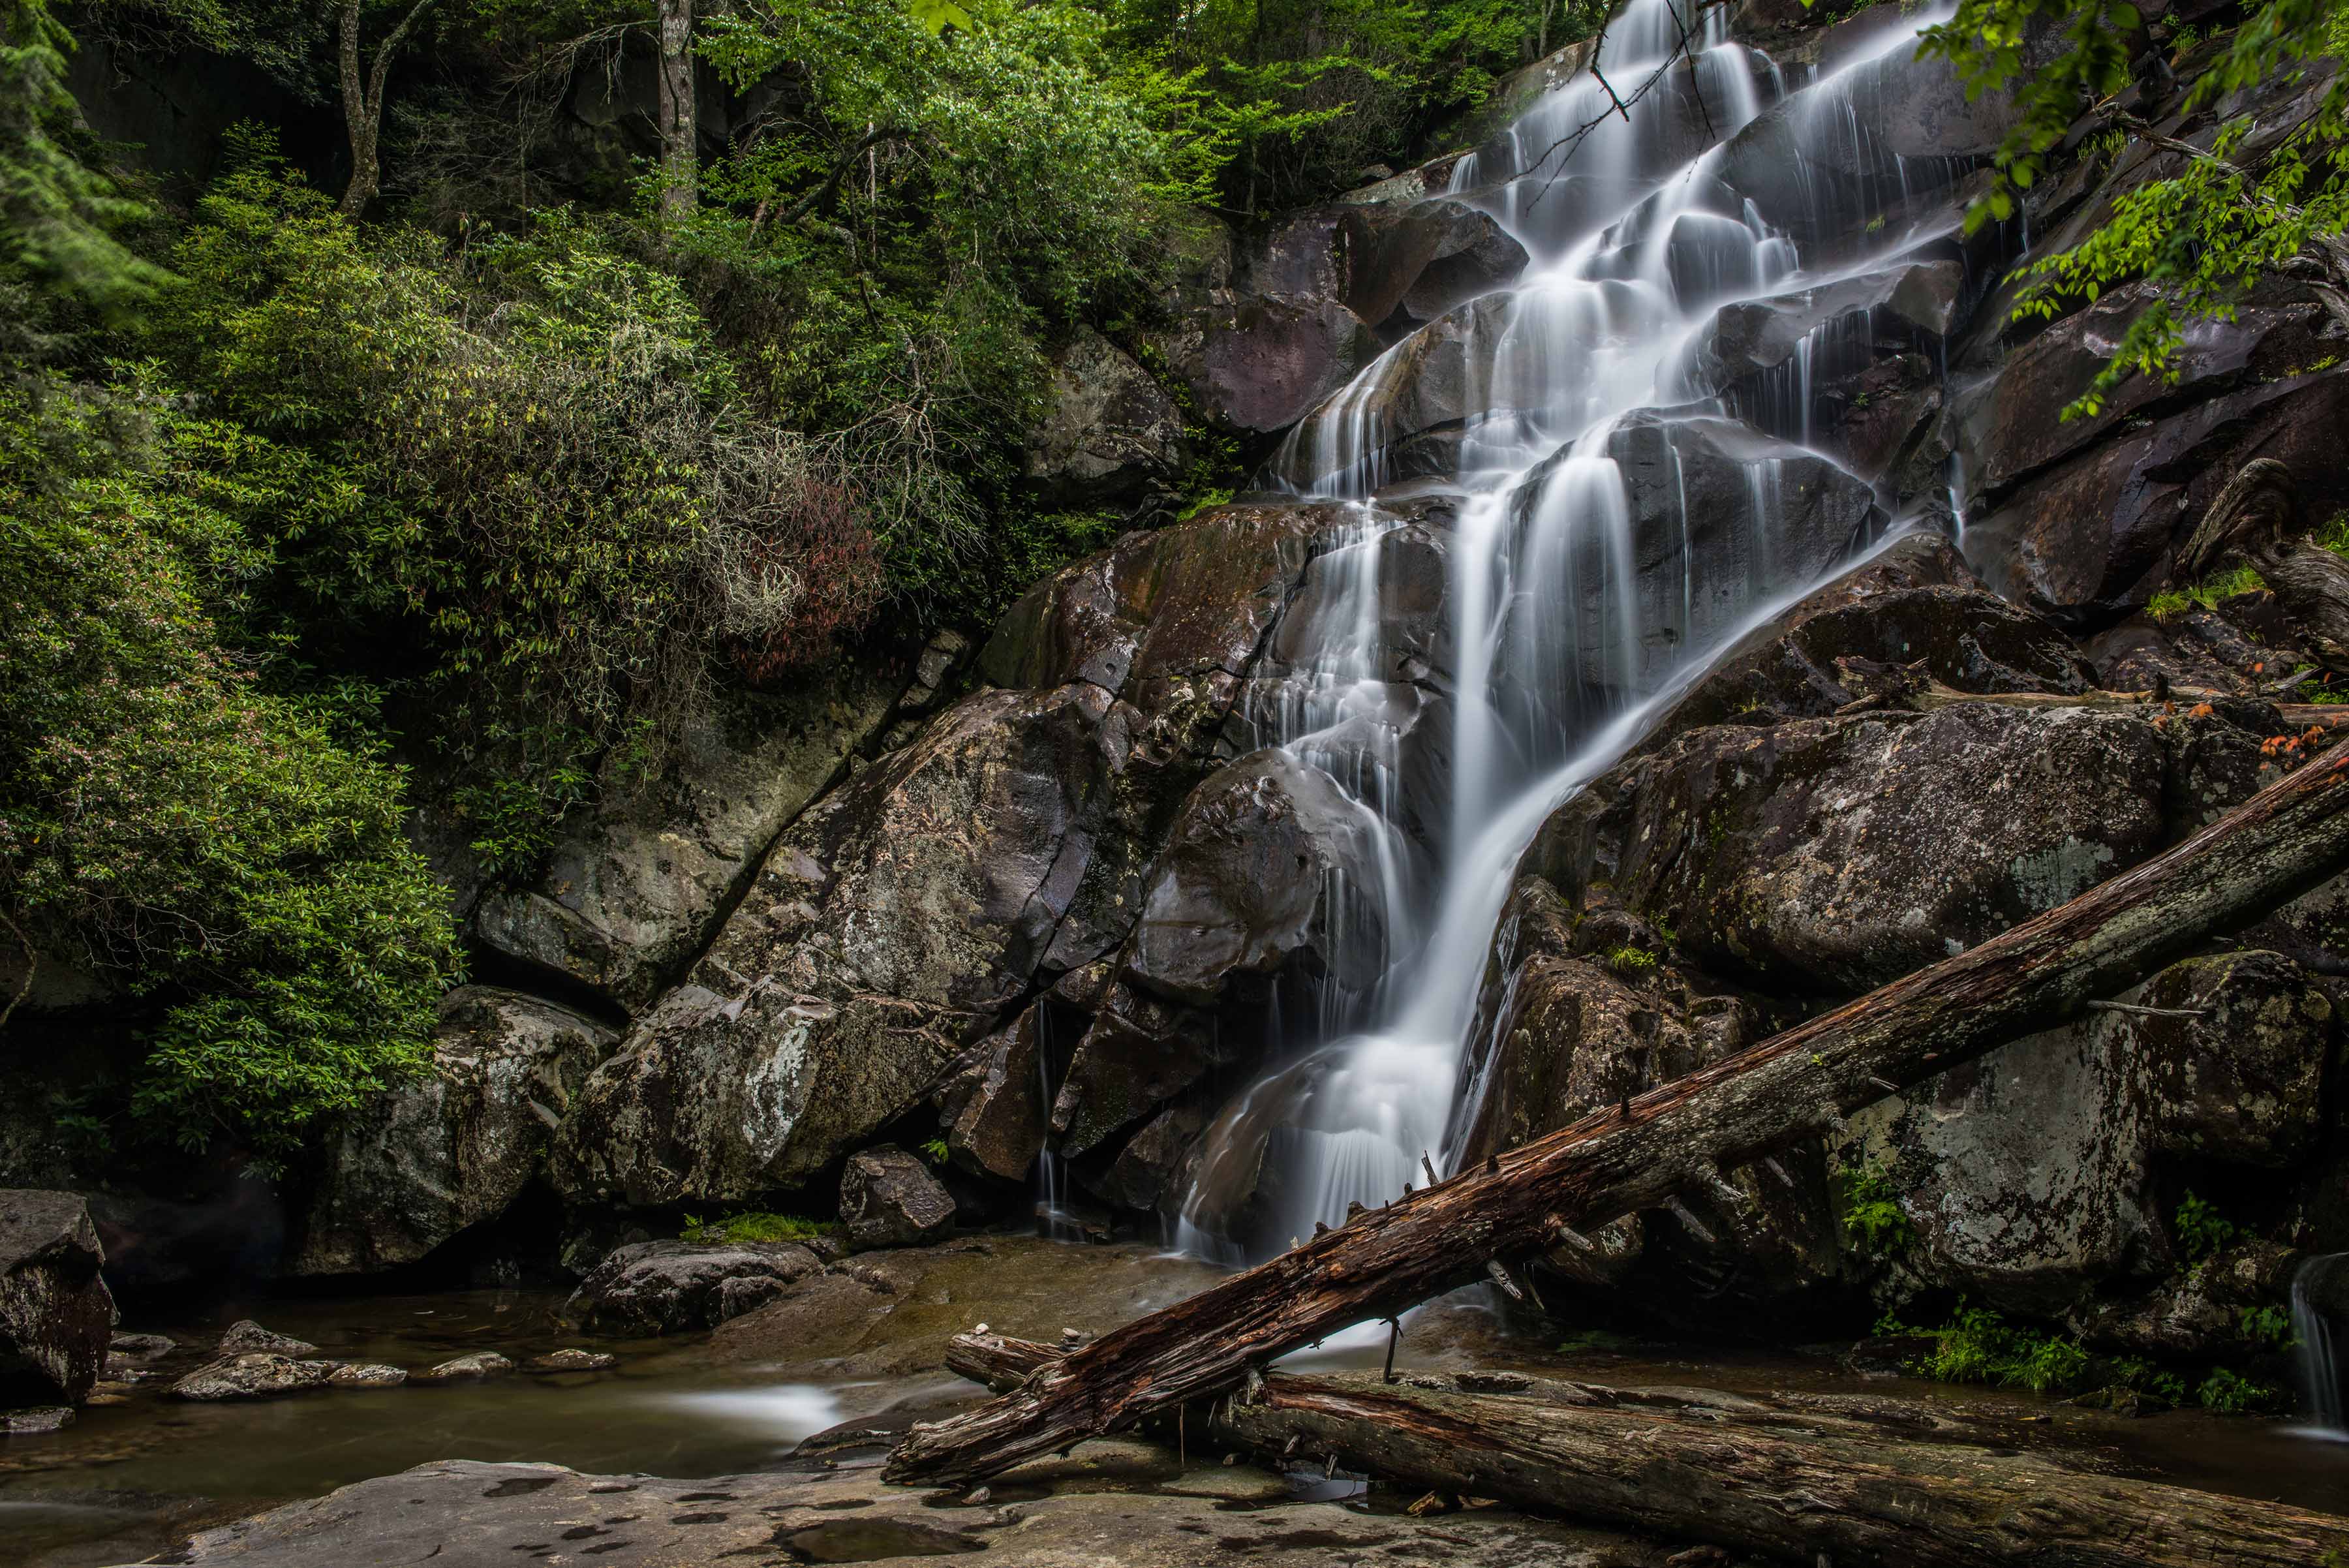
Most waterfalls in the Smokies are in grottoes and as seen as a bit darker. This falls is more open. I got as close to the top as possible but directly above this is open sky which was pretty much white on this day. i didn't want that white at the top to ruin the feel, so I cropped it off
If you prefer--try this shot |
Jul 16th |
 |
| 67 |
Jul 19 |
Reply |
Thank you Cheryl. Dynamic range is the ability of the camera to keep detail in the whitest whites and the blackest blacks this is much like the human eye. When you look into shadows YOU see detail, most cameras can't render detail in shadows without blowing out whites. As photographers we have to learn how to deal with this. For reference on the highlight side check out Wayne's photo this month. His camera could not capture the earth and retain detail in the sky that is why there is a blown out section on the right.
There are ways to deal with this. One method is to use Graduated Neutral Density filters. I attached an example of one of these to my comment on Wayne's image. This filter will bring down the exposure of the sky (which is usually bright) and then allow the camera to meter and set the correct exposure for the land. In effect it expands the dynamic range of the camera and in the case I explained above it will save the whites in the sky and the shadows in the land. The other method is to wait until the light is not as bright and harsh like it is during the middle of the day. This is why photographers like early morning and early evening. At these times the light is not as bright nor as harsh thus the camera can see in the shadows (saving detail) and balance the less bright sky and everything comes out even.
In the case of the waterfall I posted this month,it was largely exposed with no shade. I would have preferred a cloudy rain filled day because the light would not have been so harsh, but my day was fairly bright. Thus I waited until those moments when the sun was blocked by drifting clouds. At those moments the light was dimmed and the camera was better able to handle the range of light, thus I have no burn outs in the water and retain detain in the shadows. Some of the dark areas in the image are real deep holes and they remain black, However if you look inmost of the shadow areas you can see some detail. Also check out the whites of the falls and note the lack of pure white--you can see texture in the water.
This is one reason why I shoot in RAW. There is more detail in a RAW file than in a jpeg. Thus is always underexpose slightly to be sure to save the highlights and then use Lightroom to open an slightly dark shadows.
I know this was long, but I hope it makes sense. If you hae further questions, please ask. |
Jul 16th |
| 67 |
Jul 19 |
Reply |
Check out Fill-Content Aware in Photoshop. Real easy.
Just go the lasso tool in the tool bar. Then draw a generous free form shape around the offending items (Like the twigs) Then go to EDIT, Fill -- under the USE line use the drop down menu to select Content Aware then press return----watch the magic happen.
The Image Analysis course is excellent. |
Jul 13th |
| 67 |
Jul 19 |
Reply |
Wayne
I'm still processing my images from the recent trip to the Smokies. When I get them all done, later this month, I'll post a link. As for my efforts to take a photo, I just want to come home with a shot I will be happy with. I'd rather bring home one good one, than a couple of dozen so-so snapshots. I've got about 8 or 9 shots of this falls and I'm still deciding on which I like the best. But this one is one of the front runners... :-) |
Jul 12th |
| 67 |
Jul 19 |
Comment |
I've been to Isle Royal but it was years ago.
Water drops are always cool to see in photos.
I'll go shopping for garters tomorrow so I can keep my socks on during the viewing of next month's photo |
Jul 12th |
| 67 |
Jul 19 |
Comment |
Michael, I congratulate you on getting to Isle Royal, how were the mosquitoes?
You have a lovely shot of, as you note, one of the more beautiful of the orchids. Photographing these beauties is always a challenge and under the circumstances you did a fine job. Trying to turn a telephoto lens into a macro is a challenge in and of itself. I'm going to have to agree with Wayne on this and note that a higher f-stop would help this a great deal. While you have a clean and crisp shot of the center of the orchid the petal in the foreground being out of focus really grabs my attention. The higher f-stop would go along way to solving that issue. Of course that brings into the discussion a whole host of problems. You already have a high ISO and raising the aperture would mean that the ISO would have to be raised also. Really, the only way to beat this is to carry a tripod. Thus we are back to under the circumstances this is the best you can do. One simply trick for backgrounds that I use is to carry a couple of small bunge cords in my camera bag (just the little 6 inch ones). I often use them to pull branches, twigs and other little things out of my field of view to help clean up the backgrounds. You can also use strips of velcro for the same purpose. |
Jul 11th |
| 67 |
Jul 19 |
Comment |
Really an interesting shot of the spider. I like the environmental type image as it puts the spider in his natural home and he is large enough to still stand out.
I would have reversed the camera setting, getting a lower Fstop (5.6-8) and raising the shutter speed. When hiking in the forest I actually preset my camera for what I think I might find so I"ll be ready. That slow shutter, with such a long lens is probably why the spider is a bit soft (as is the rest of the image).
I played with this in post a bit. I increased exposure onthe spider and added a bit of yellow to help separate him from the tree. then I sharpened the heck out of him. I used Lightroom's sharpening mask. I also added some clarity. In this type of image with the rough texture of the spider and the tree I was not afraid of sharpening noise so I really went to the extreme.
The spider in the sunbeam really draws the eye of the viewer.
Well seen and a nice image. |
Jul 10th |
 |
| 67 |
Jul 19 |
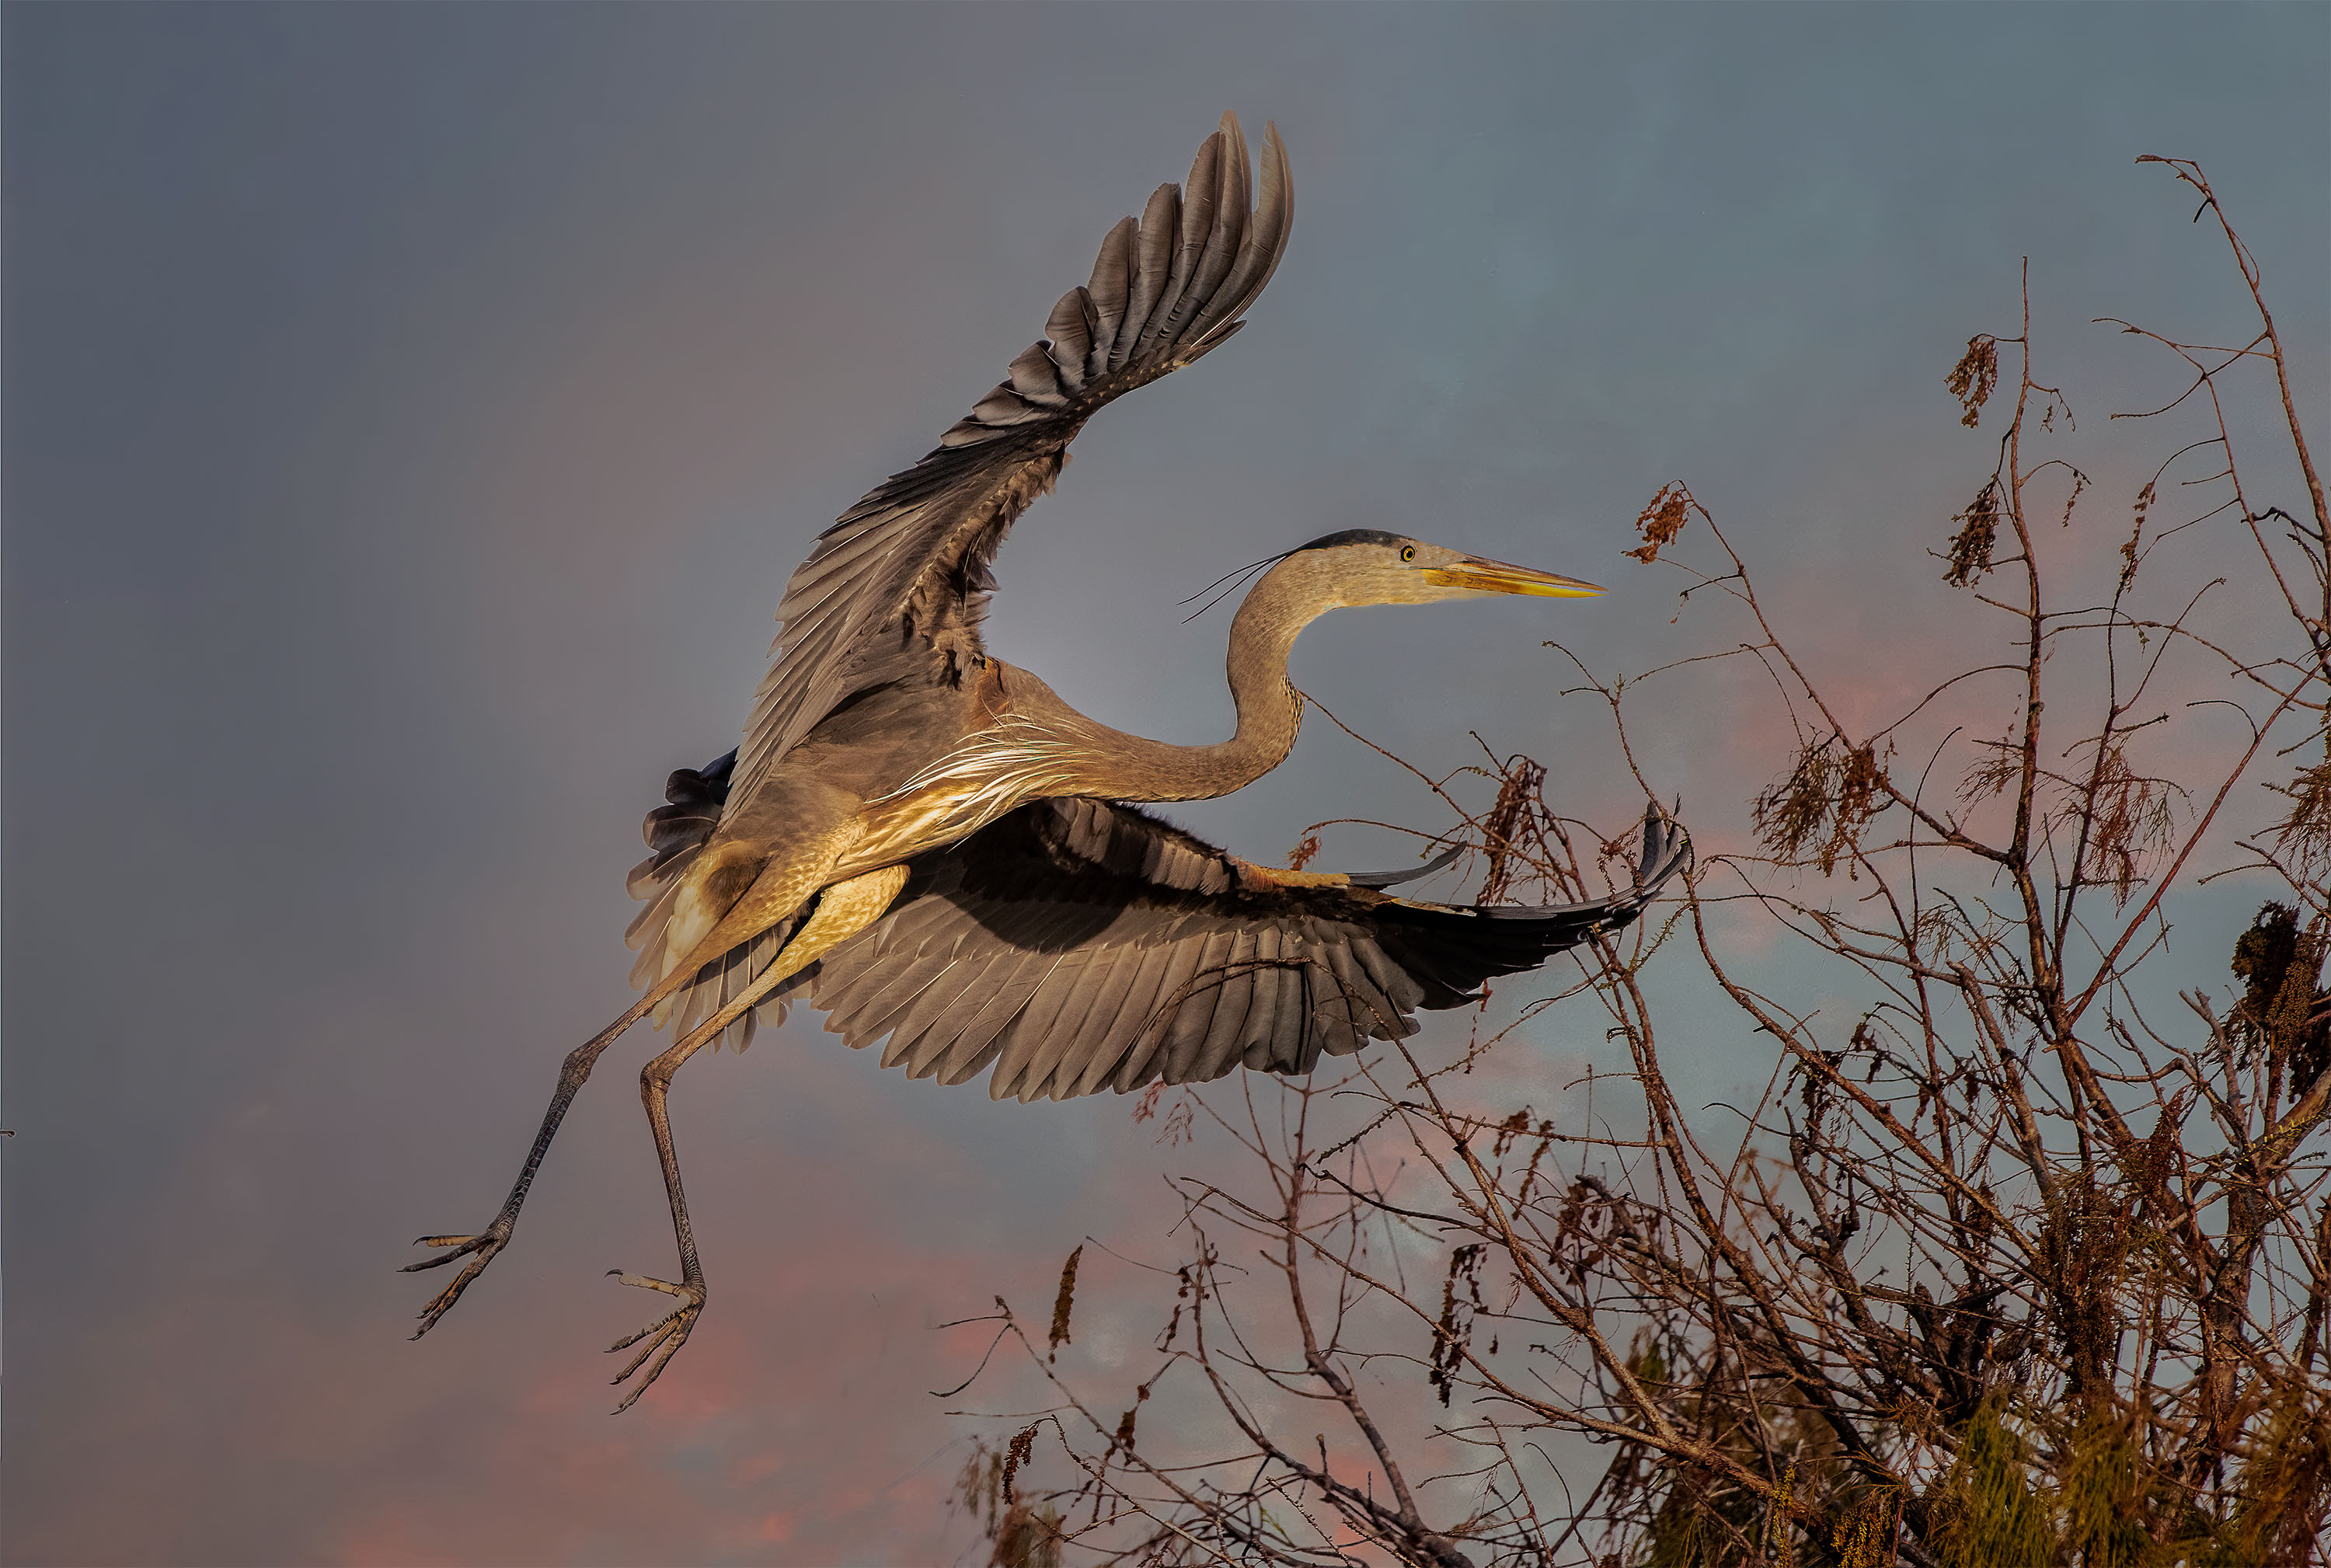
Comment |
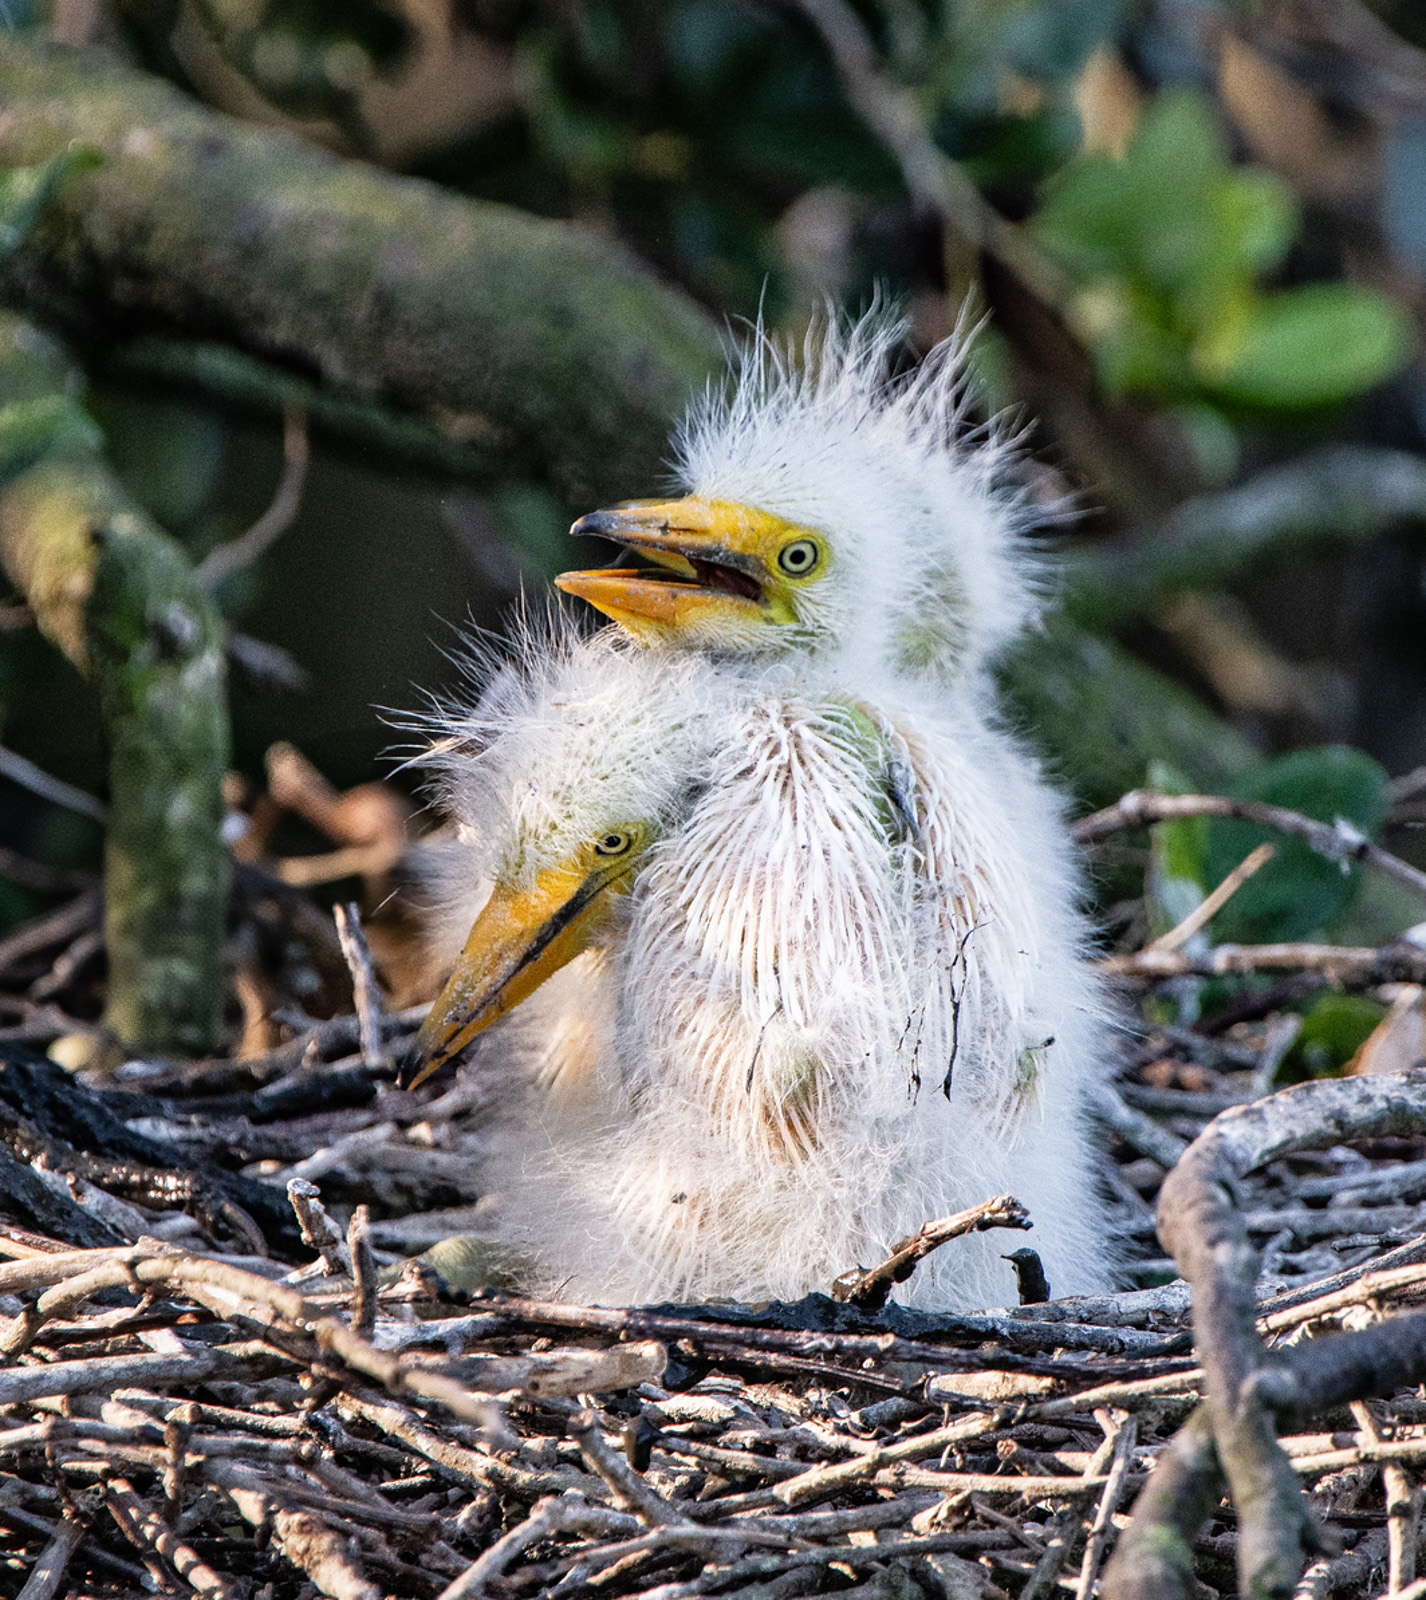
Oh boy, you are making me really struggle. I've been flipping back and forth between this and last month's image trying to decide which is better (or at least which I like better).
Last month is the classic portrait with such a lovely background that I am drawn to it. I like the bird better this month because the front view (last month) make him look on the fat side (short and rotund).
The background this month is almost as beautiful as the shot from June. I really like the brownish blush of light on the left side that compliments the brown bird on the right side. The soft nature of the overall light is lovely for a portrait--it is really wonderful light.
The foreground is what is giving me pause. I like the grasses but that loopy thing on the far left annoys me. I keep wanting to look at it.
Maybe a square crop, eliminating that loopy thing (technical term for sure) would work.
But I think I want this month's bird on last month's branch.
Way too much to think about. But what ever way it goes--this is a stellar image. Well done. |
Jul 10th |
| 67 |
Jul 19 |
Reply |
I was disappointed that I could not get the feathers on the wing to become white. There was a lot of color noise in that portion of the image. I think it was due to the fact that I had a small image to work with and it was not RAW. If I had the RAW I could probably have done better.
That Adjustment brush is really powerful--it just takes some playing with it. |
Jul 10th |
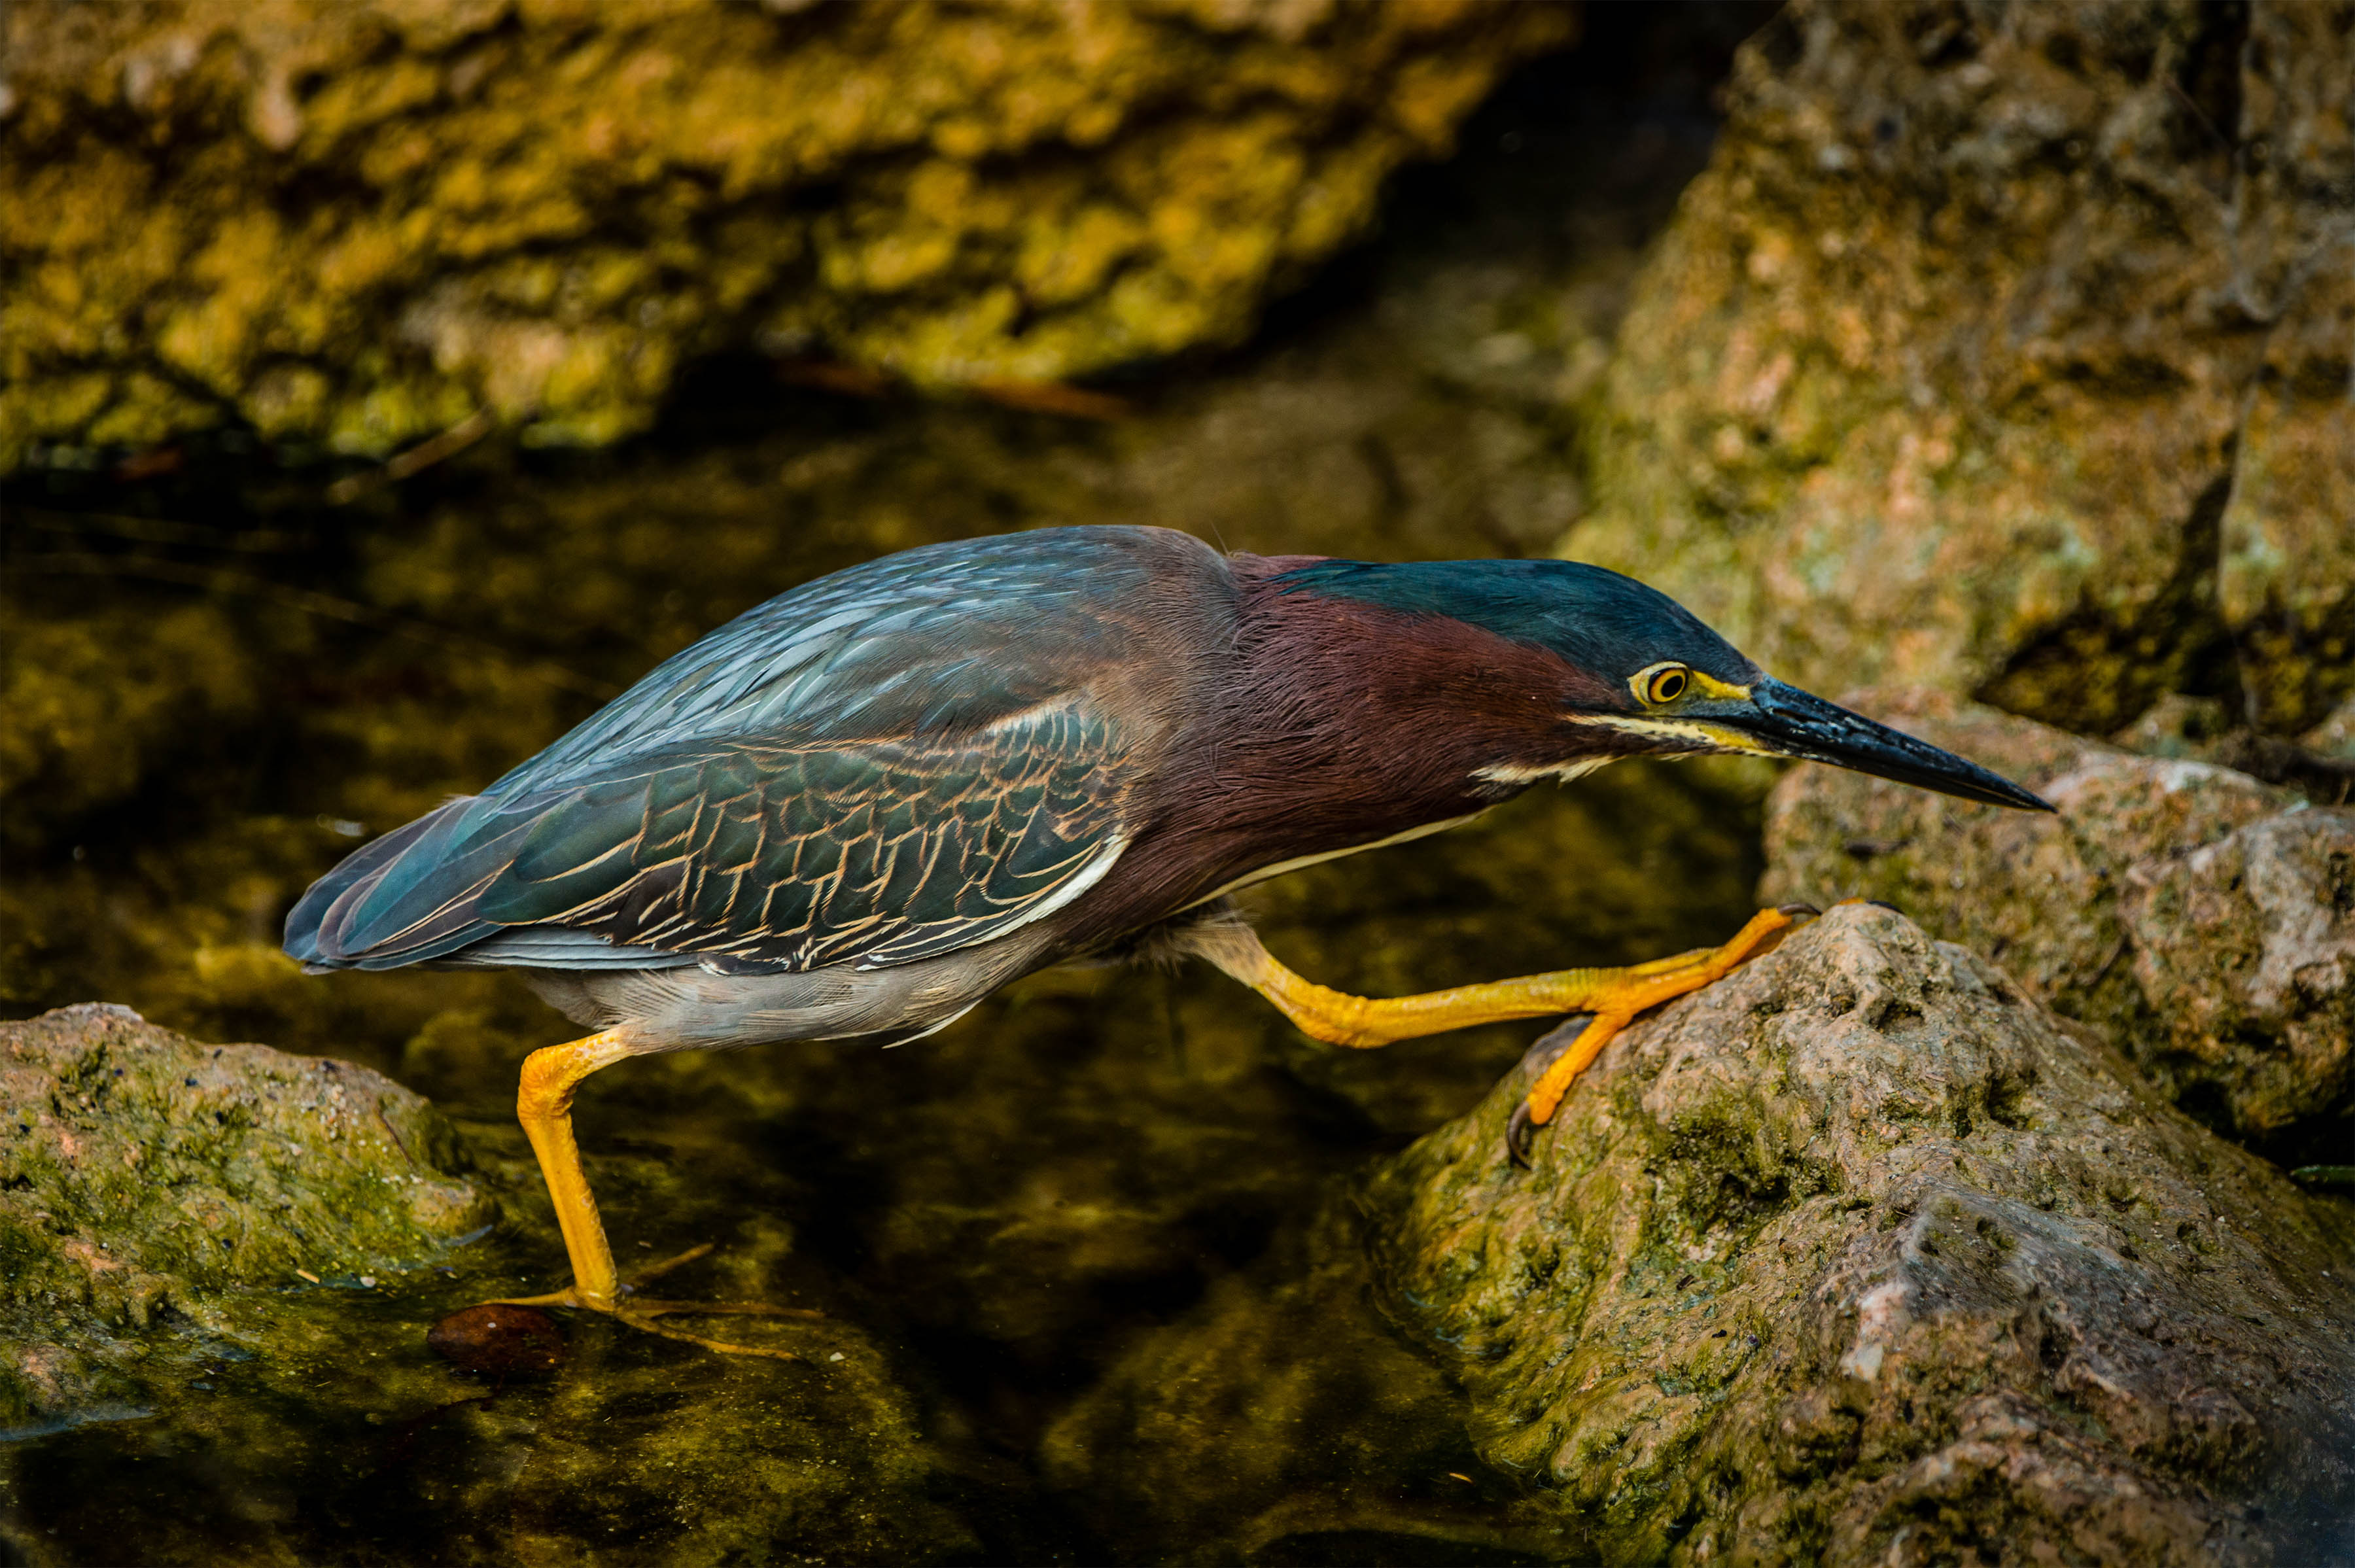
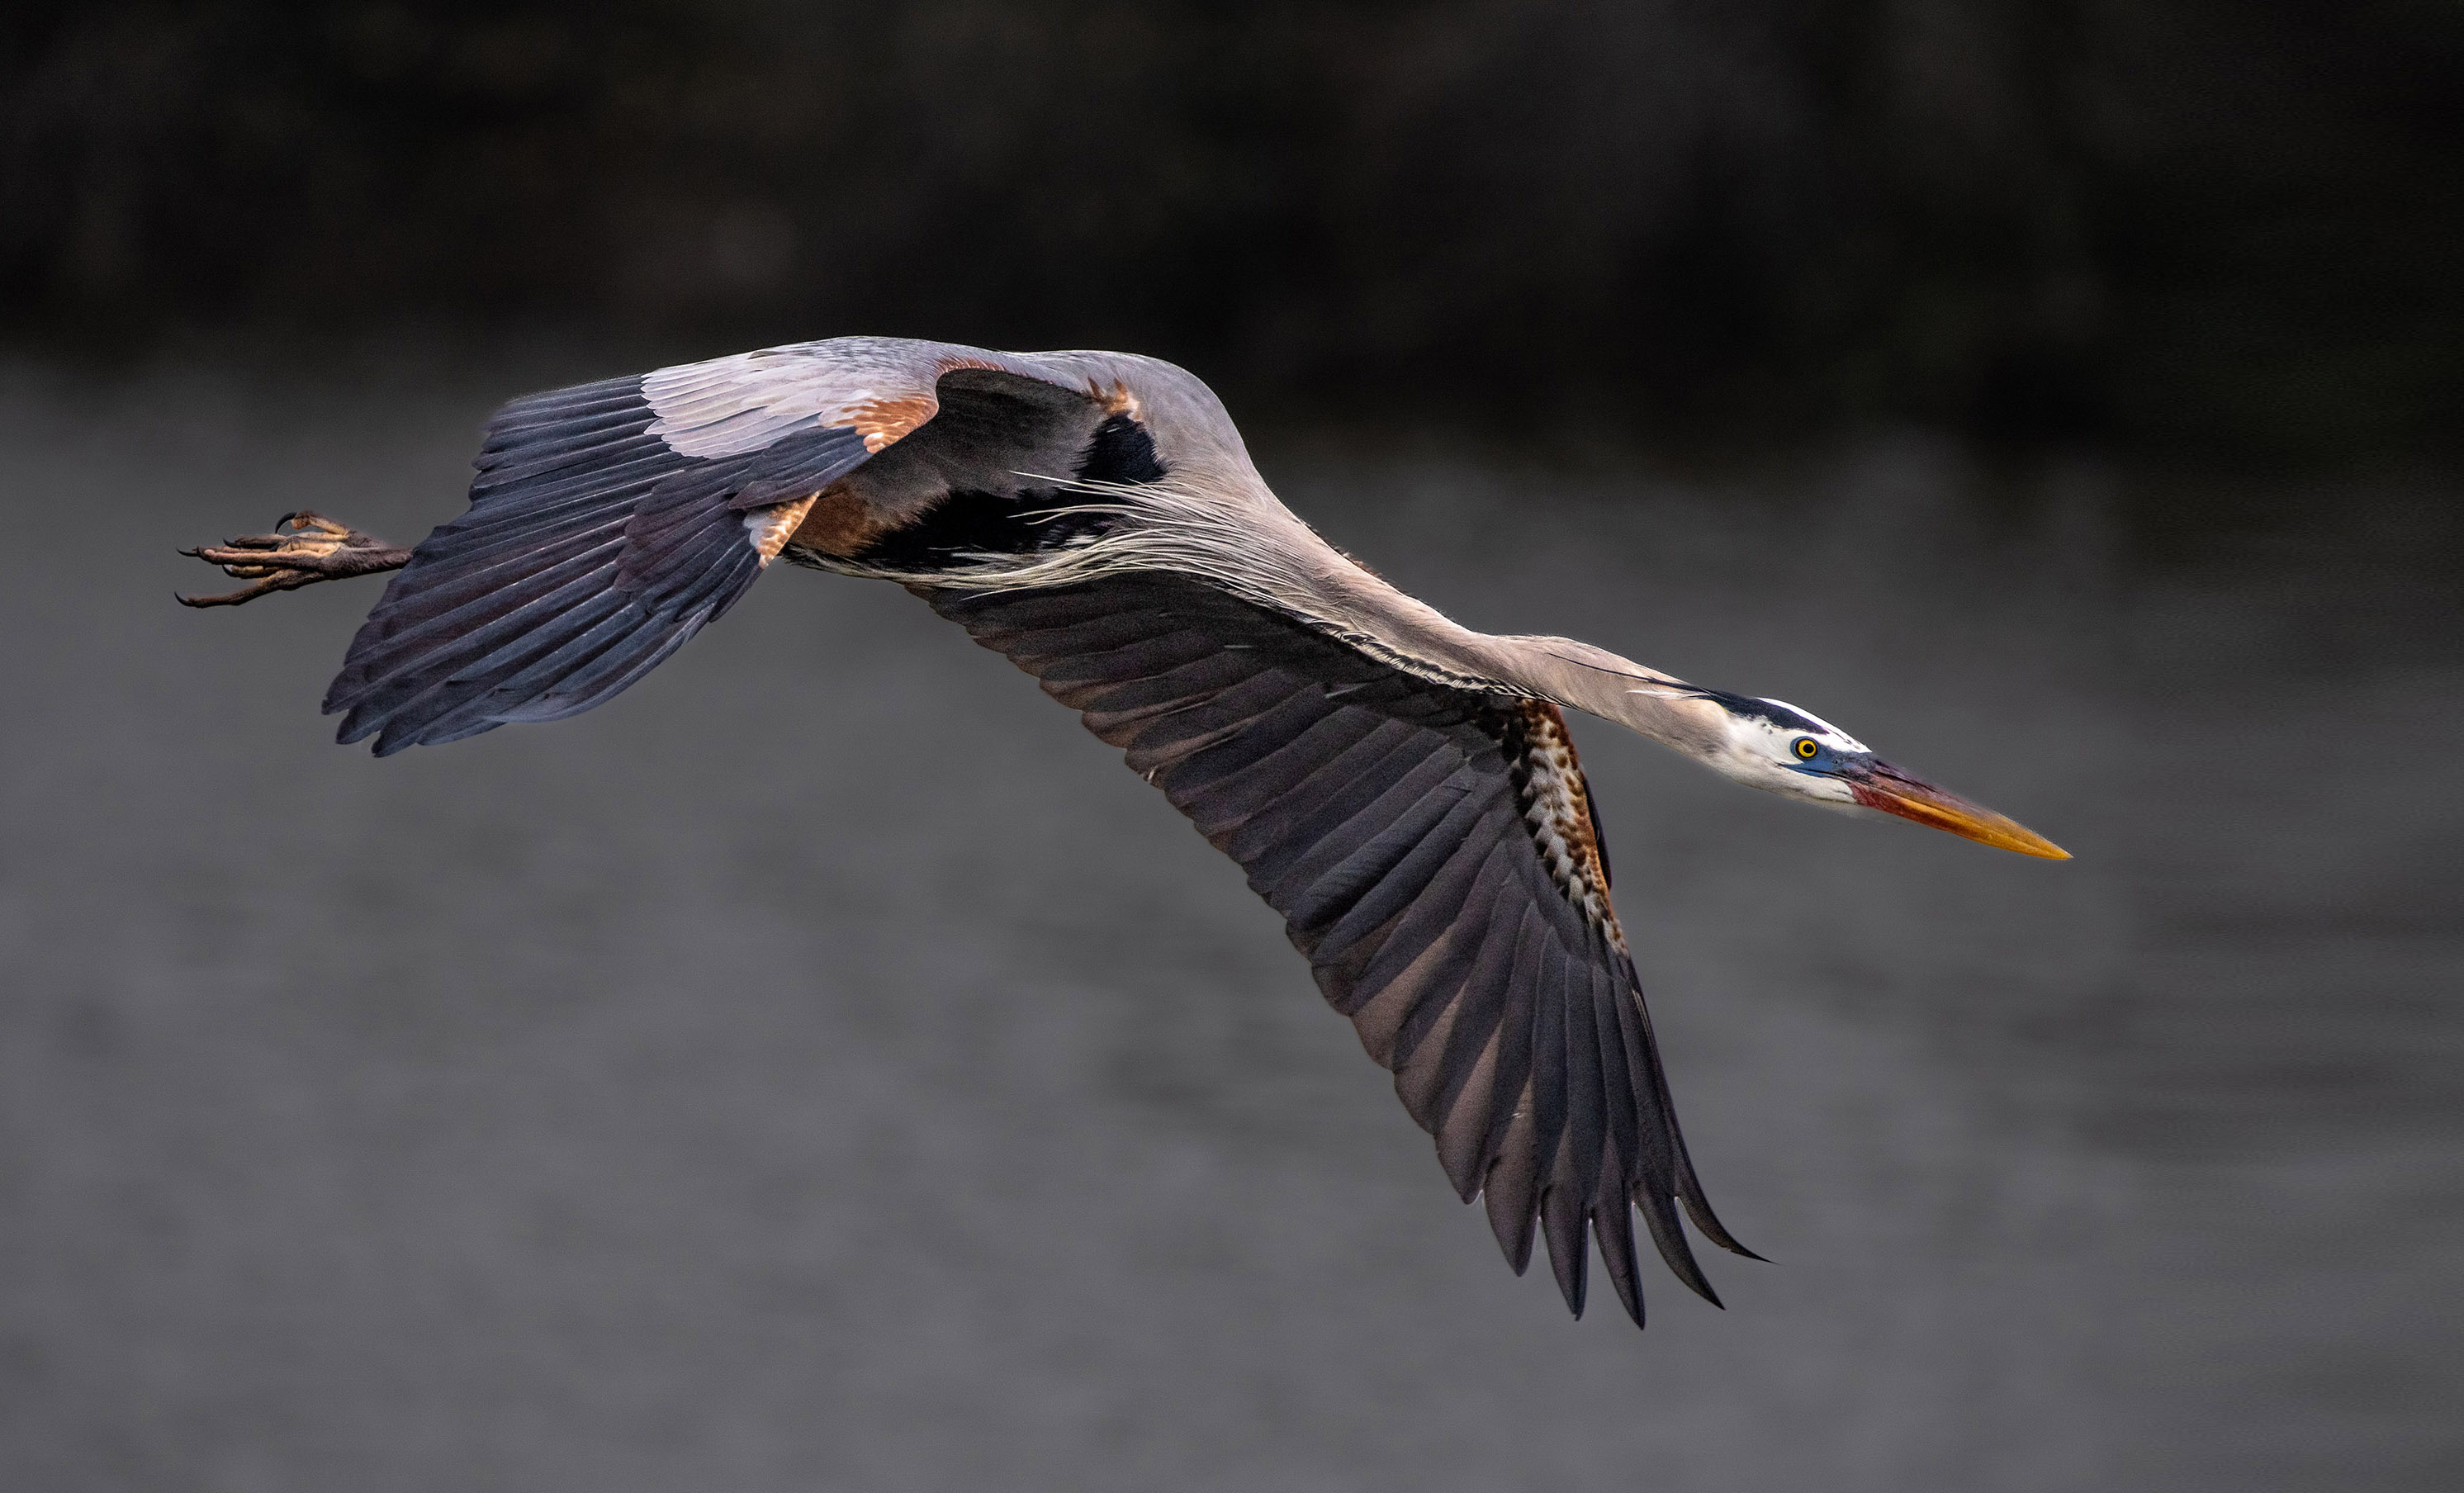
| 67 |
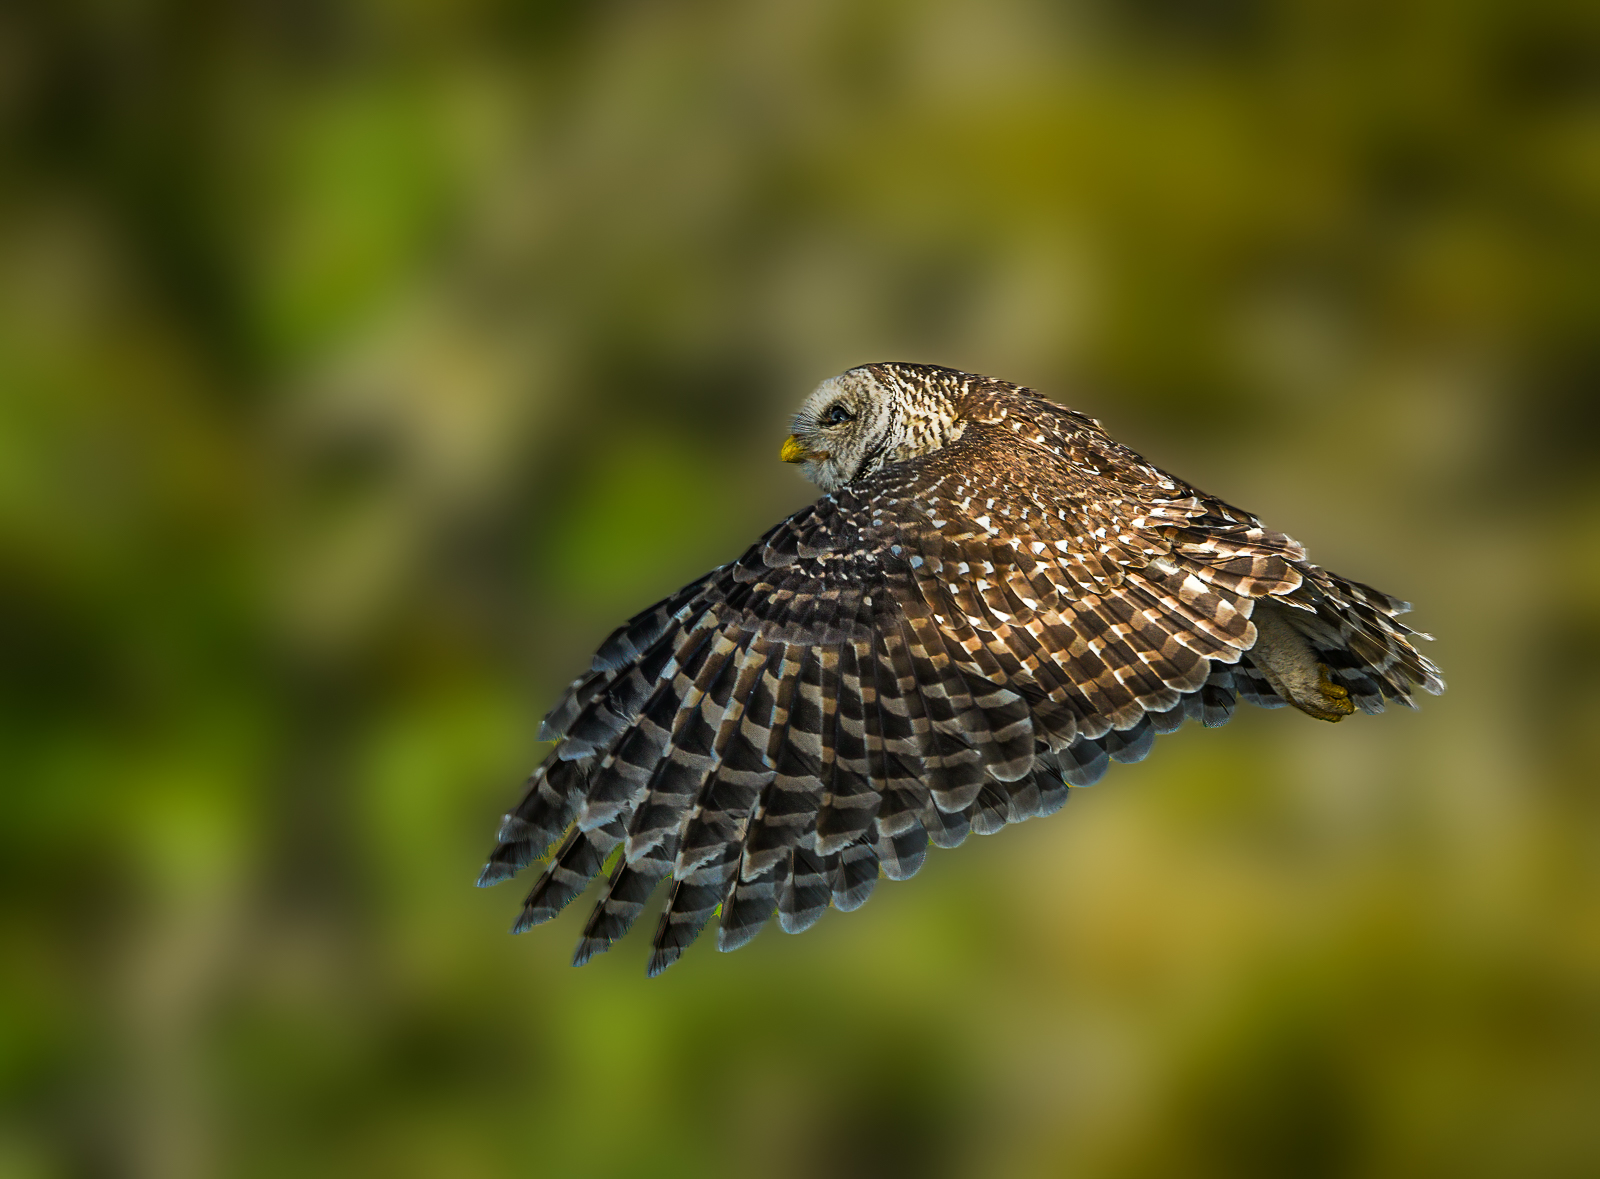
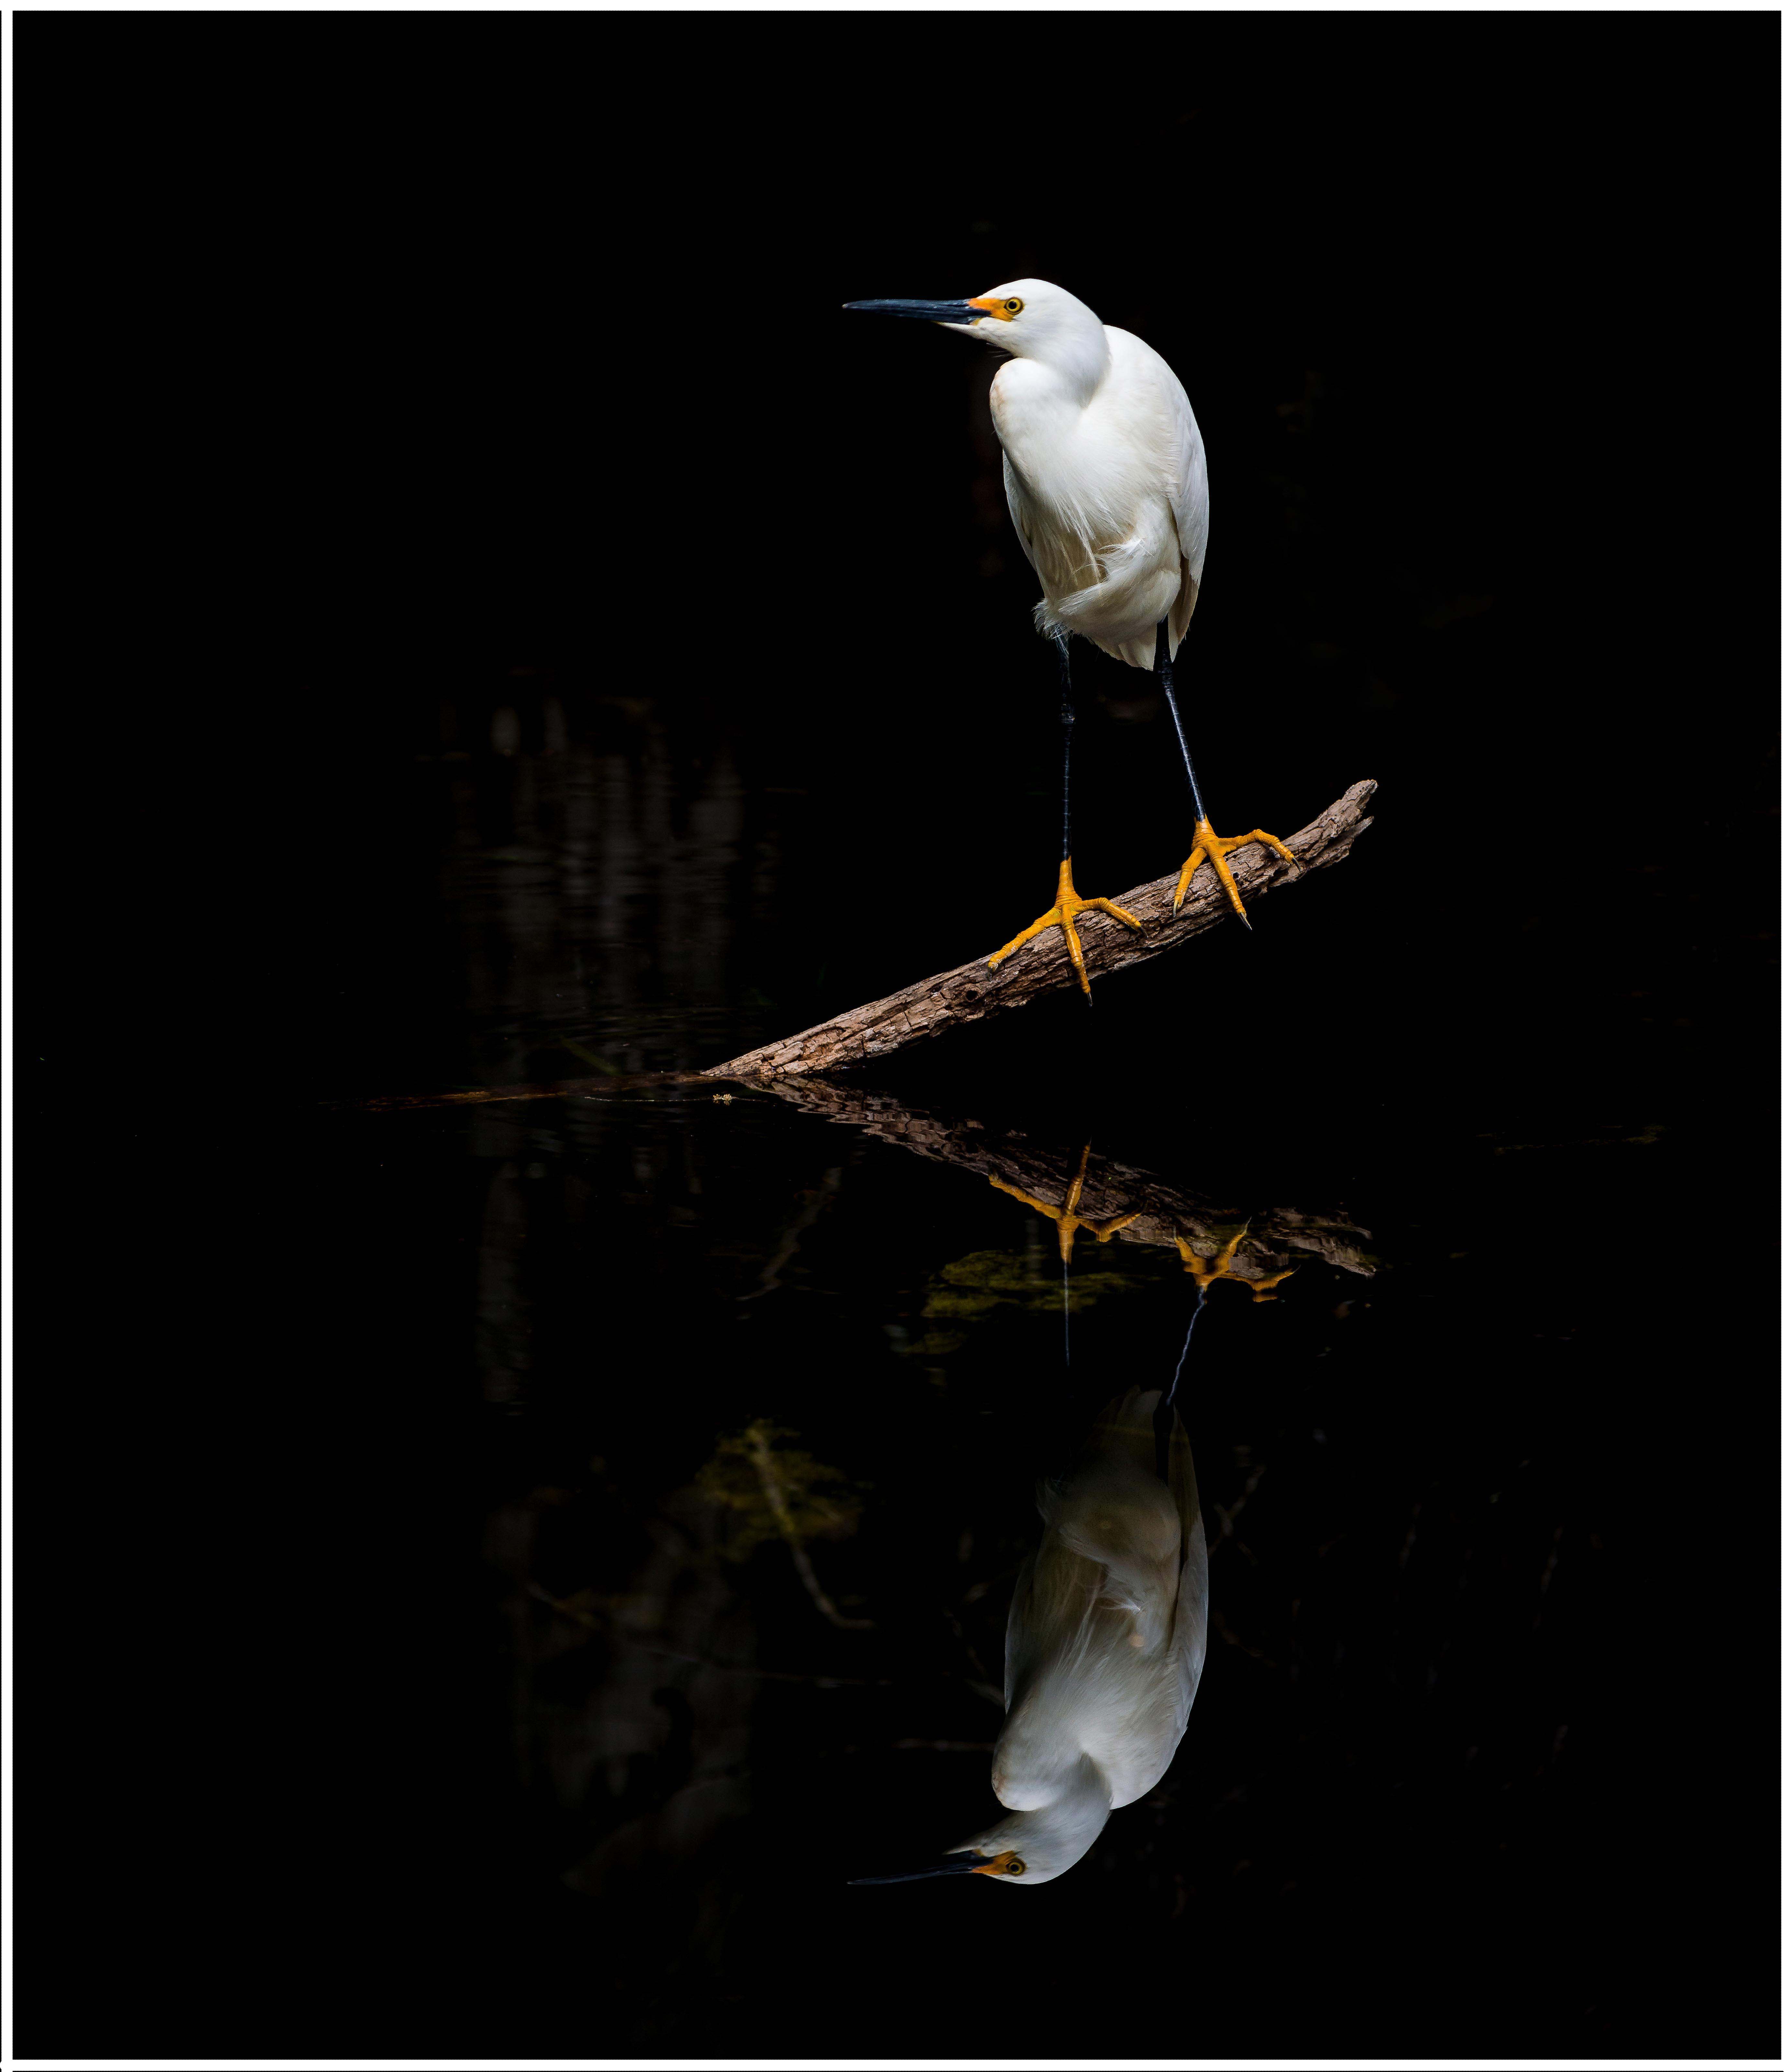
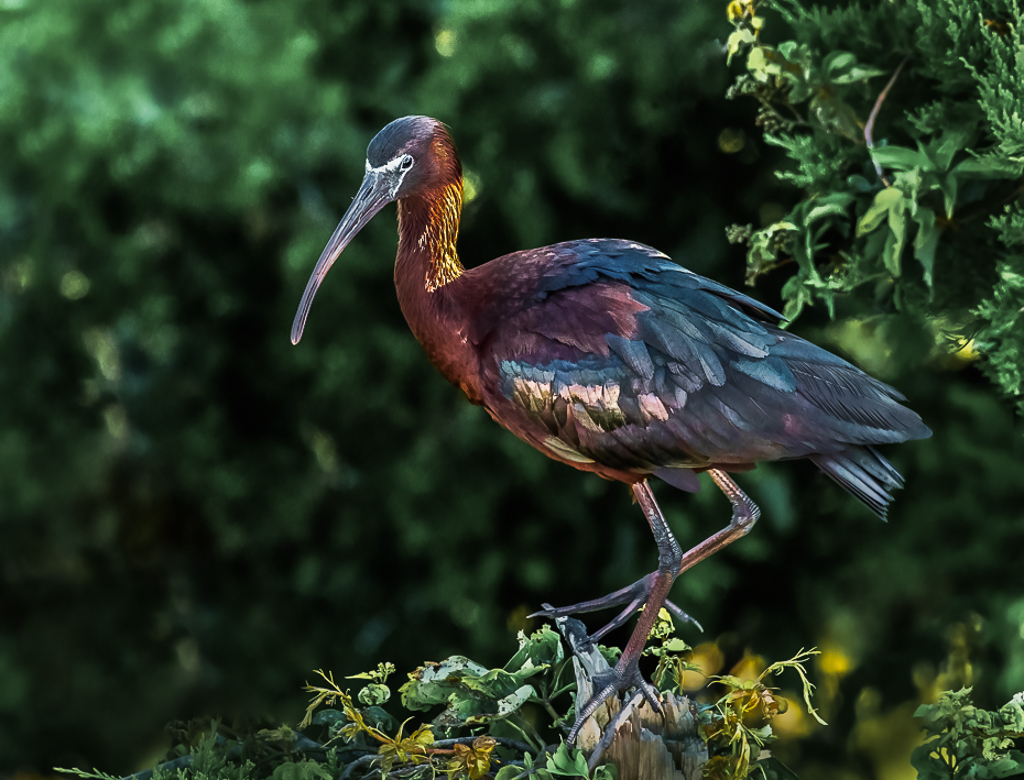
Jul 19 |
Comment |
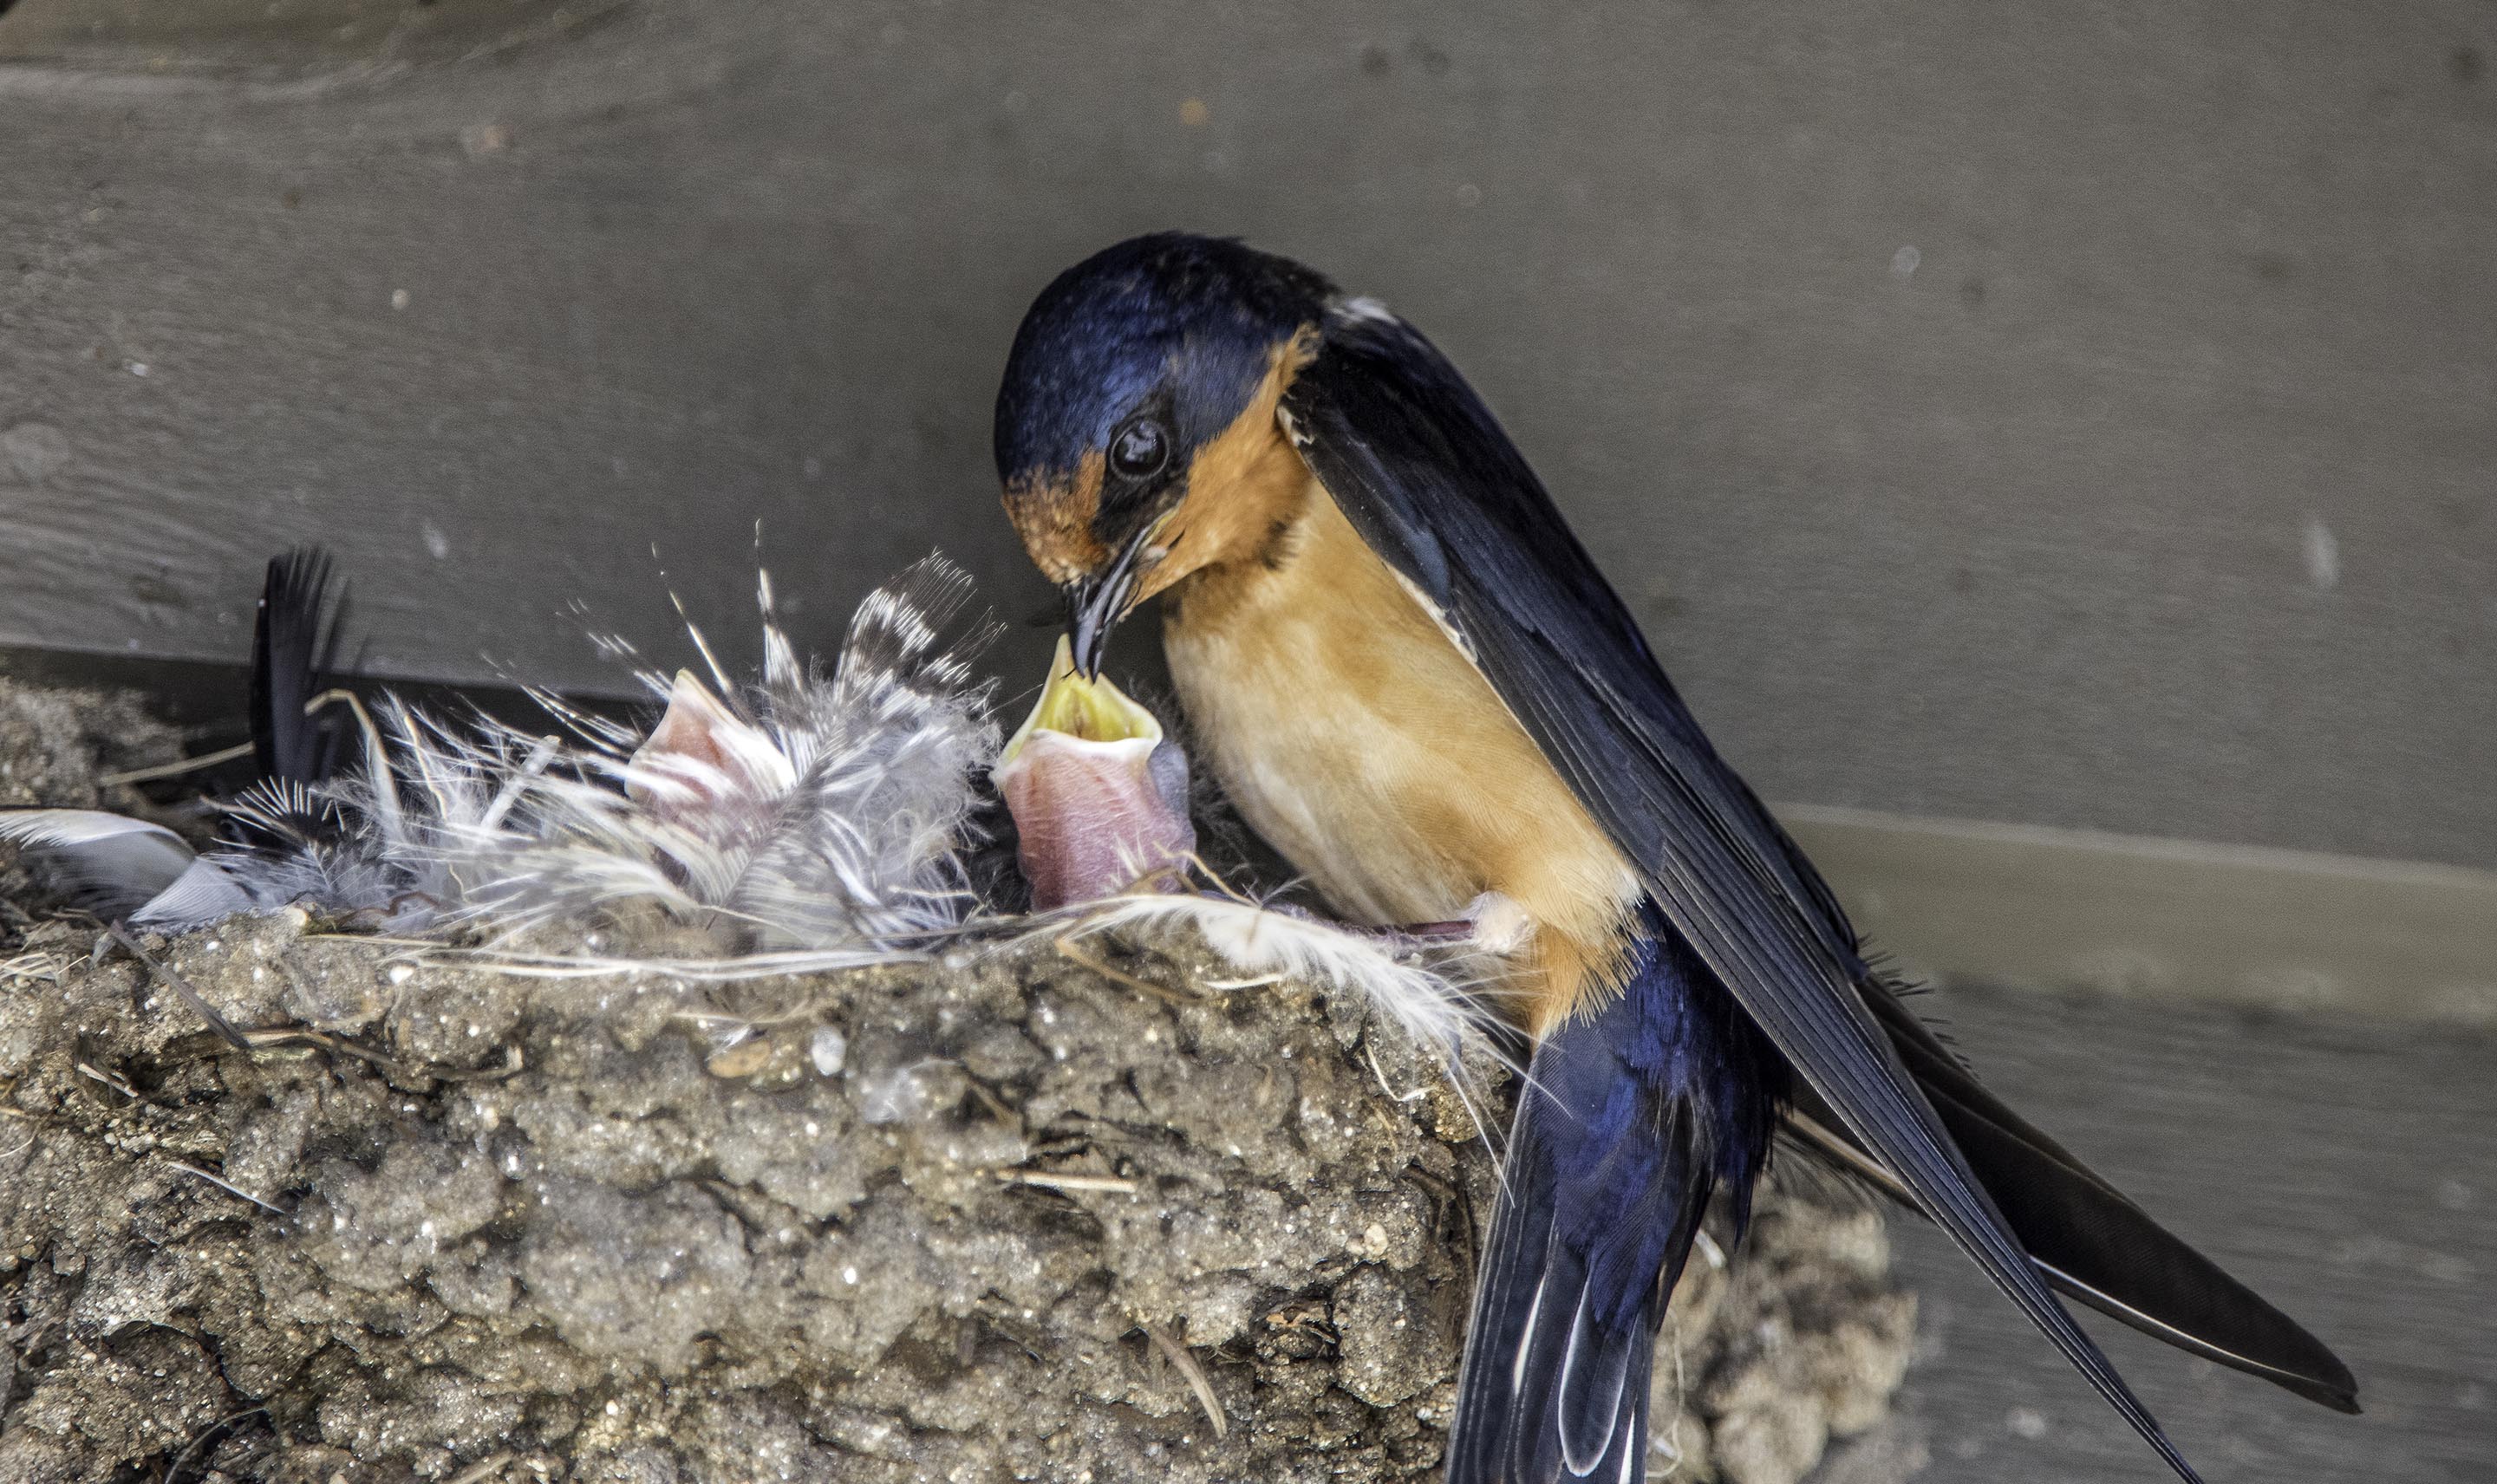
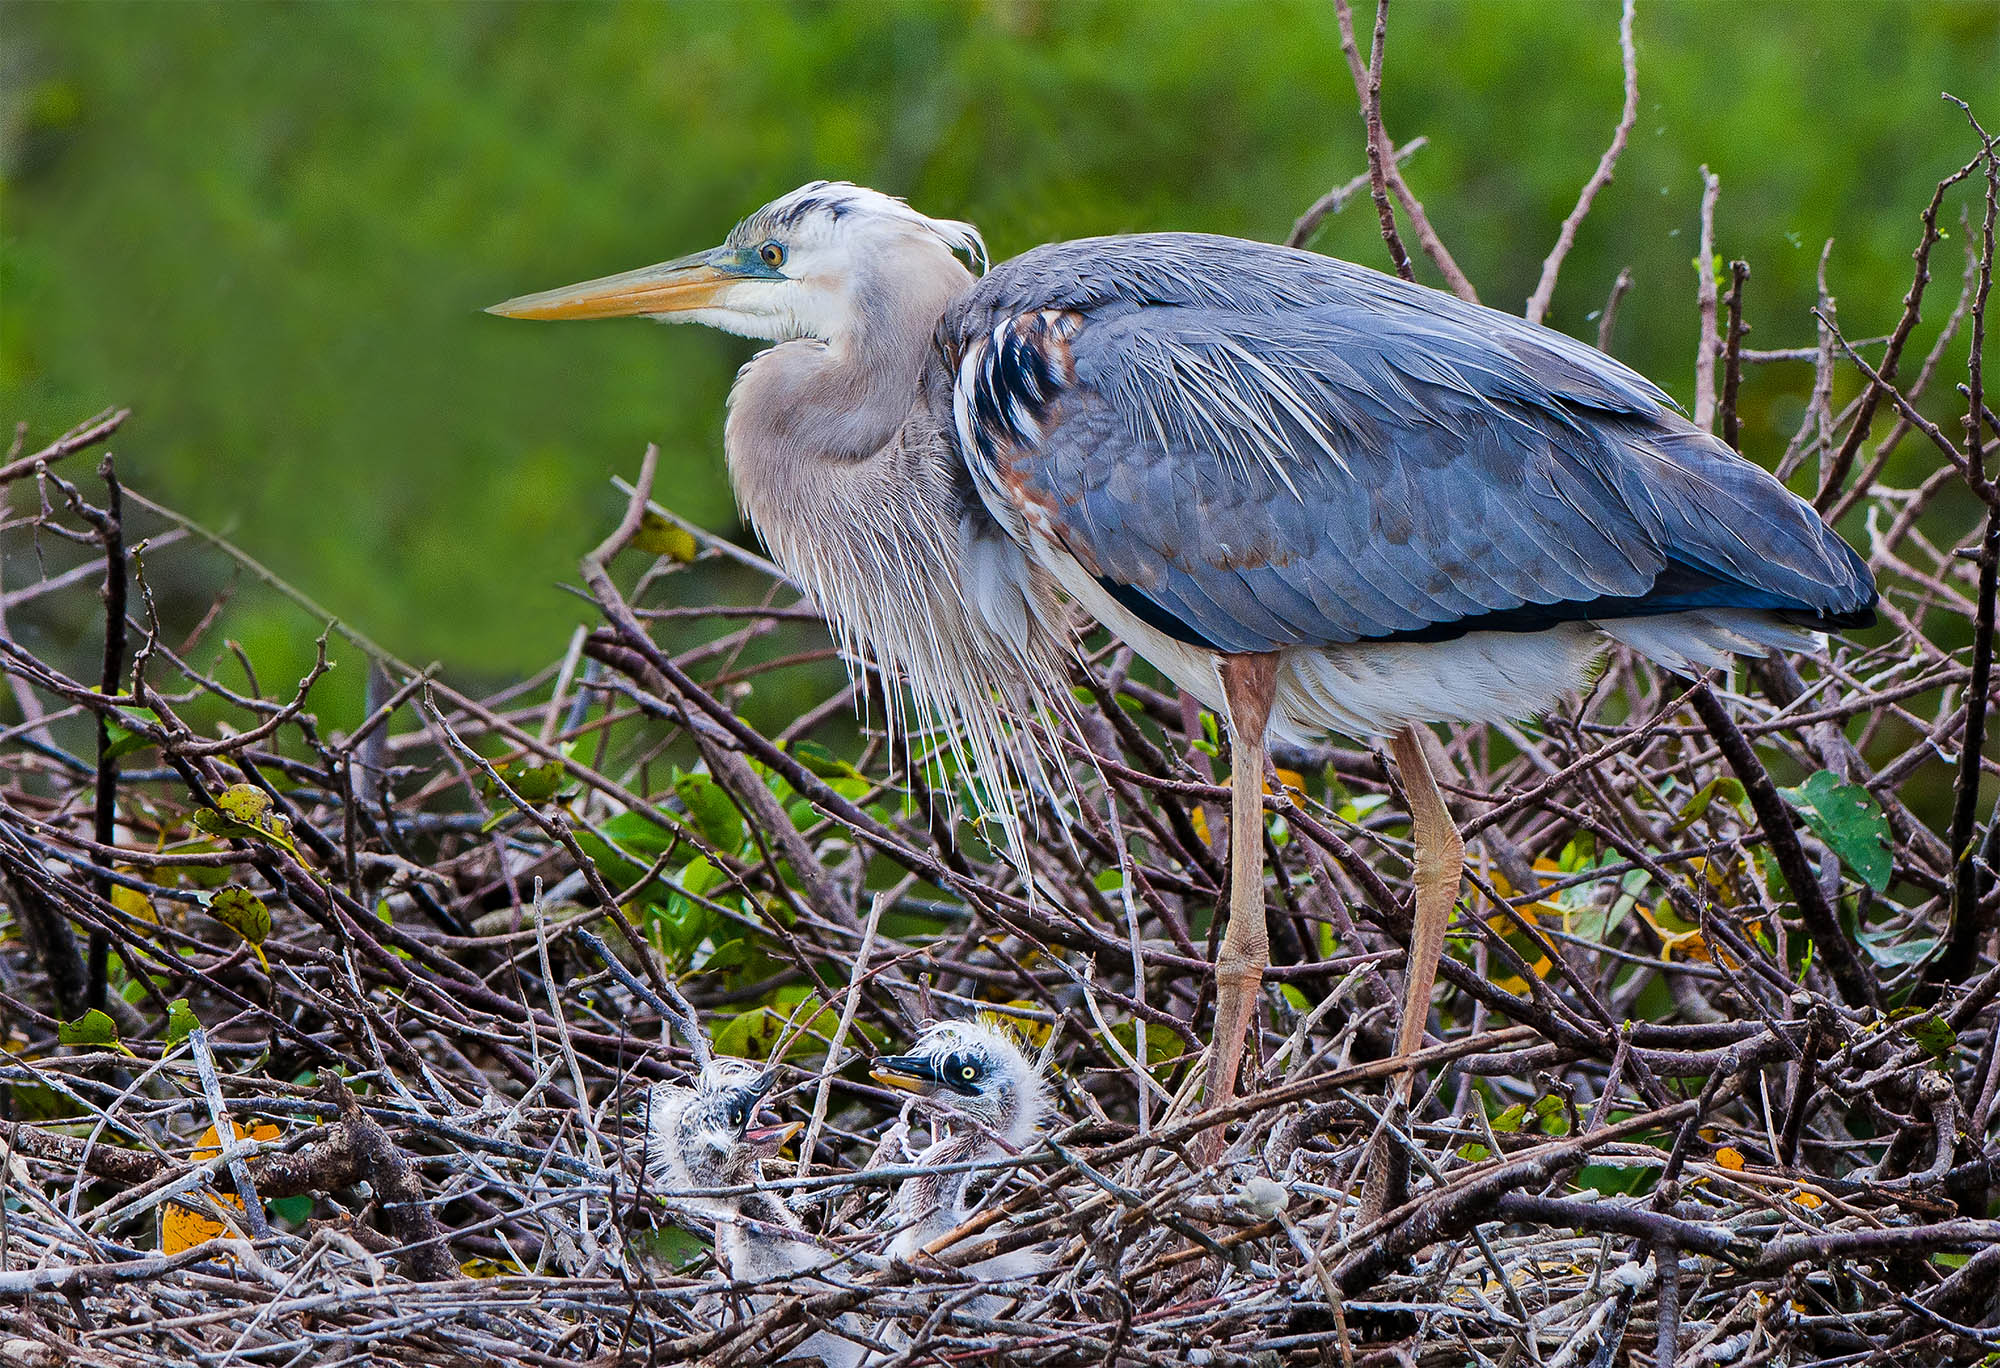
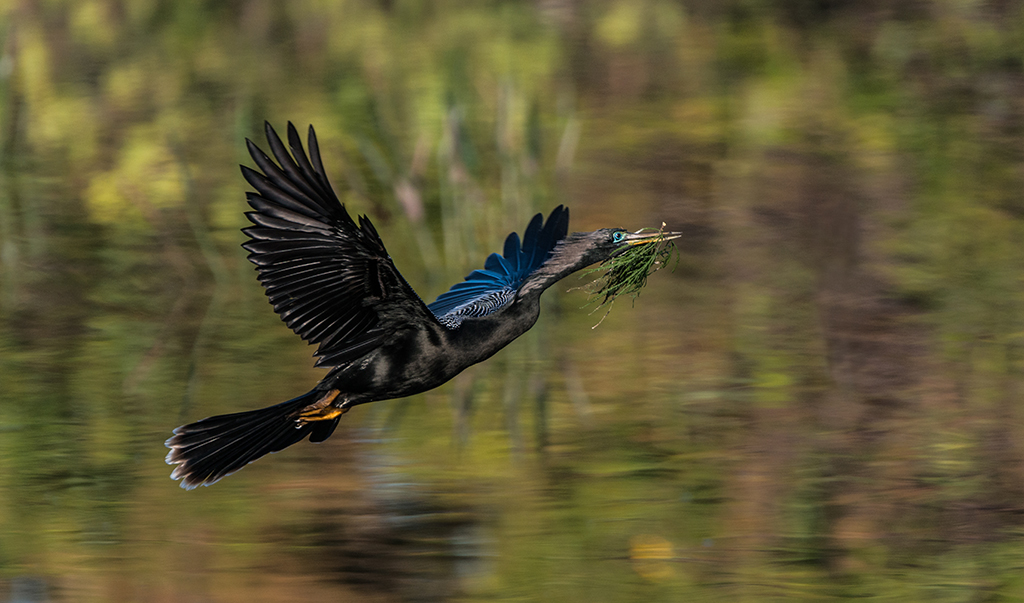
Pretty Bird! I think the Glossy Ibis is the best of the species and certainly the most colorful. You have a really interesting image of this bird. Although you shot this in a great deal of shadow you were able to recover quite a bit of detail in post.
Just for fun I made a few adjustments in Lightroom. I feel that in bringing the bird out of the shadows you actually over exposed him a bit. Thus I used the adjustment brush to darken the bill, kill the highlights in the feathers on his back, and bring down the brightness on his legs.
I used the masking tool under sharpness to reduce noise and sharpness in the background. I then added noise reduction to the feathers and also sharpened them. Finally, I reduced the luminance of the greens which brought out the bird a bit and also cropped some bright leaves off the top and a bright yellow spot off the far left.
I had some time tonight and nothing else to do so I played with the image. Hope you don't mind. |
Jul 9th |
 |
| 67 |
Jul 19 |
Comment |
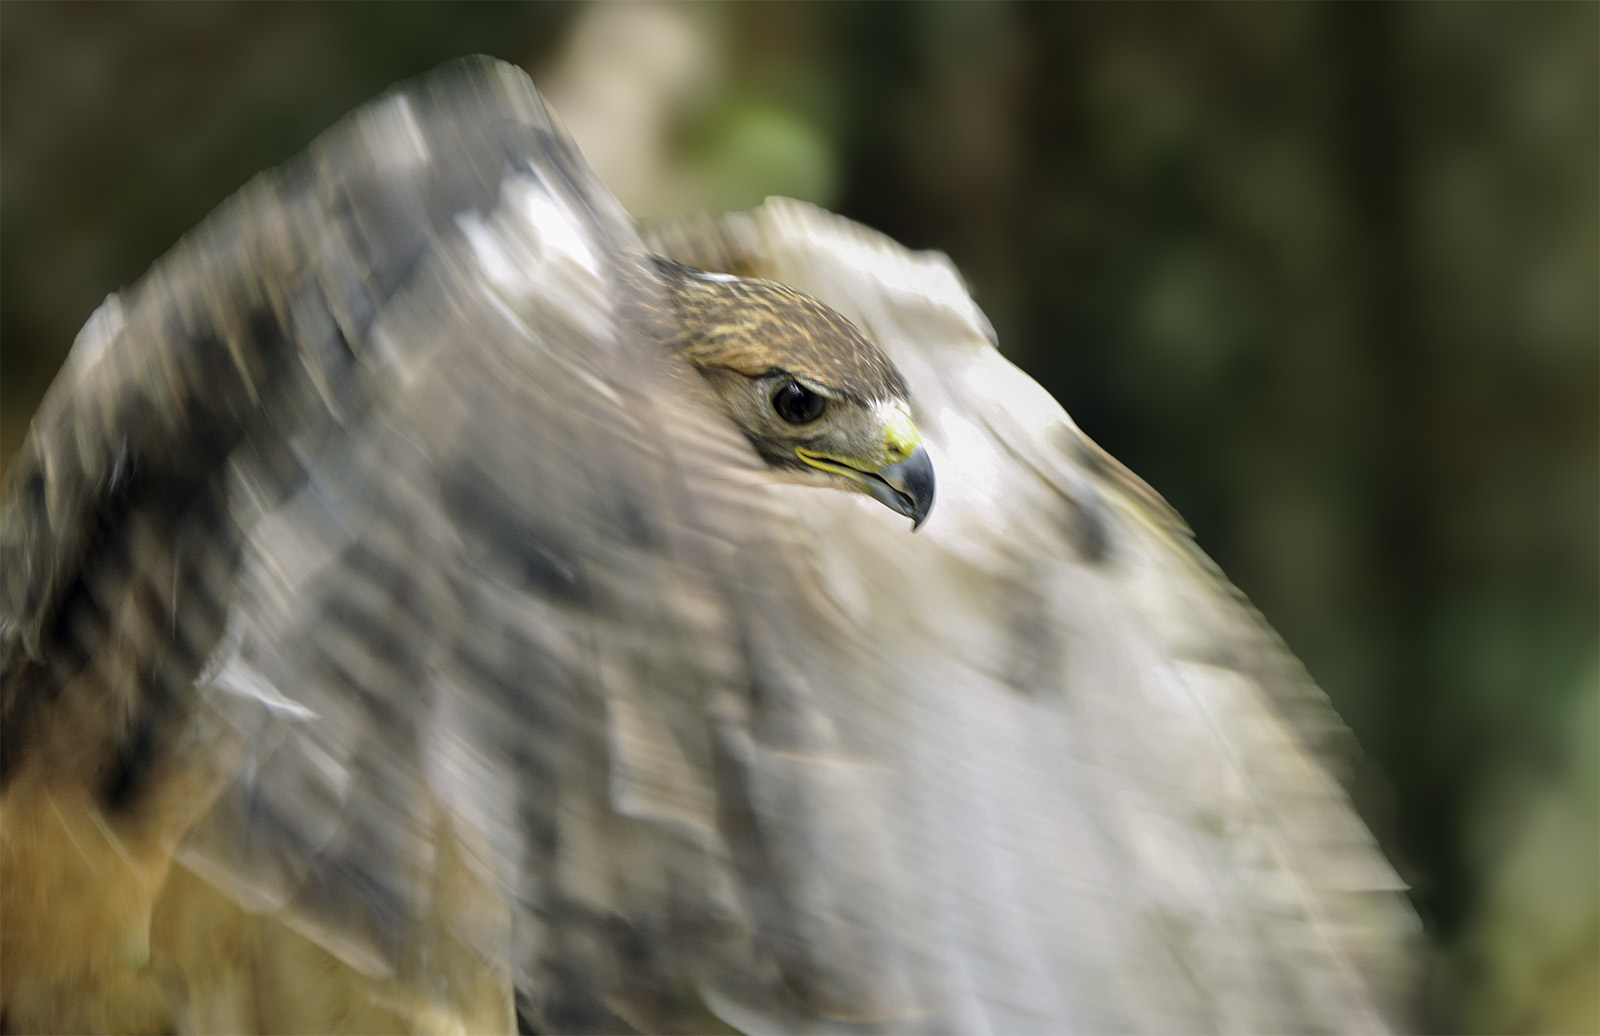
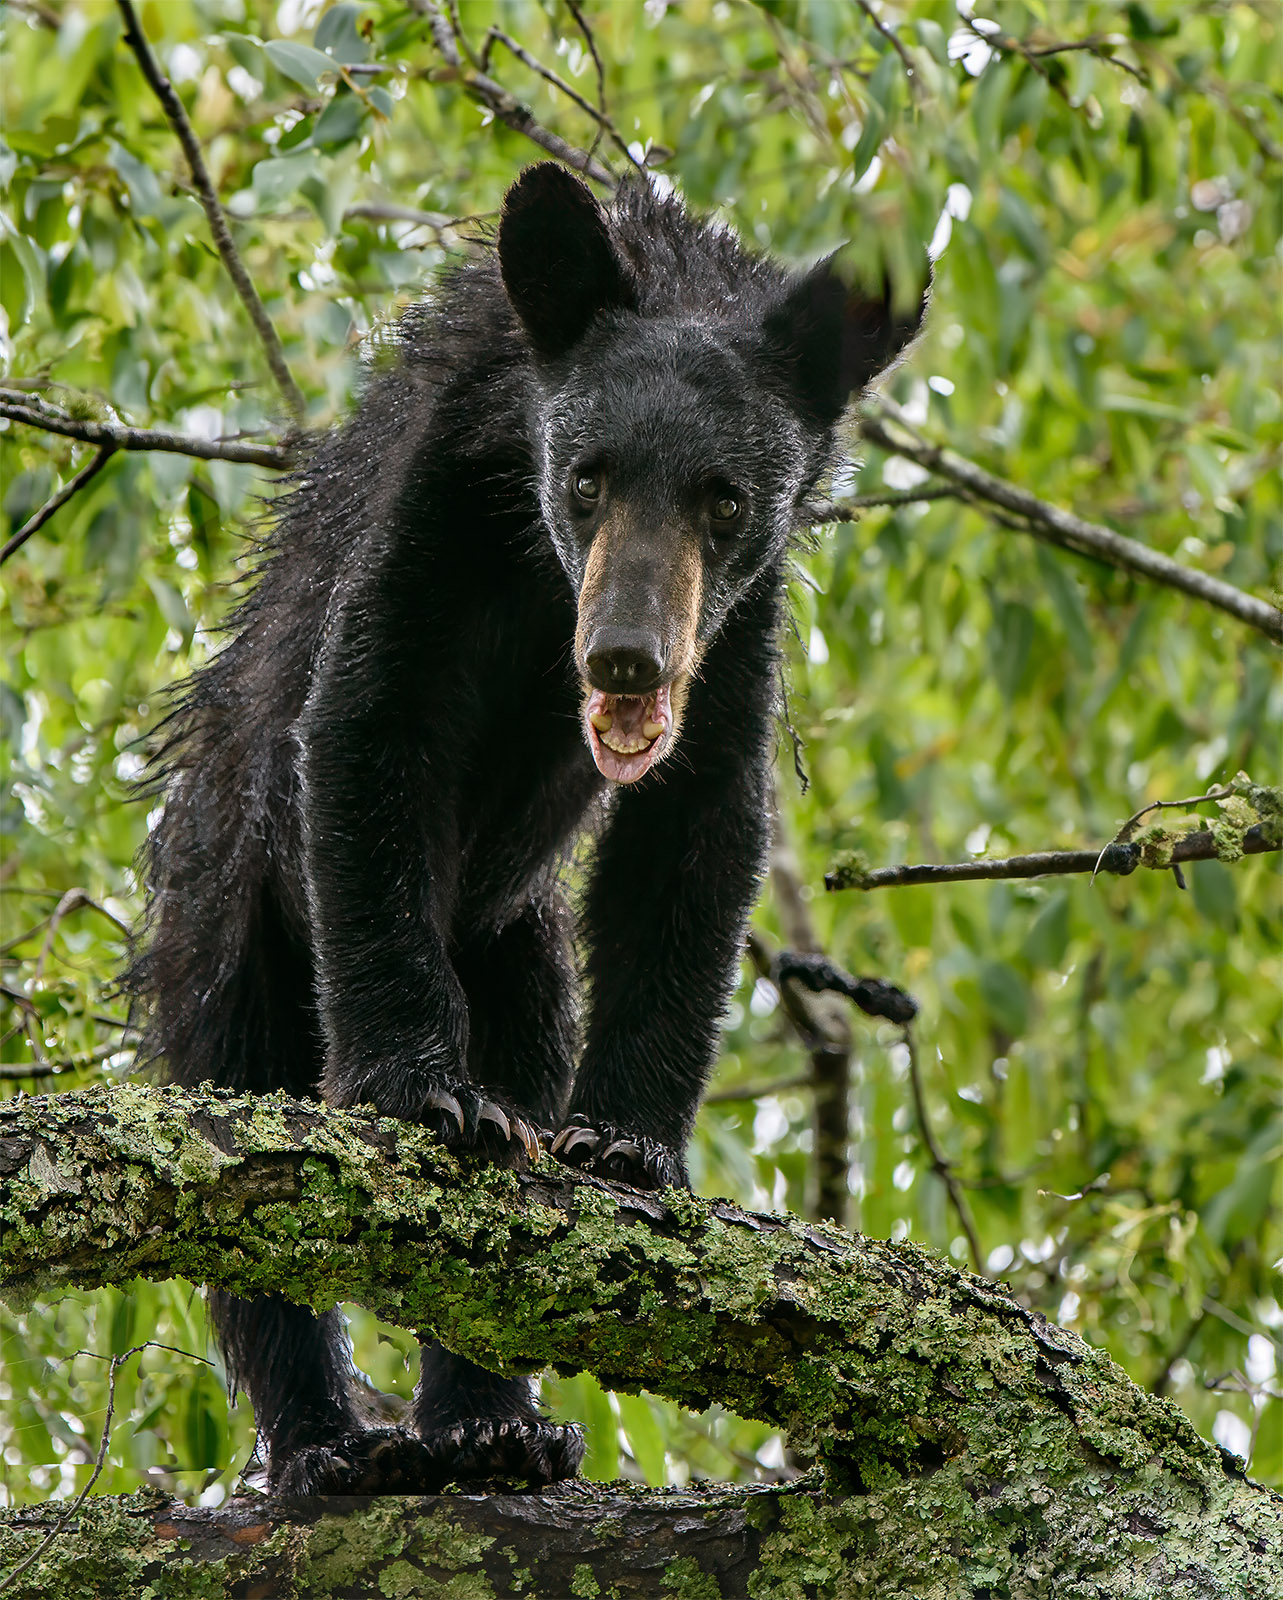
Bet this was an exciting image to capture. Since the image shows little cropping, even at 700mm you were still pretty close to the action.
The dynamics of the mother bear making a turn adds a great deal of motion and drama to the final image and sort of helps to off set the fact that she is dead center in the image. I'm wondering if you used single focus point or some sort of dynamic grouping. I ask because the bear's paw and the rock directly under her nose seem to be the sharpest part of the image.
I would like to offer two suggestions. First, the cub is slightly out of focus as he is behind the sow and at 700mm the DOF is a problem. The cub is also sort of jammed into the upper left corner. I would have liked to see a bit of breathing space above the cub (note the ears and part of the back are cut off). Second, i would crop the brown twigs in the upper right corner (or use content aware in Photoshop to remove them). If you crop off the right side, it will move the sow toward the right side focal points and create a stronger image.
Overall this is an exciting image. |
Jul 9th |
| 67 |
Jul 19 |
Comment |
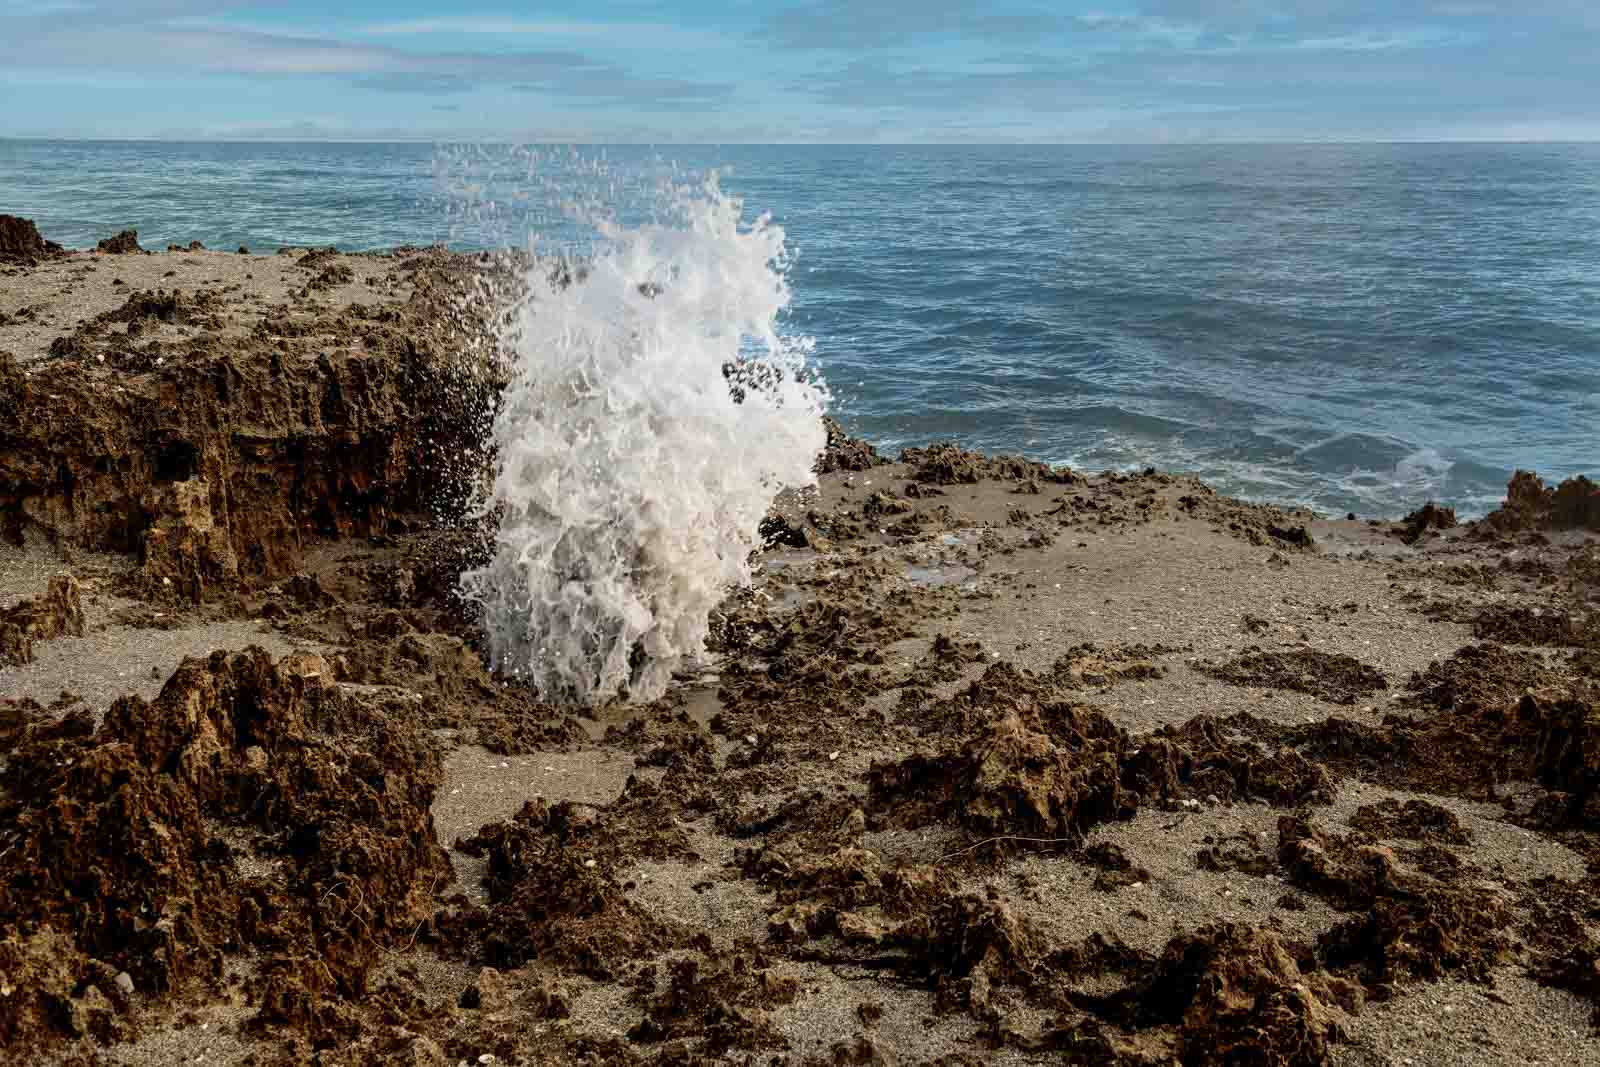
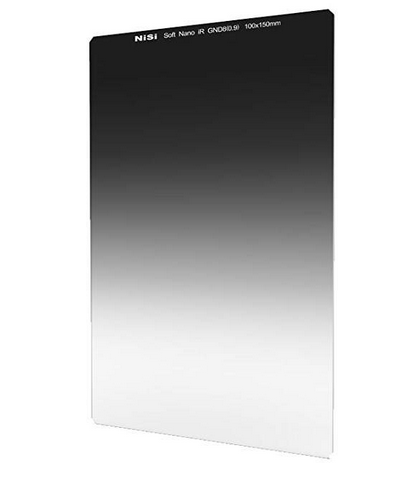
You have the makings of a stunning image with the colors in the sky and the contrast and textures in the clouds. I have a couple of suggestions that would he made this a great image. First you have two greatly over exposed areas, one in the center just above the mountains and then the one on the far right. The one on the right could be cropped out and thus remove that very bright area that draws the eye. But there are two better ways of dealing with this. First in post processing you cannot recover areas that are totally burned out, but you CAN recover a great deal of detail from shadow areas. Thus, if you had UNDEREXPOSED the entire image you could have saved some of the detail in the sky and and then just lightened the dark shadows in processing. You would be amazed at the amount of detail you can recover from shadows. A second method is to obtain a GRADUATED NEUTRAL DENSITY filter. I strongly suggest one like what you see in the attached image. If you are going to get just one (that is probably all you will need) get a 3 stop. I do not recommend the round screw on filters. Place the dark portion of the filter over the sky area and you will instantly darken the sky by three stops without changing the foreground. exposure. You will have to shoot in manual mode. So just meter the shot--note the settings then set those same setting in manual and then add the filter. I use a GND filter on 90% of my landscape images. The filter is a miracle worker. By the way, you could still use your polarizer and just add the GND on top. I often hand hold the GND in front of the lens.
Since your ISO was only set at 100, you could raise this to 320 and then raise your shutter speed to about 1/100 without impacting the image quality and then not have to worry about camera shake. Using a super wide angle lens like an 18mm you have an easy option for get great depth of field. With an 18mm lens you would reach infinity on your focus ring at about 12-15 feet as measured from the front of your lens. Thus, if you put nothing in the image that is closer to the camera than 15 feet everything from 15 feet to infinity would still be in focus. I know this is a really long response--sorry about that.
|
Jul 9th |
 |
| 67 |
Jul 19 |
Comment |
If you click on the photo it will enlarge to a super sized image (I don't know why it is so large this month) But in the enlargement you can see just how tack sharp this image actually is. The detail is really amazing. |
Jul 6th |
| 67 |
Jul 19 |
Comment |
Just playing around with the image. May give it another look later. Note, I like drama...
|
Jul 5th |
 |
14 comments - 13 replies for Group 67
|
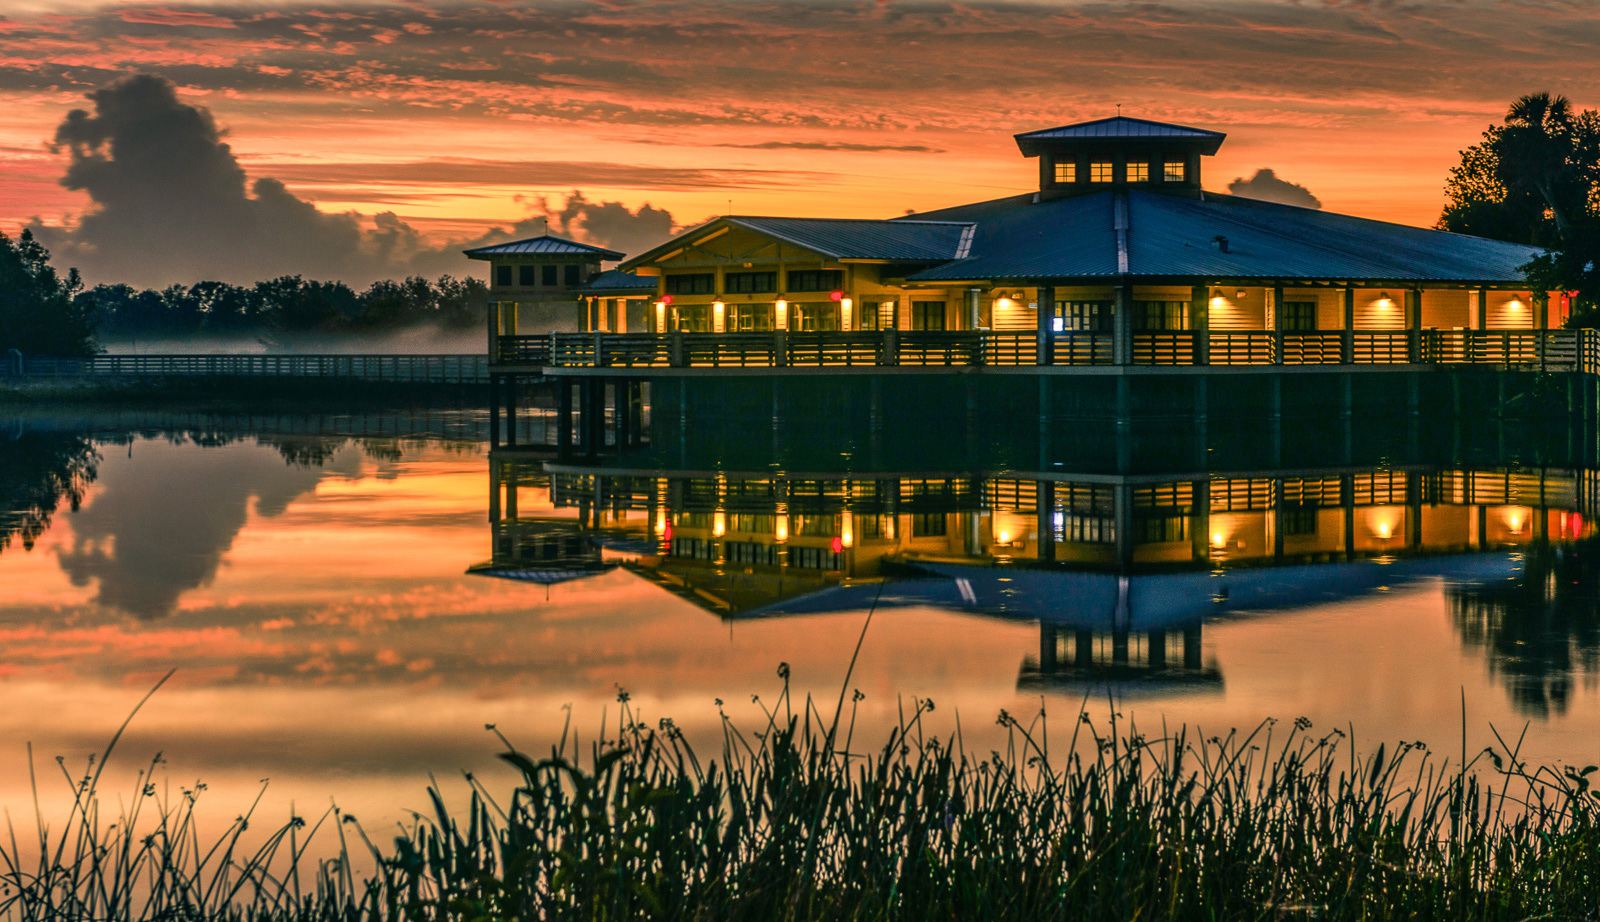
| 69 |
Jul 19 |
Comment |
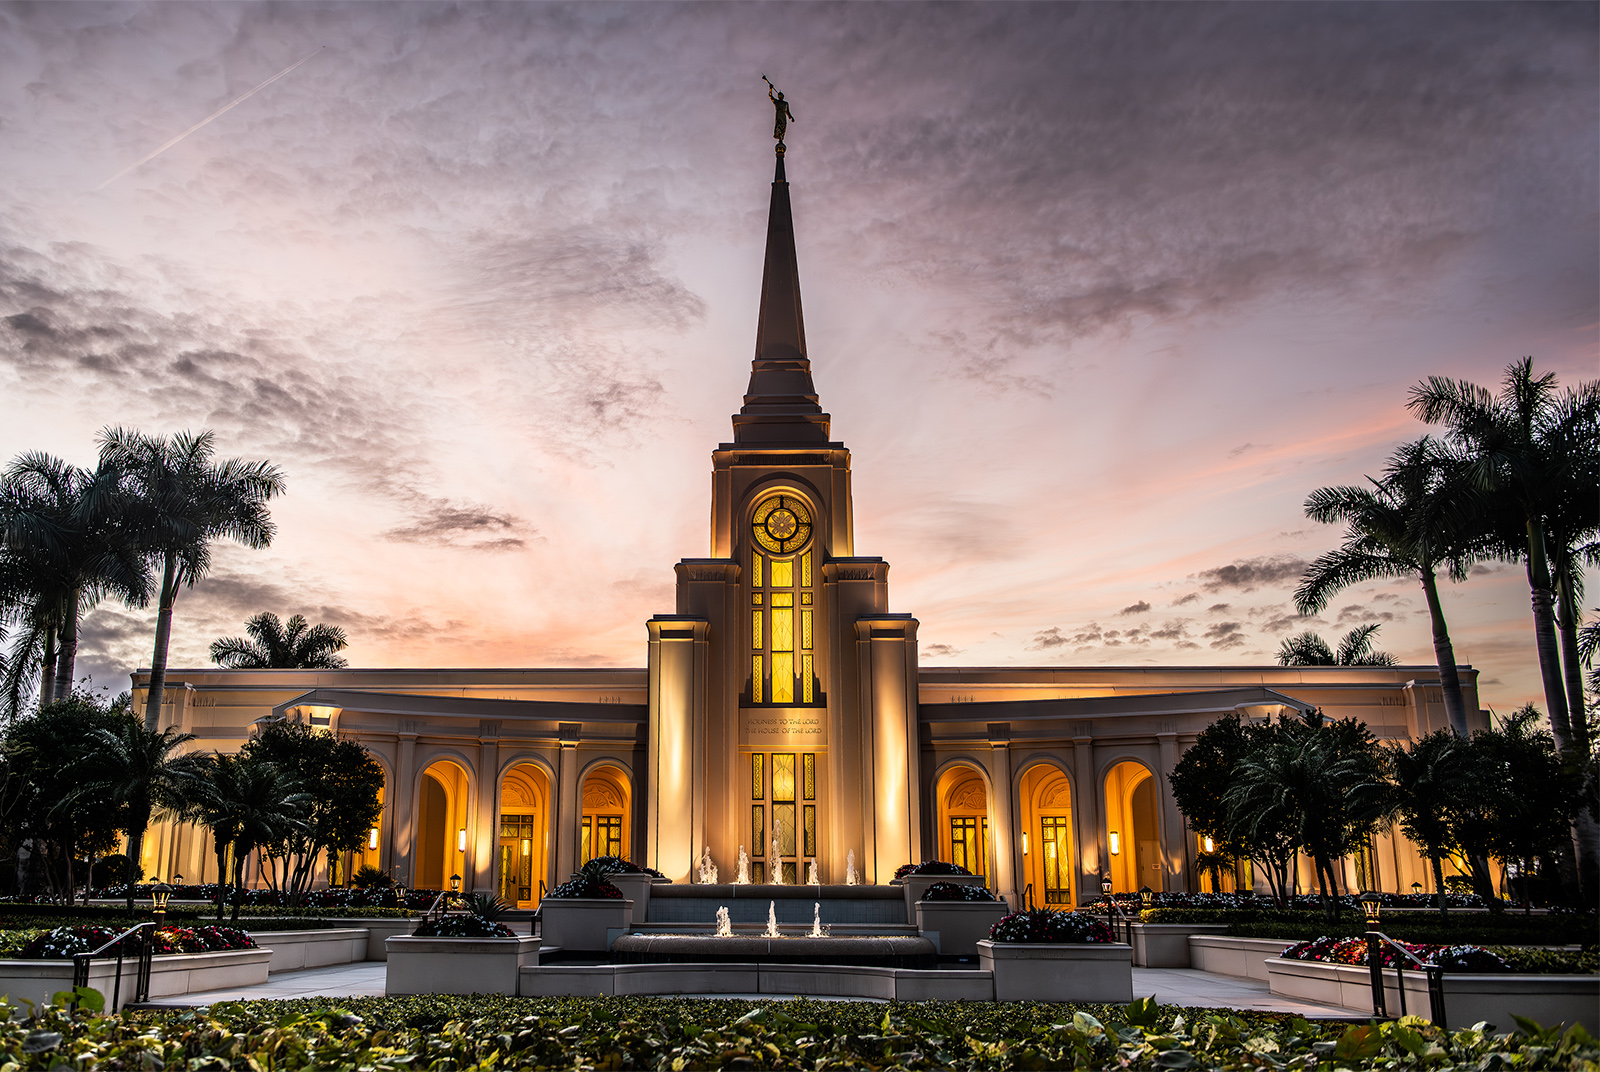
Right place, right time, and of course--you have the perfect touch. Hope I see this in September! |
Jul 28th |
1 comment - 0 replies for Group 69
|
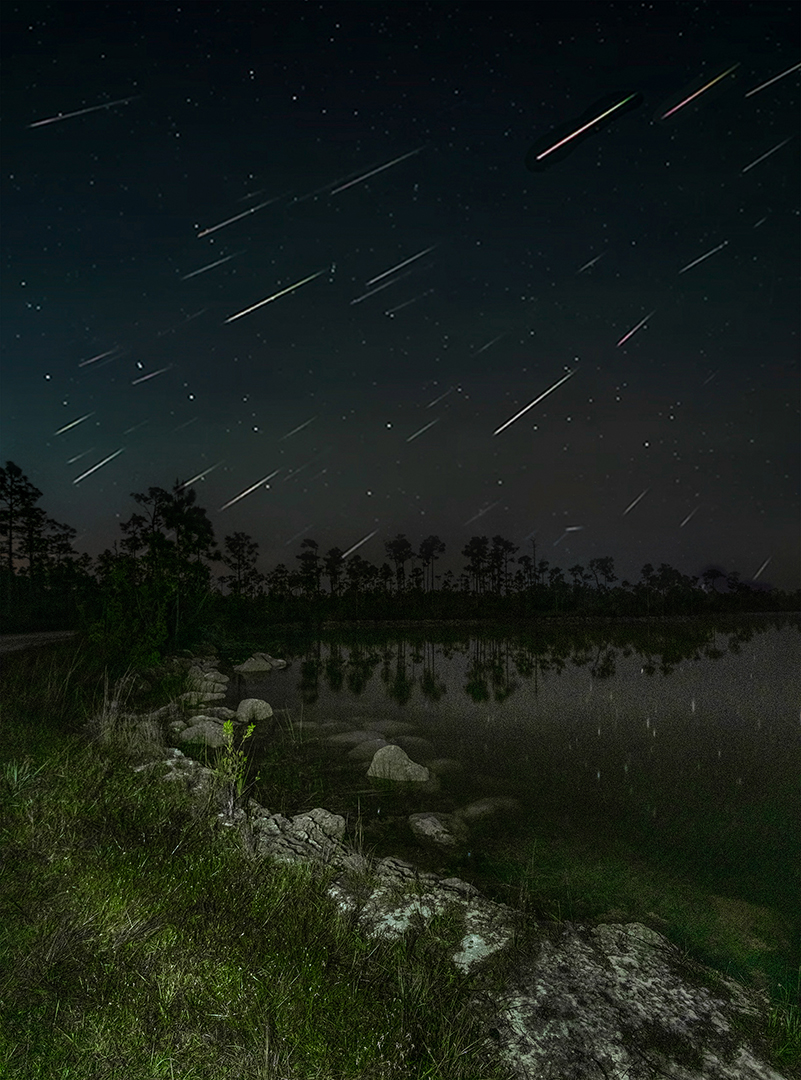
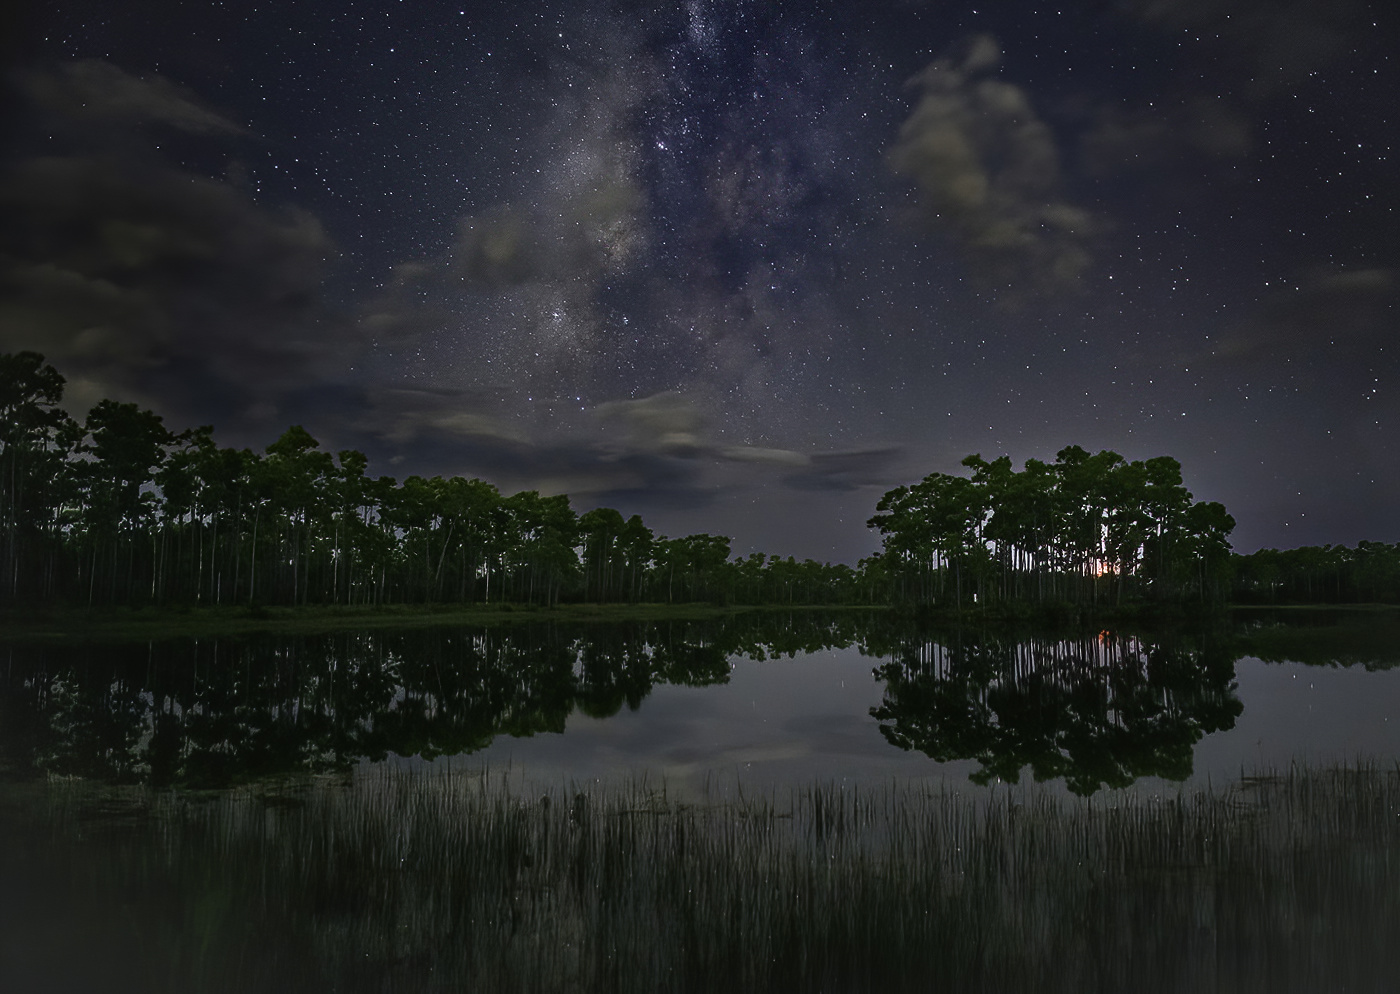
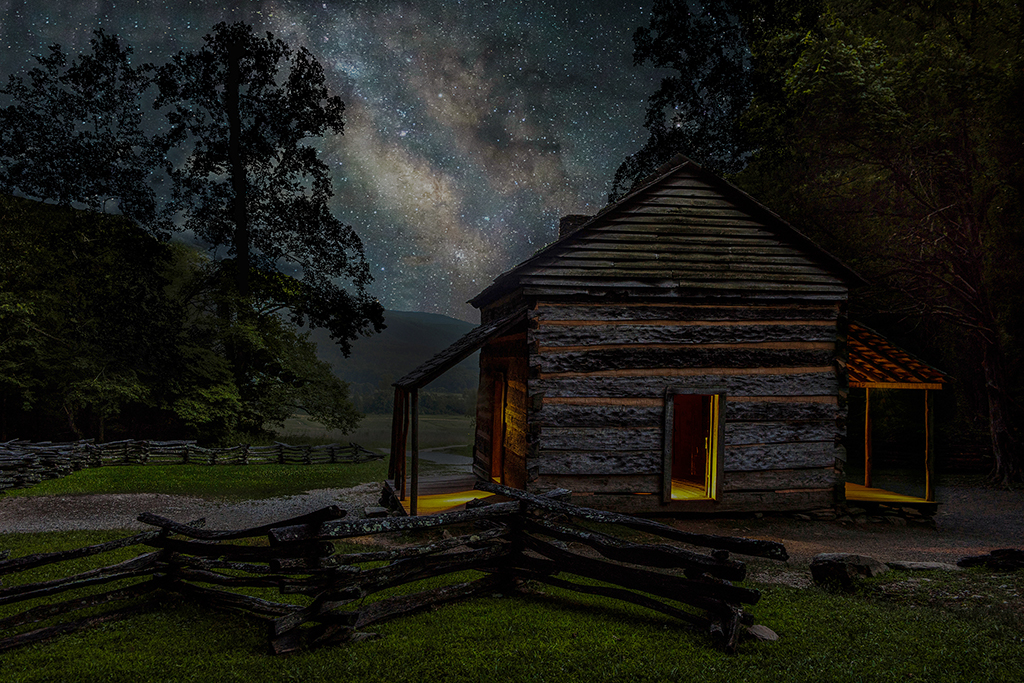
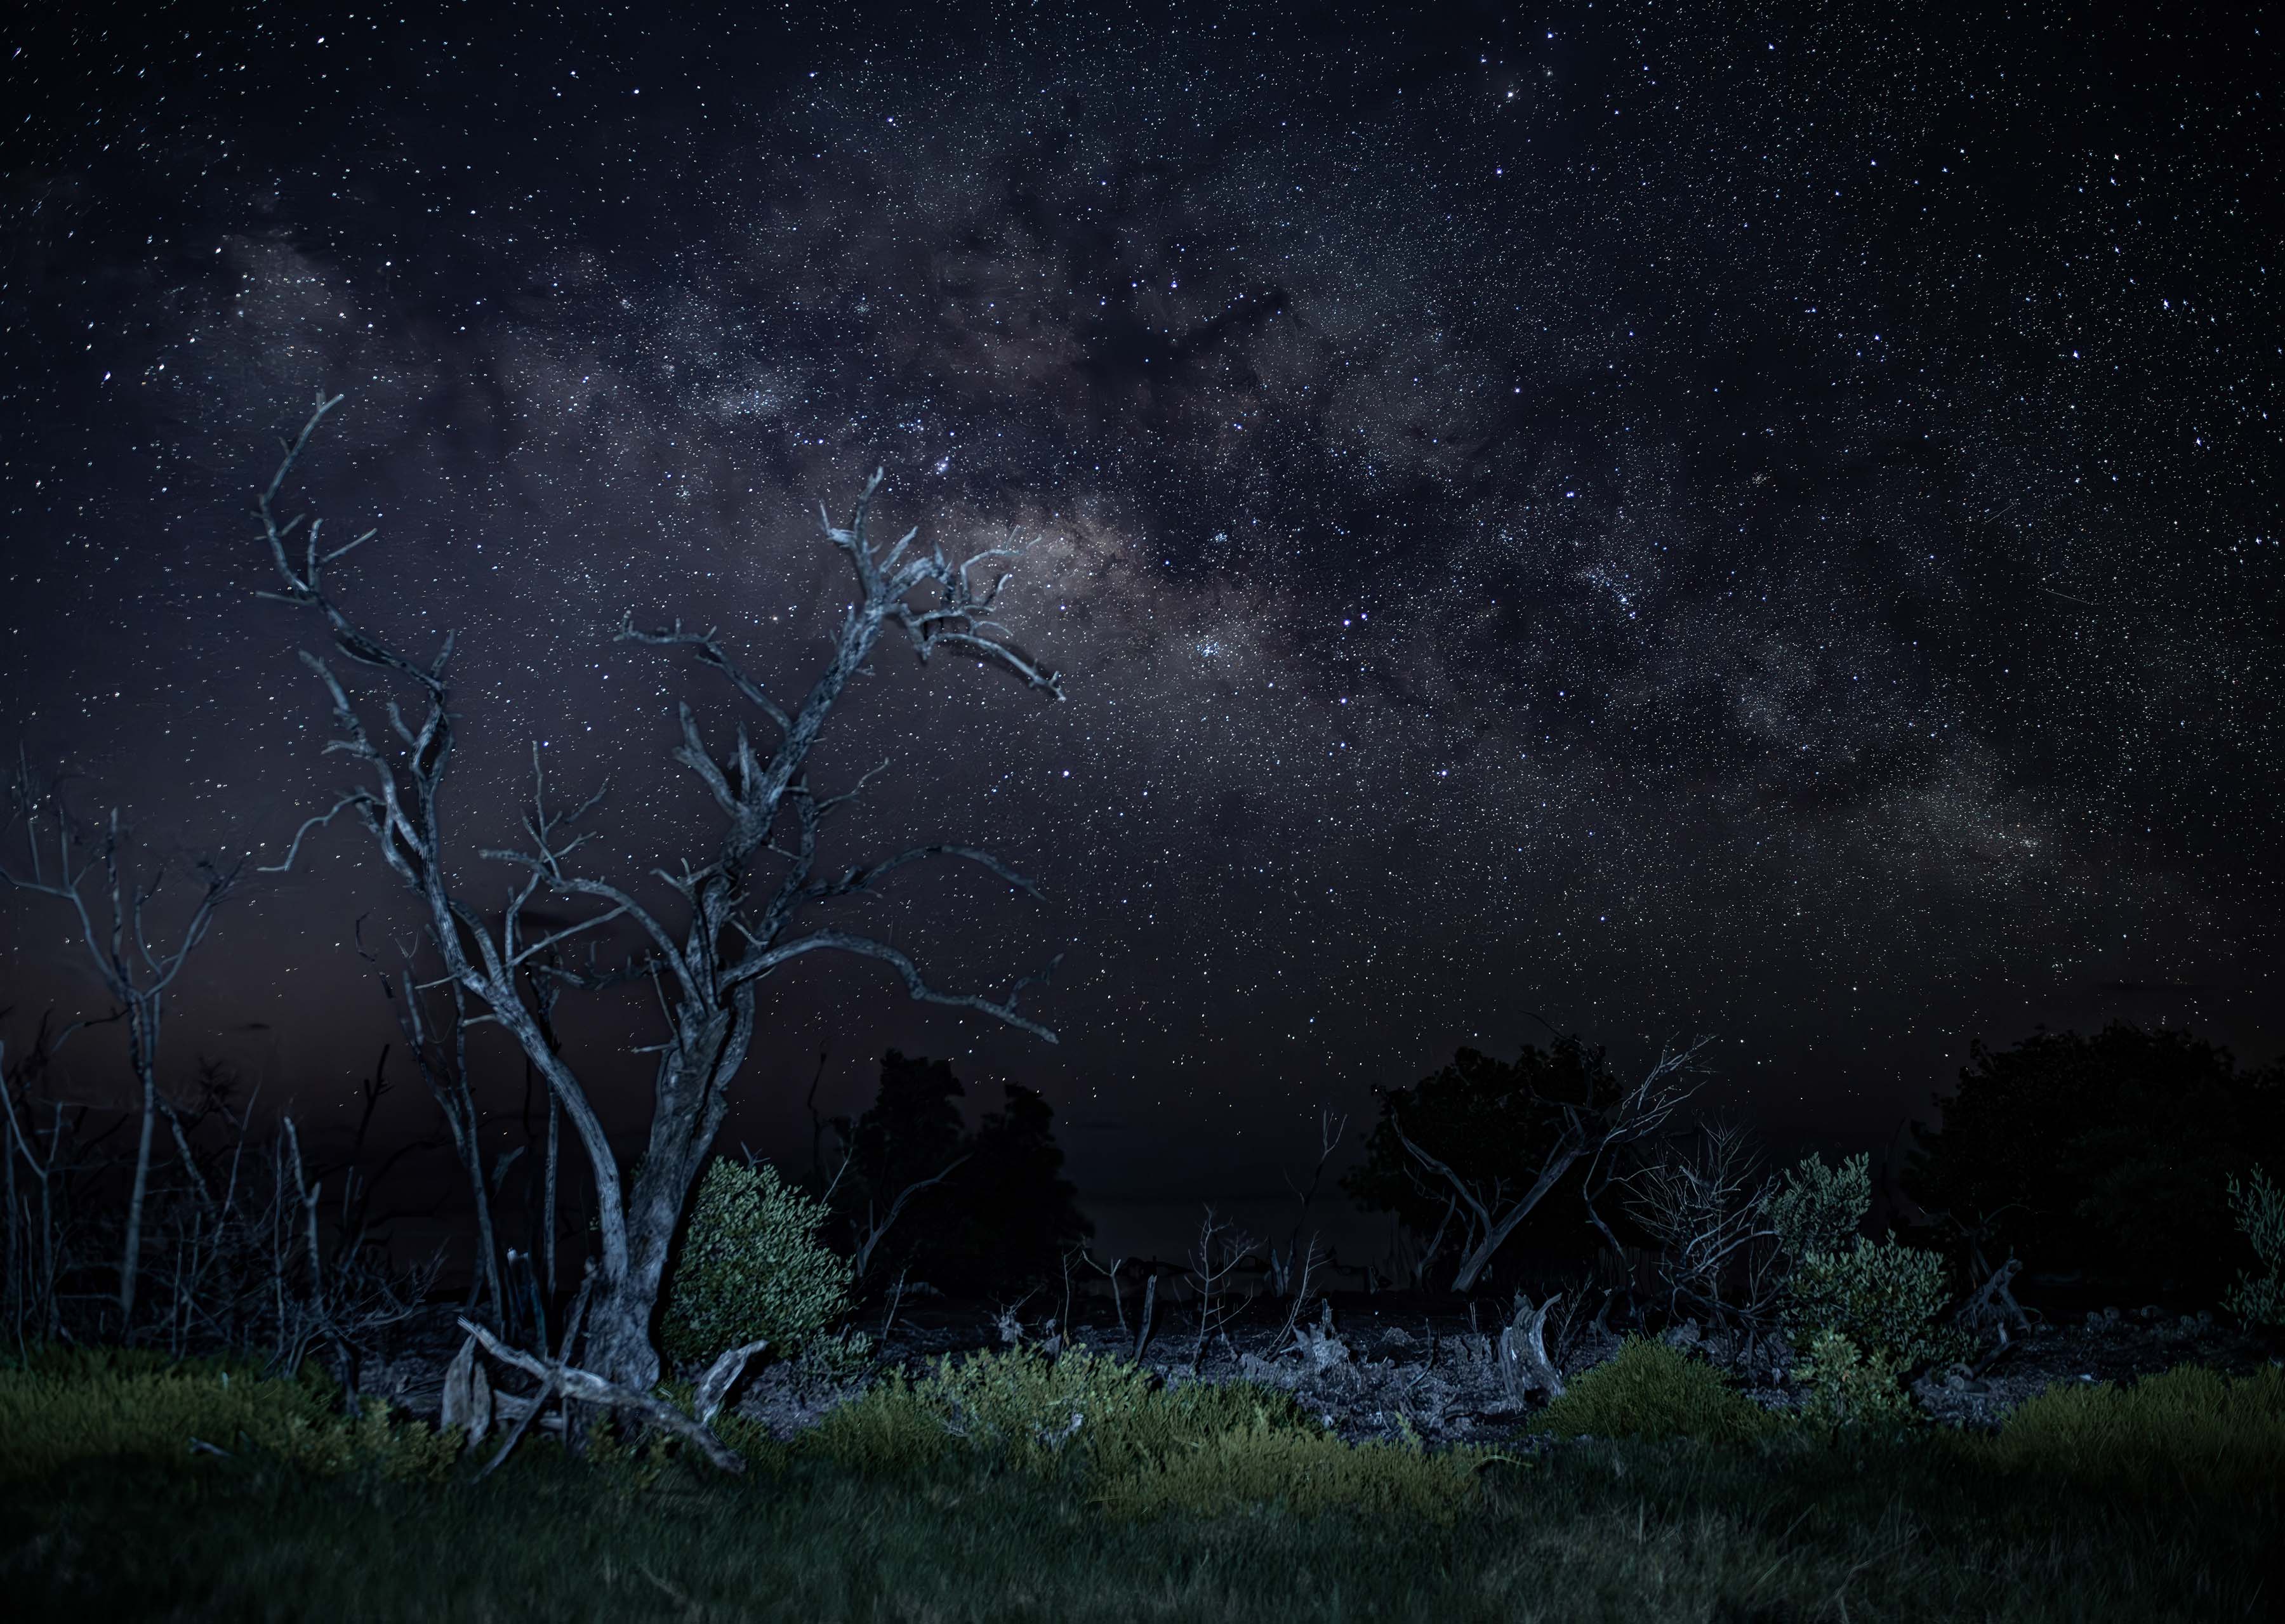
| 73 |
Jul 19 |
Comment |
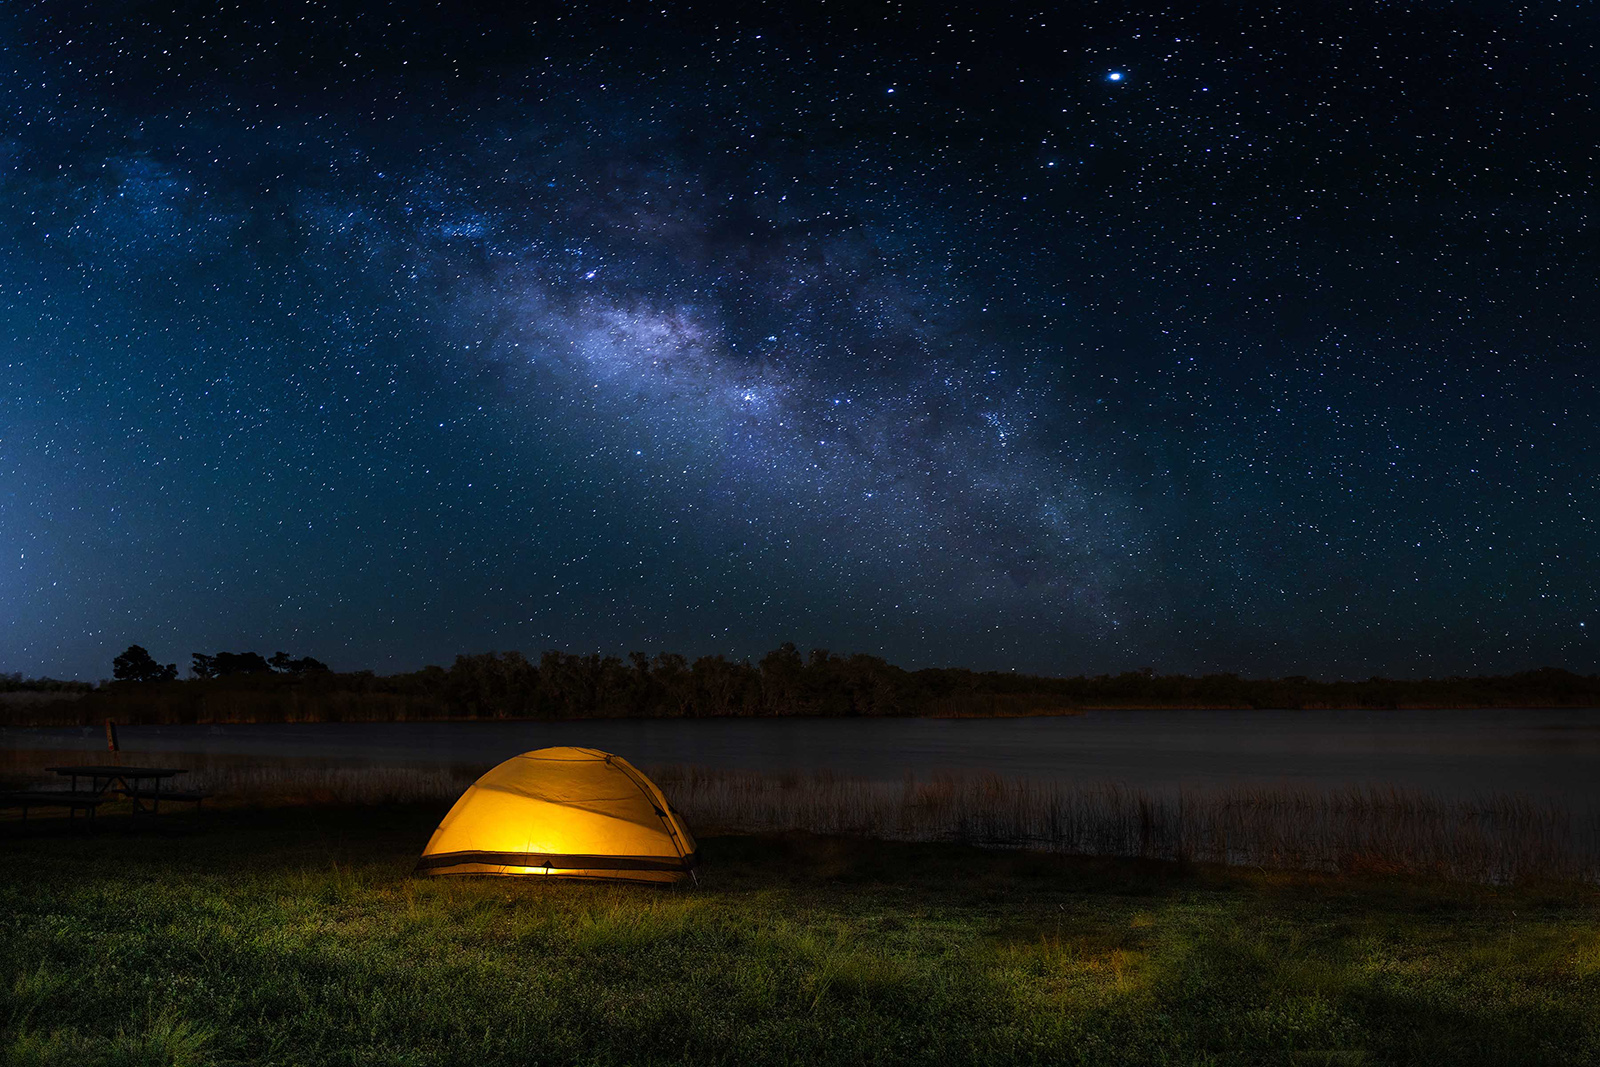
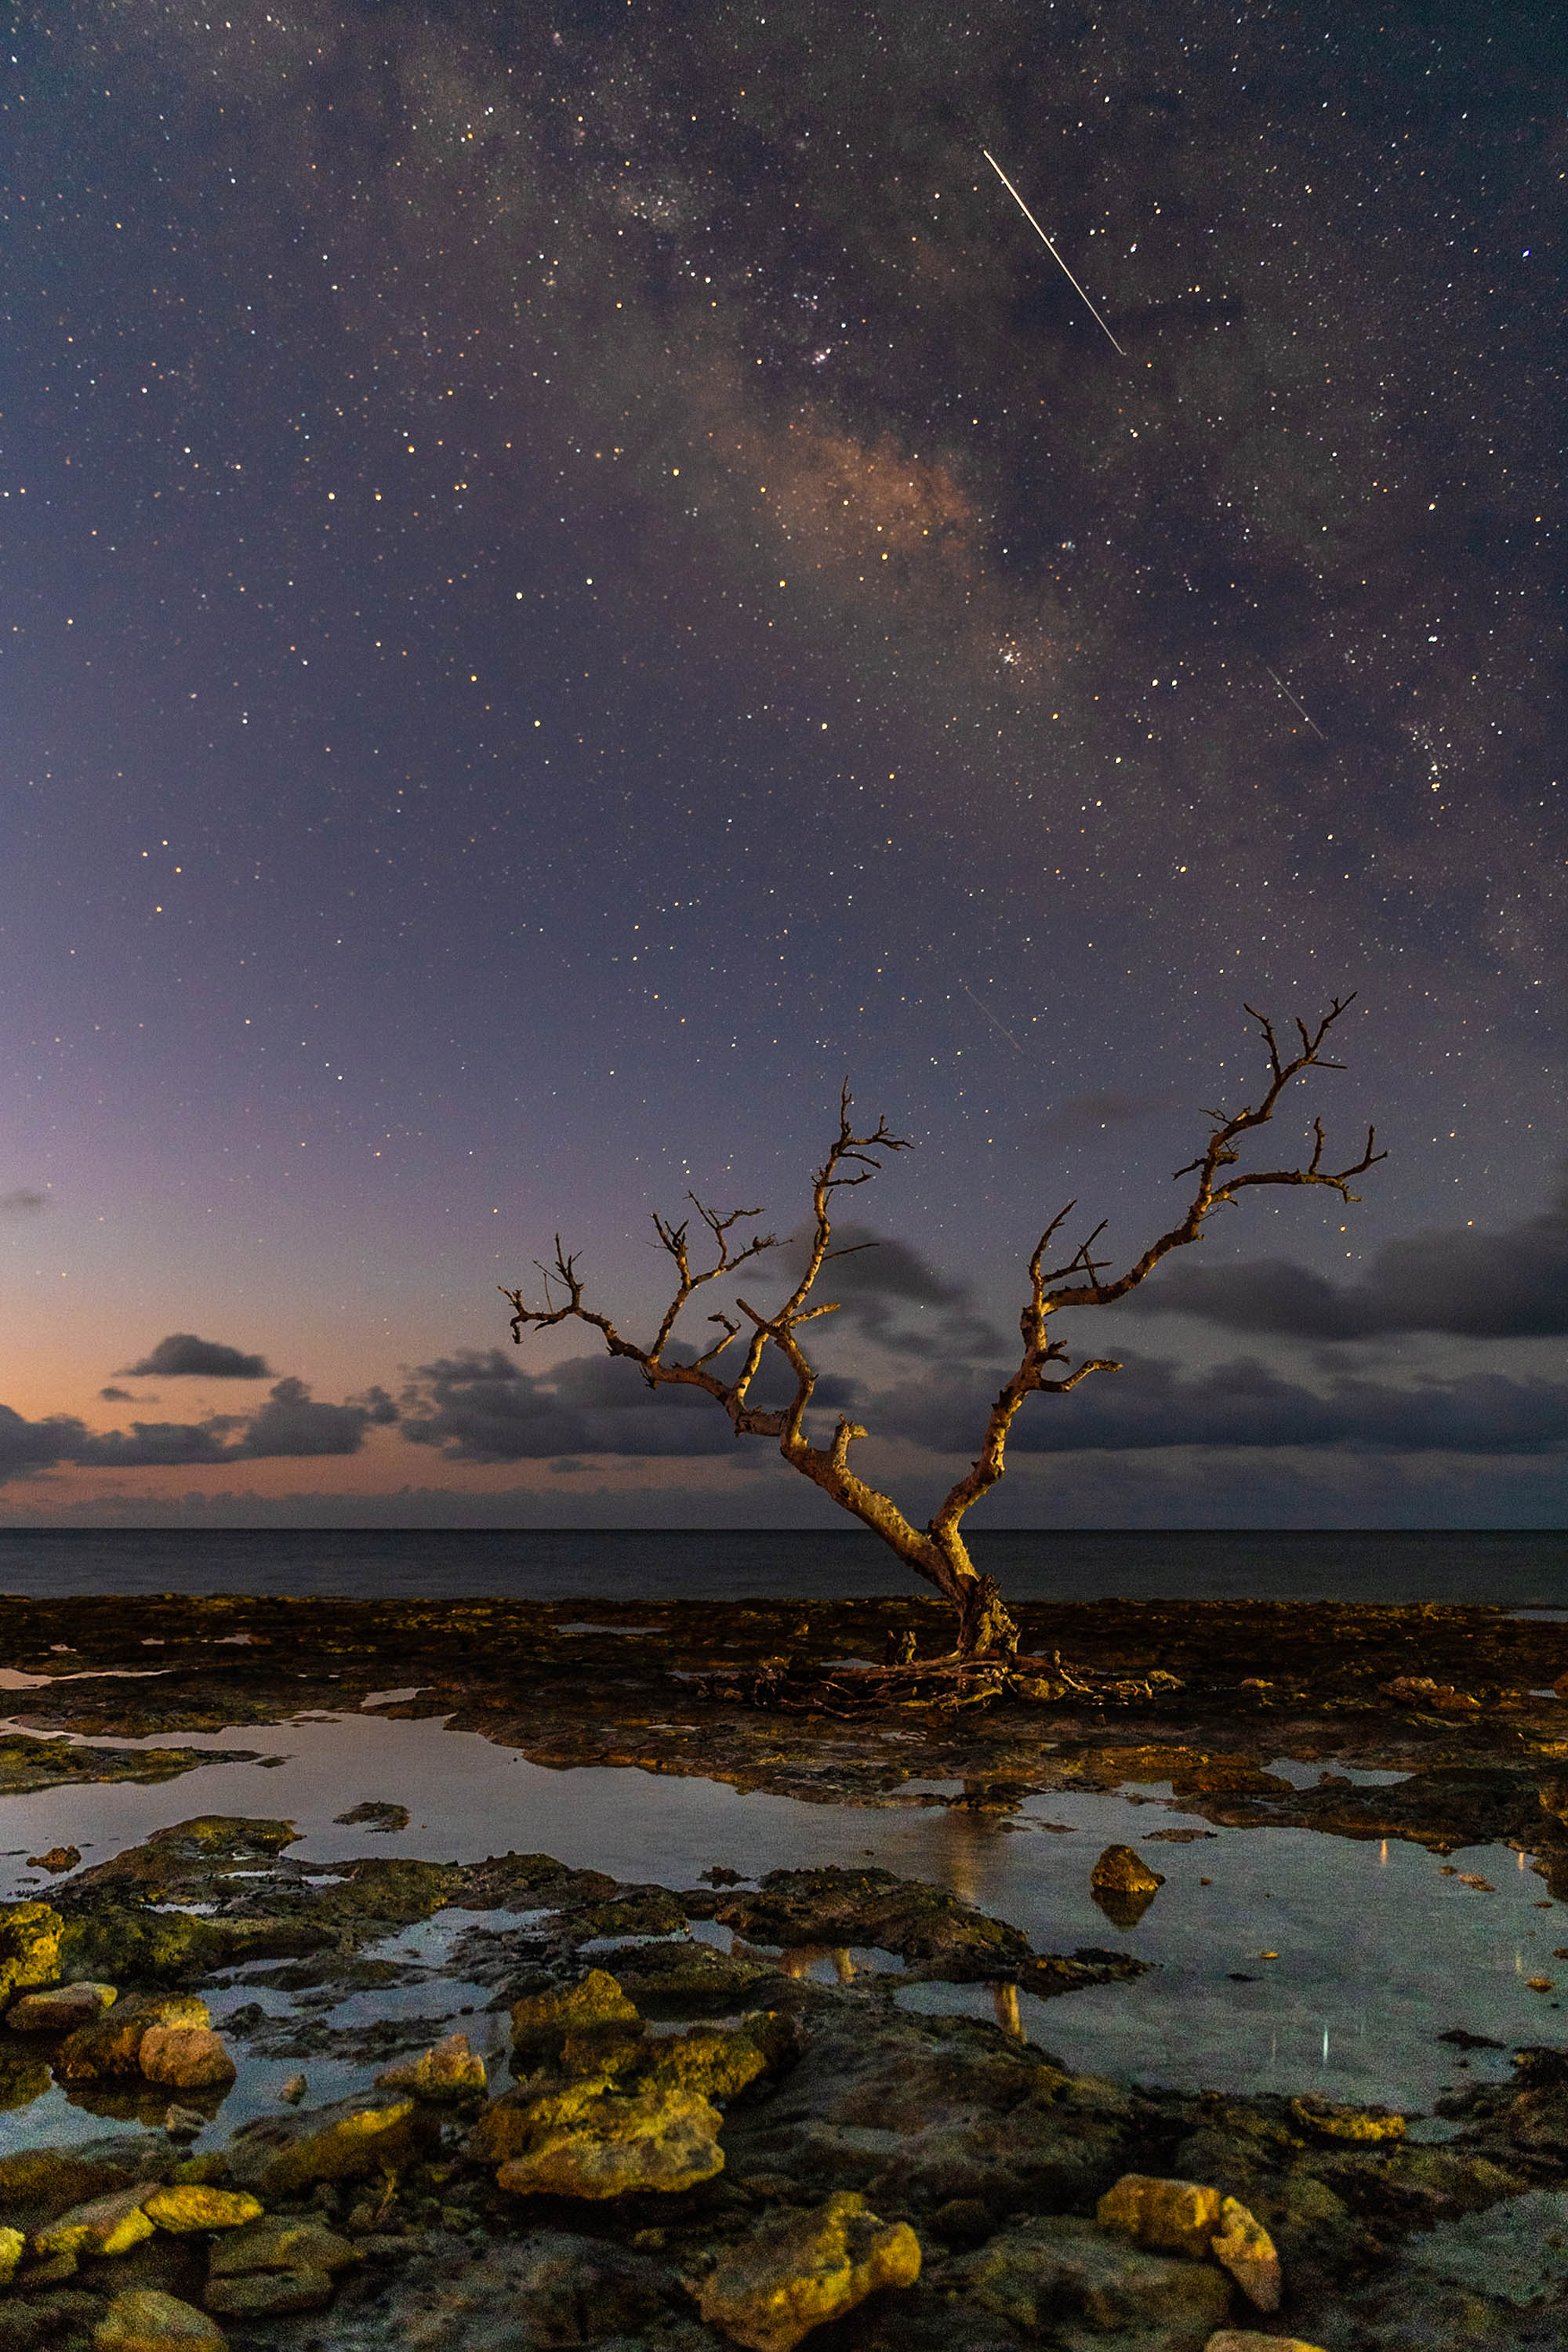
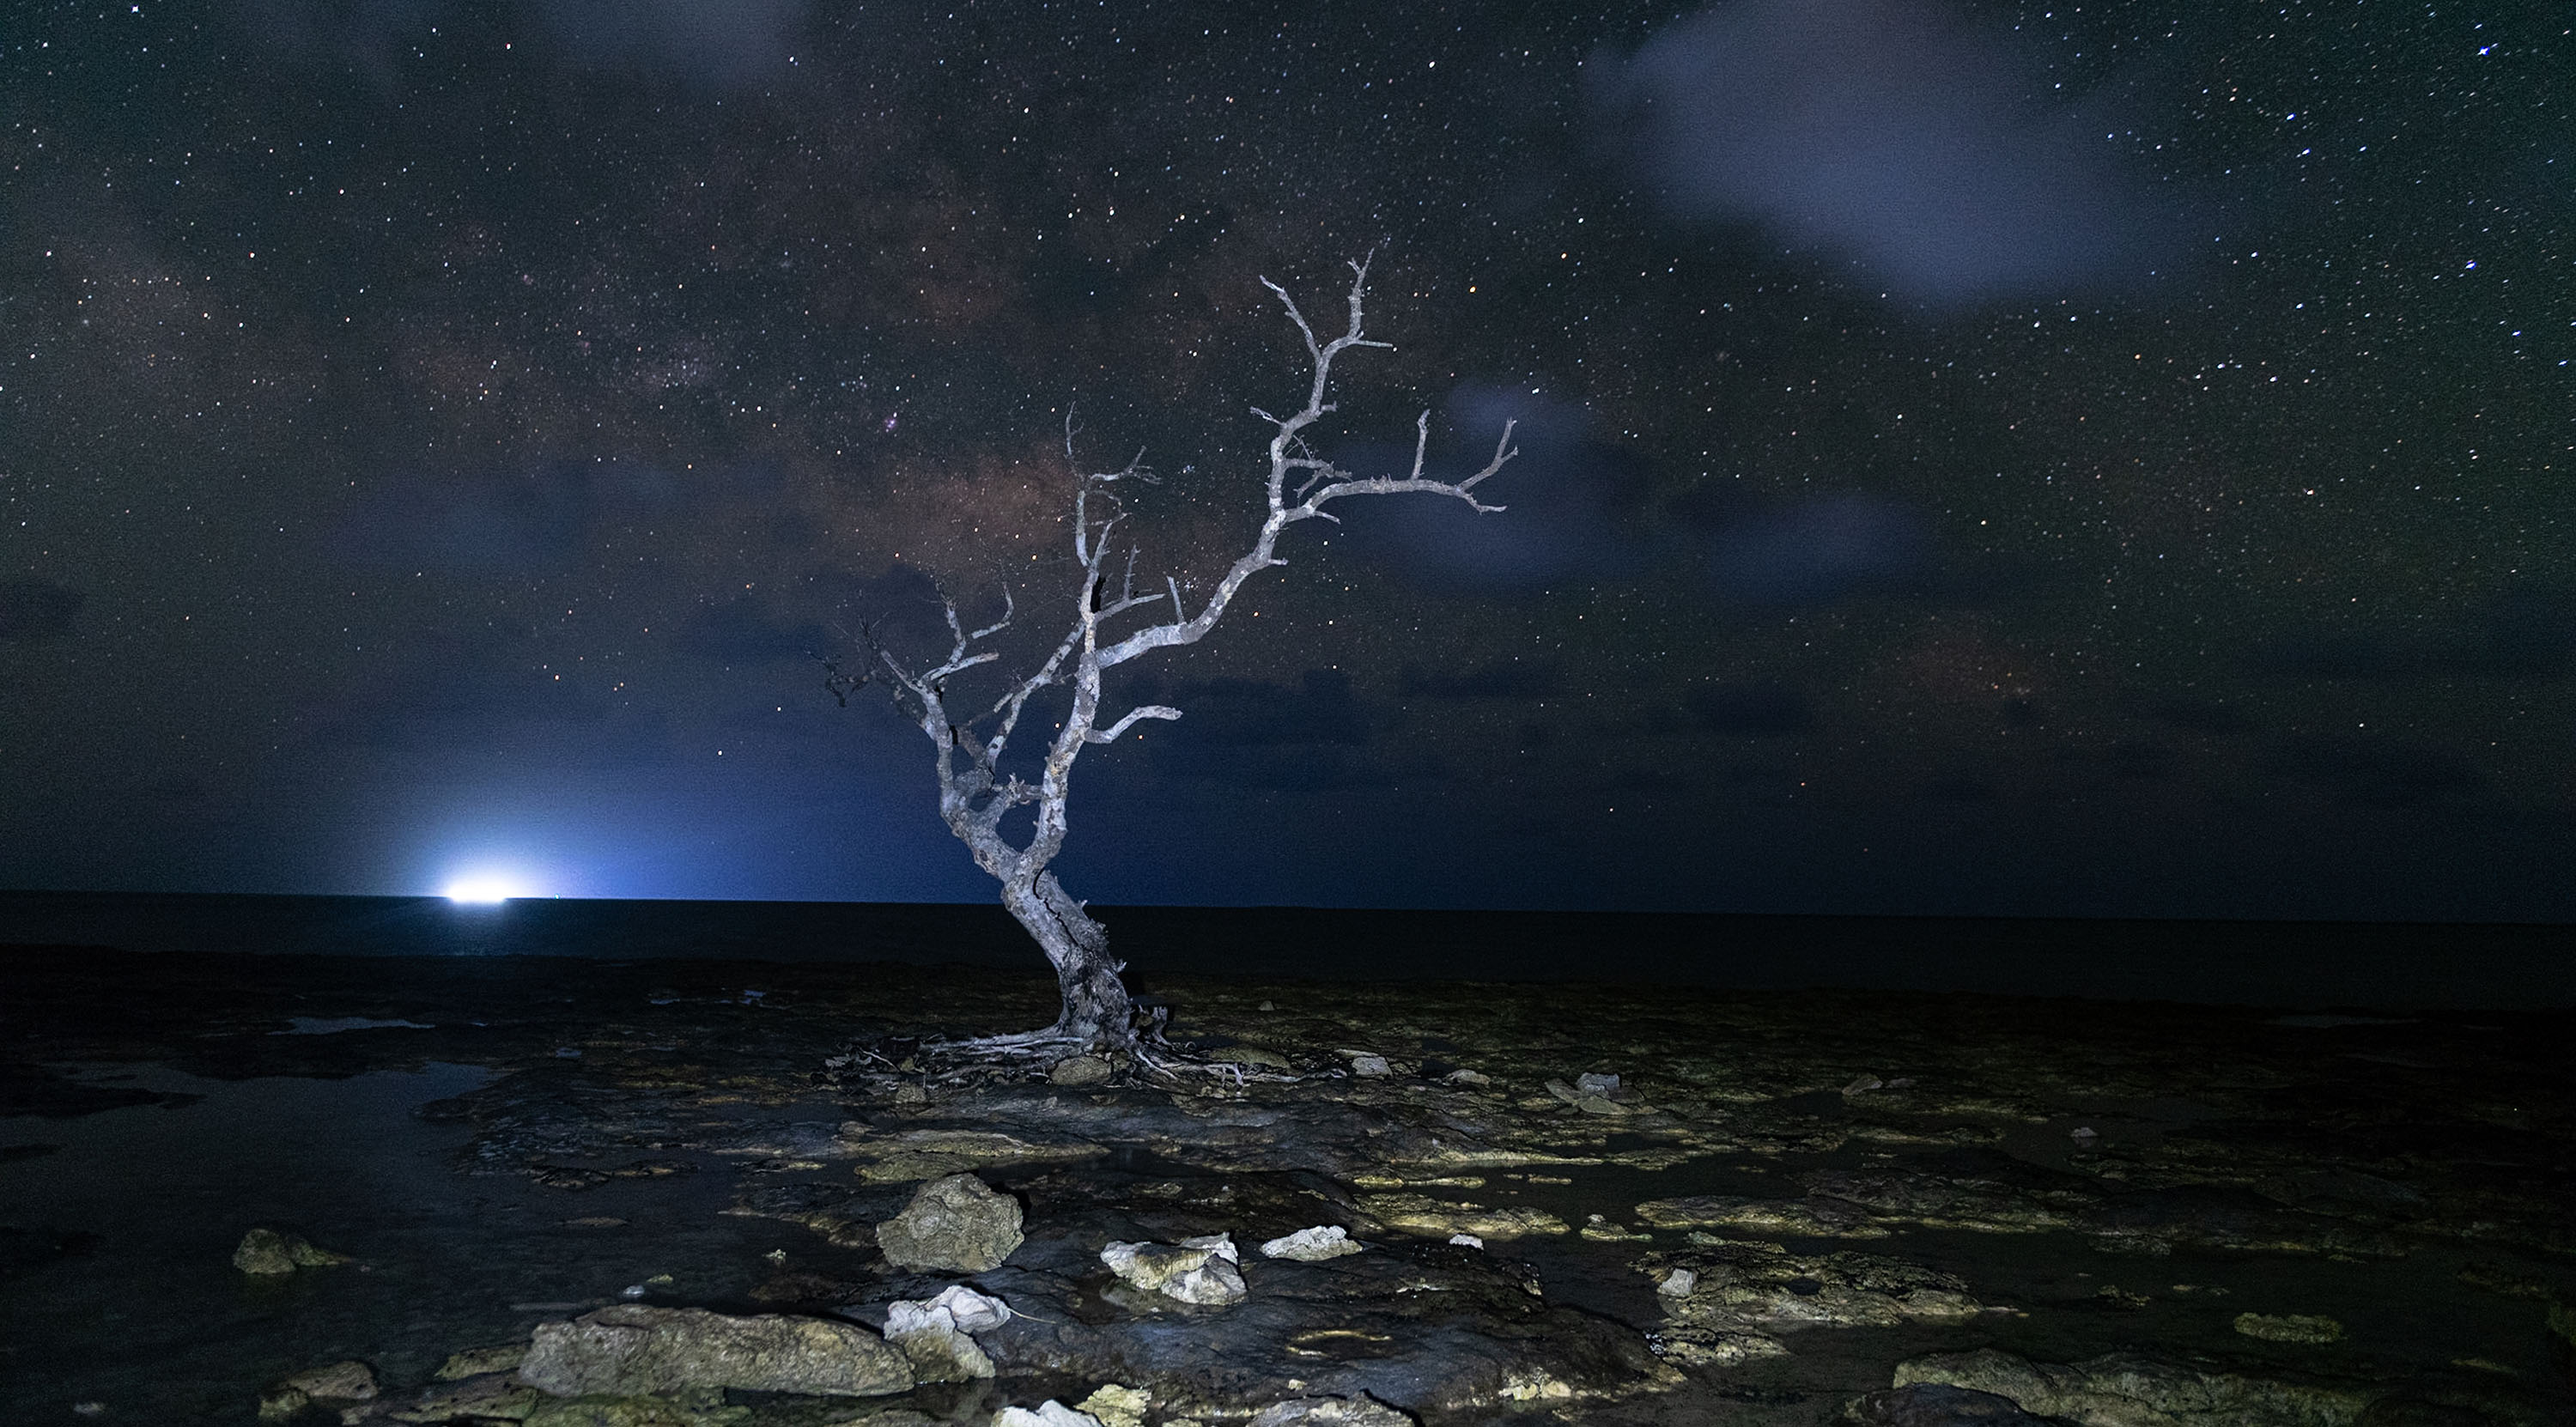
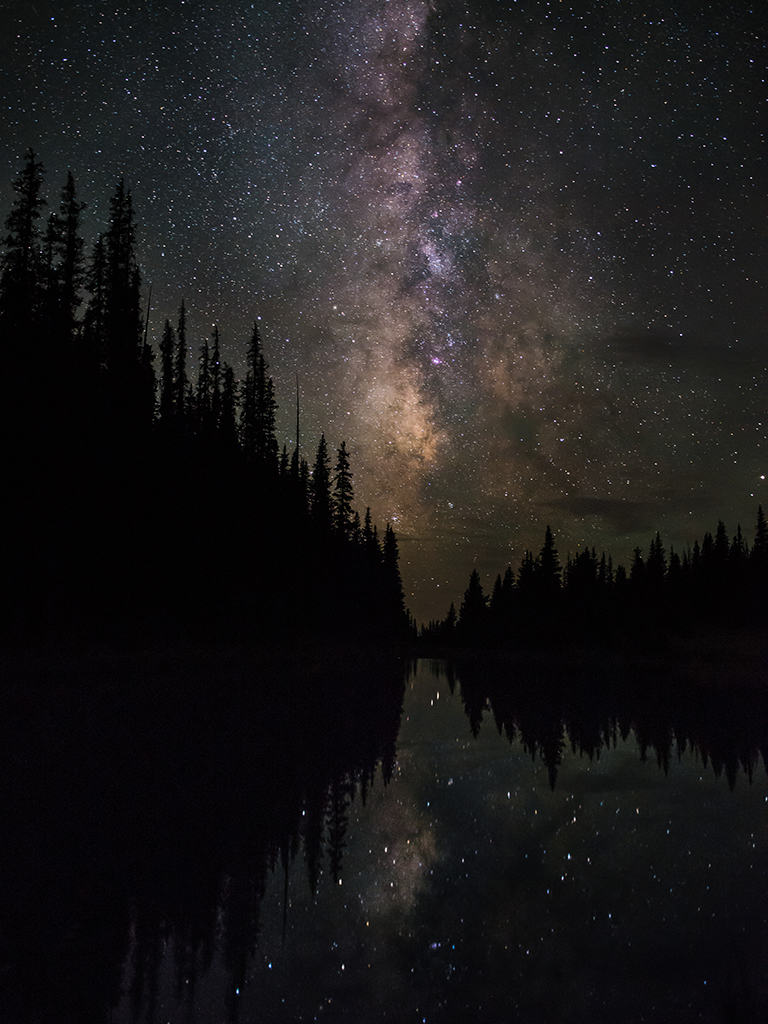
This is a hauntingly beautiful image. Your idea of blending the two images was a perfect touch and really makes the image. I'm glad to see someone else doing some astro photography--your Milky Way is very well done.
May I suggest that, at least for me, the red flower in the lower right seems to draw my eye away from the rest of the image. I wonder how it would work if that were cloned out? |
Jul 9th |
1 comment - 0 replies for Group 73
|
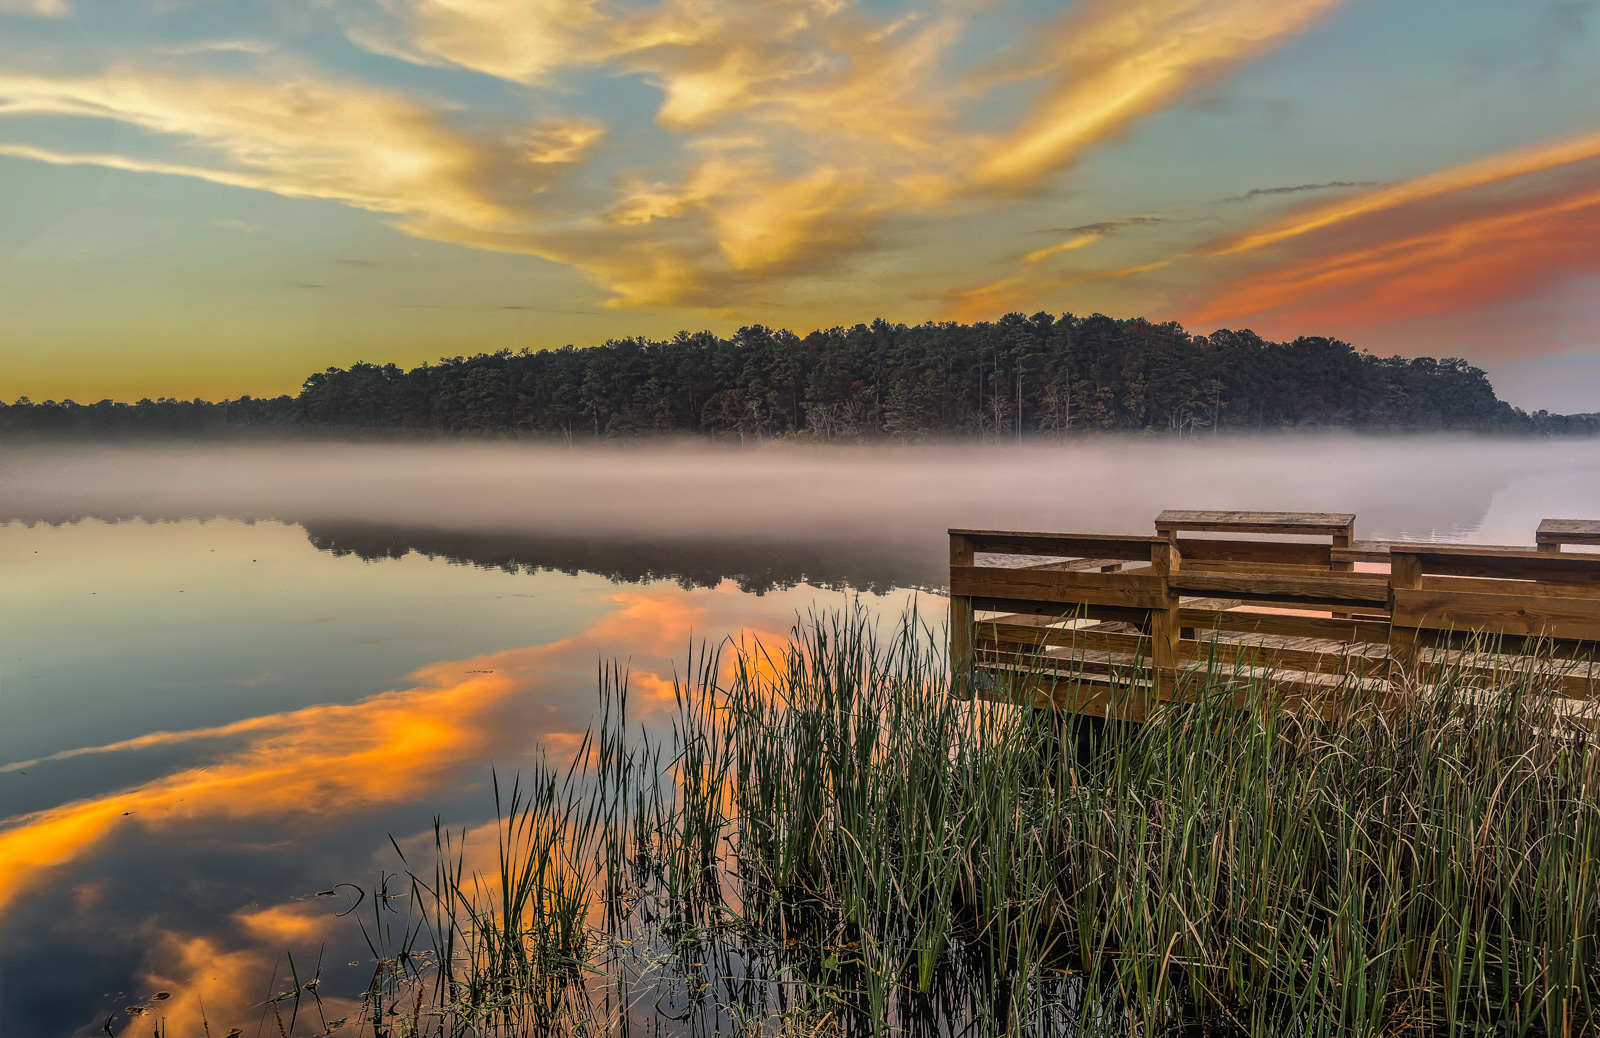
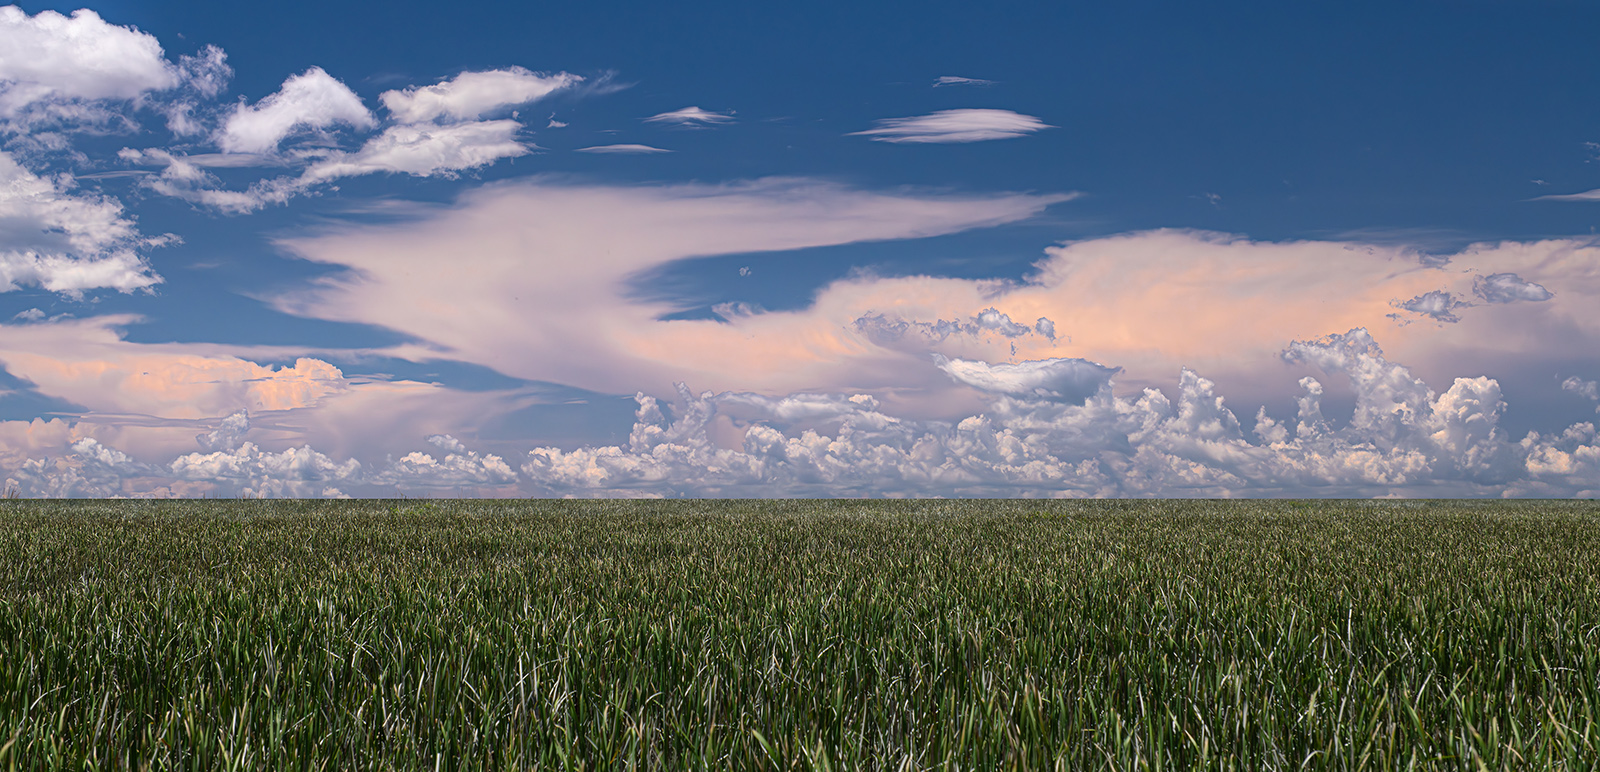
| 89 |
Jul 19 |
Comment |
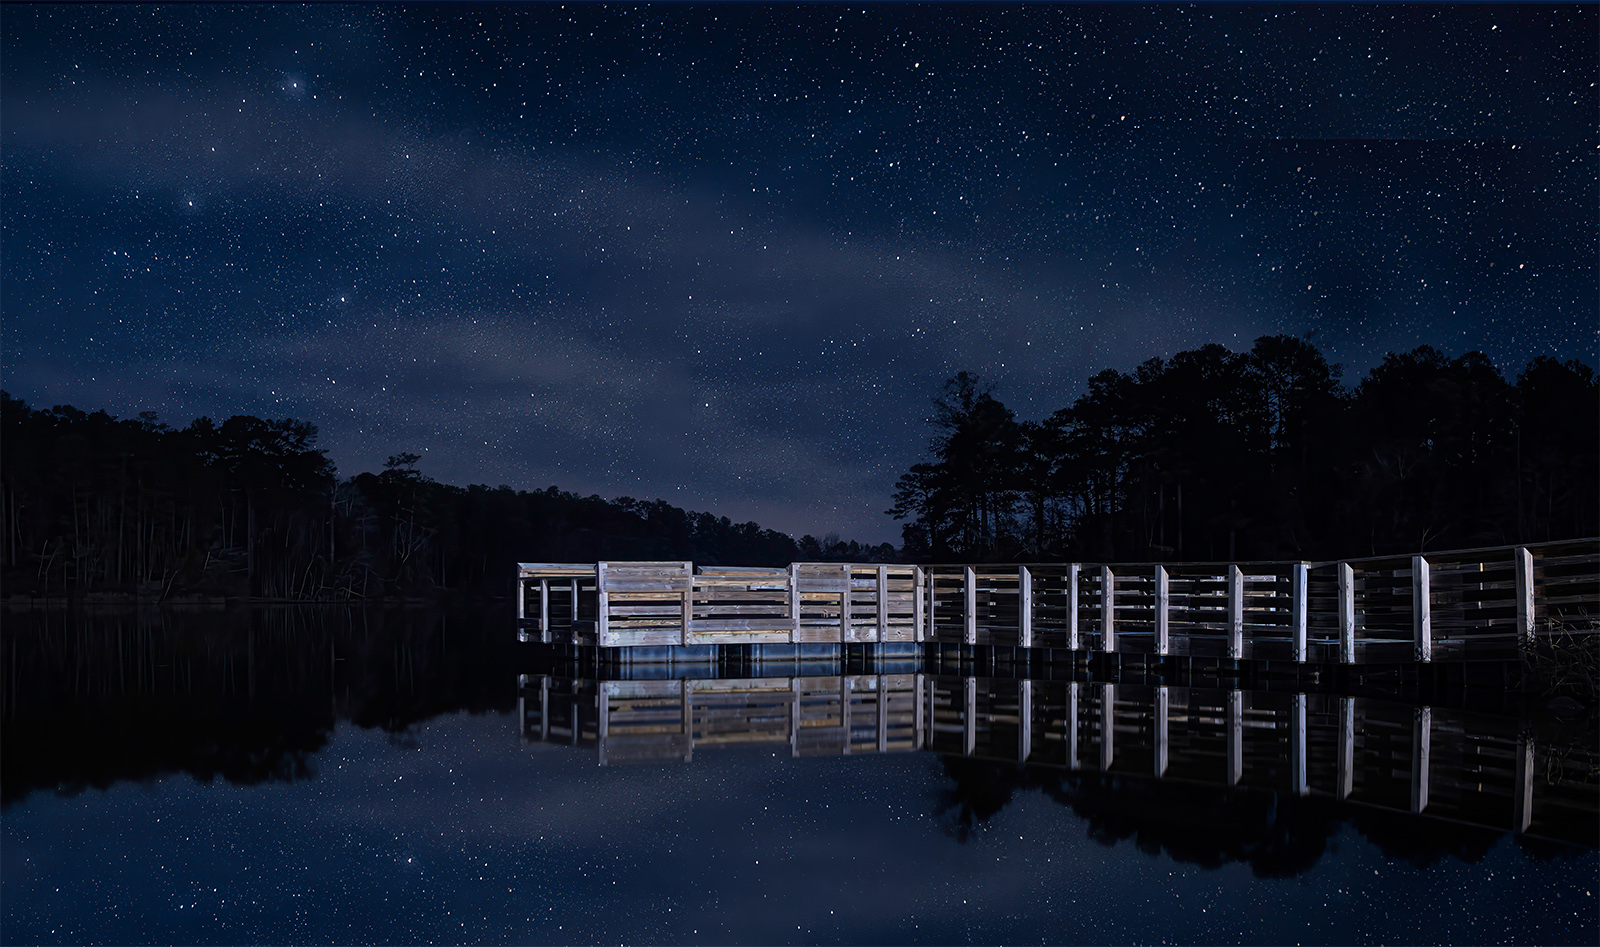
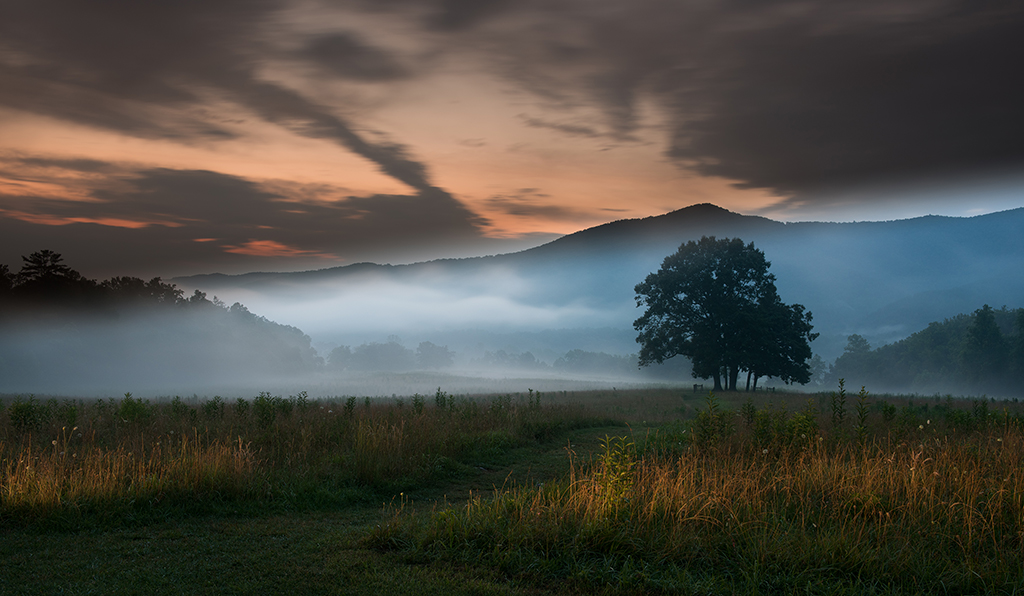
You have a very nice composition that works well for this setting. The reflection and the sky in the reflection a quite good. With the gear you have I do not believe you could have gotten a better image.
If I may offer a pair of suggestions. Since the eye is drawn to the light and the bright, the viewer of your image will be forced to look at the bright sky. I bet if you check your histogram you will find that you overexposed the highlights.
So hear are my suggestions. Remember you can easily bring detail out of shadows but you cannot save blown highlights. Thus,when you take a shot like this, take a second and underexpose it by at least a stop, in this case, since the entire image is a bit hot, maybe underexpose it 2 stops. That will help save the sky and add some punch to the trees as well. My other suggestion is to get a Graduated Neutral Density filter---I suggest a 3 stop don't get the circular get the square. Using this on the sky would darken the sky by 3 stops and would have given you a sky like what you see in the reflection. Something to think about before your next trip to the park. :-)
If you have questions about the filter---drop me a note and I'll try to help. |
Jul 28th |
| 89 |
Jul 19 |
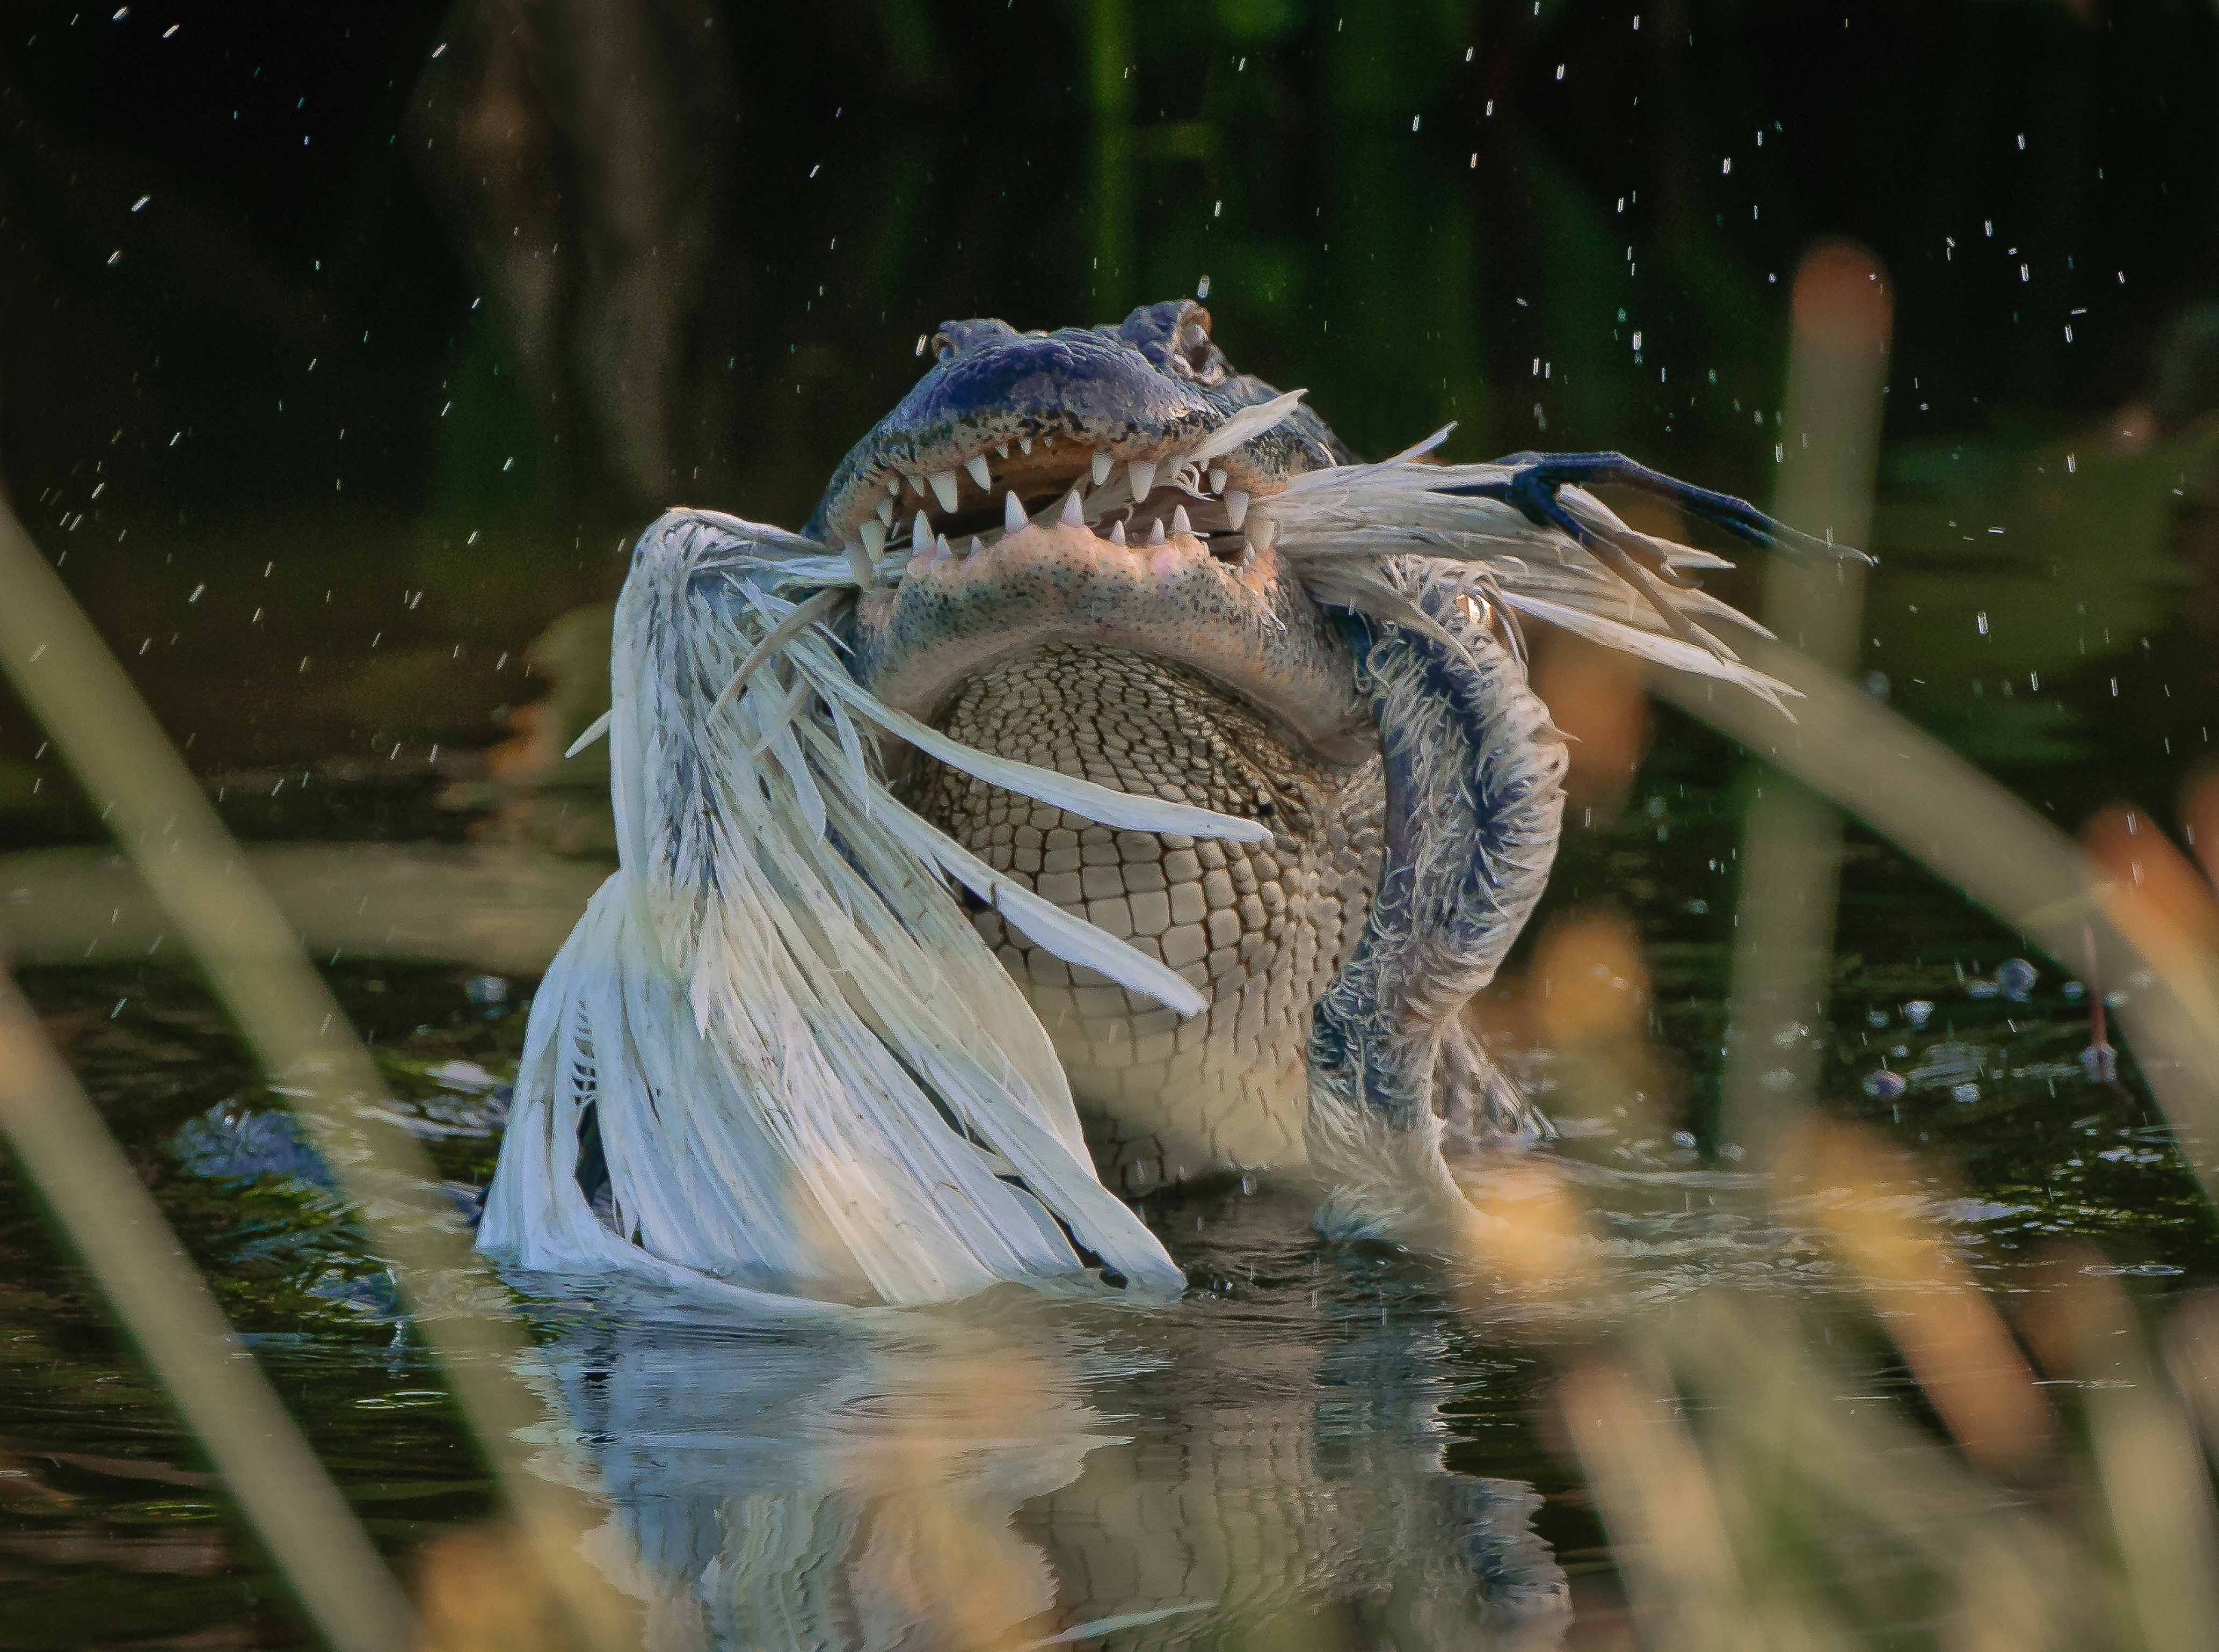
Comment |
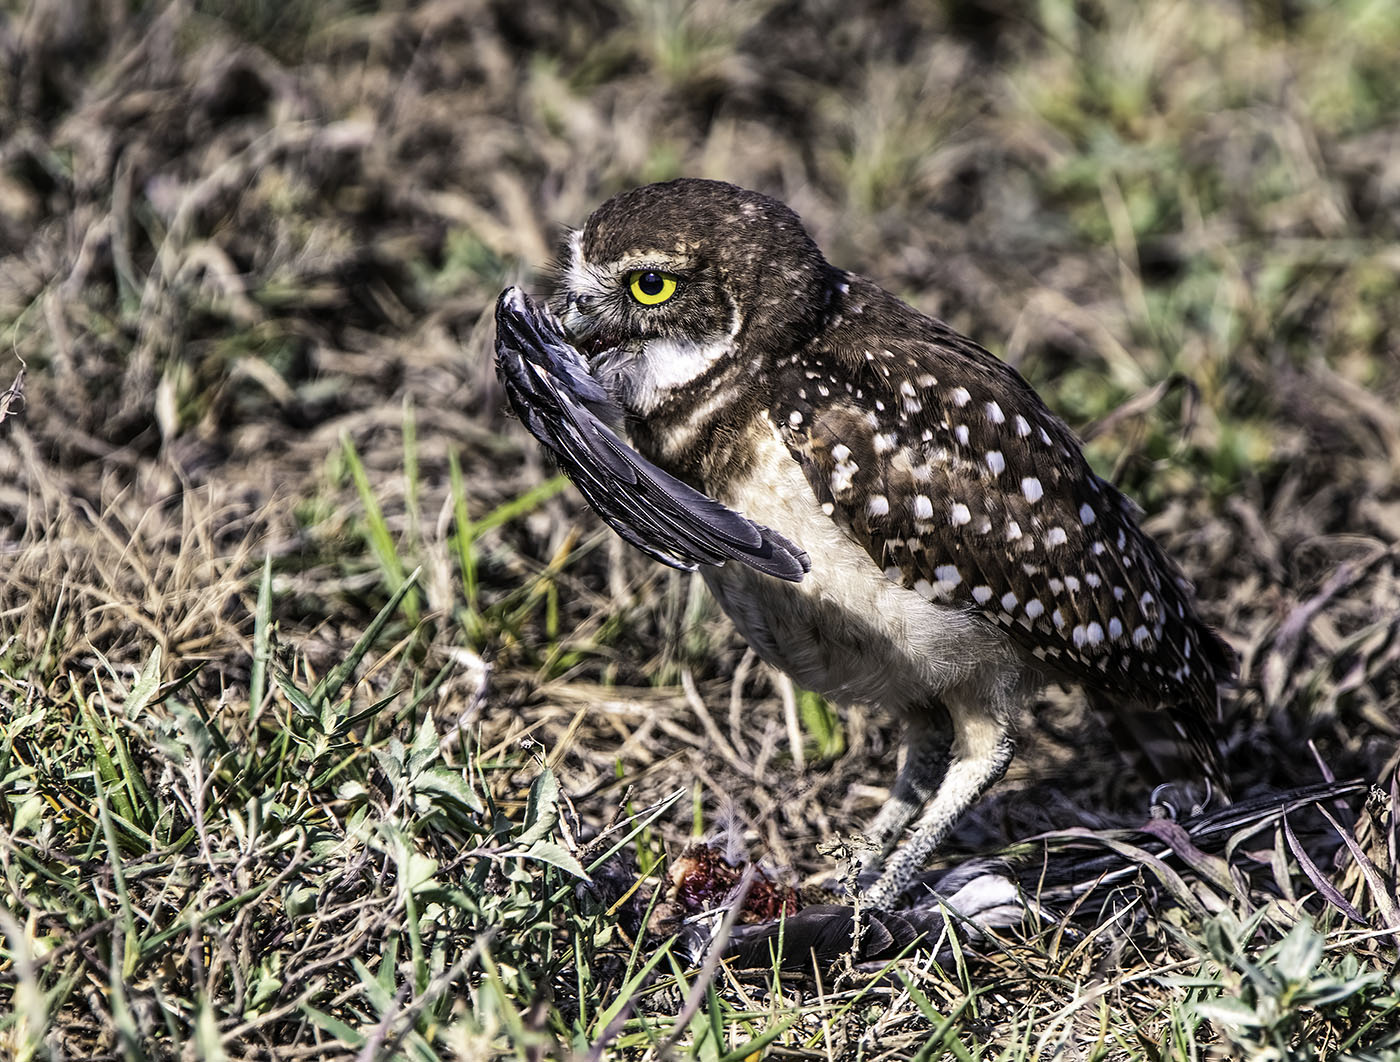
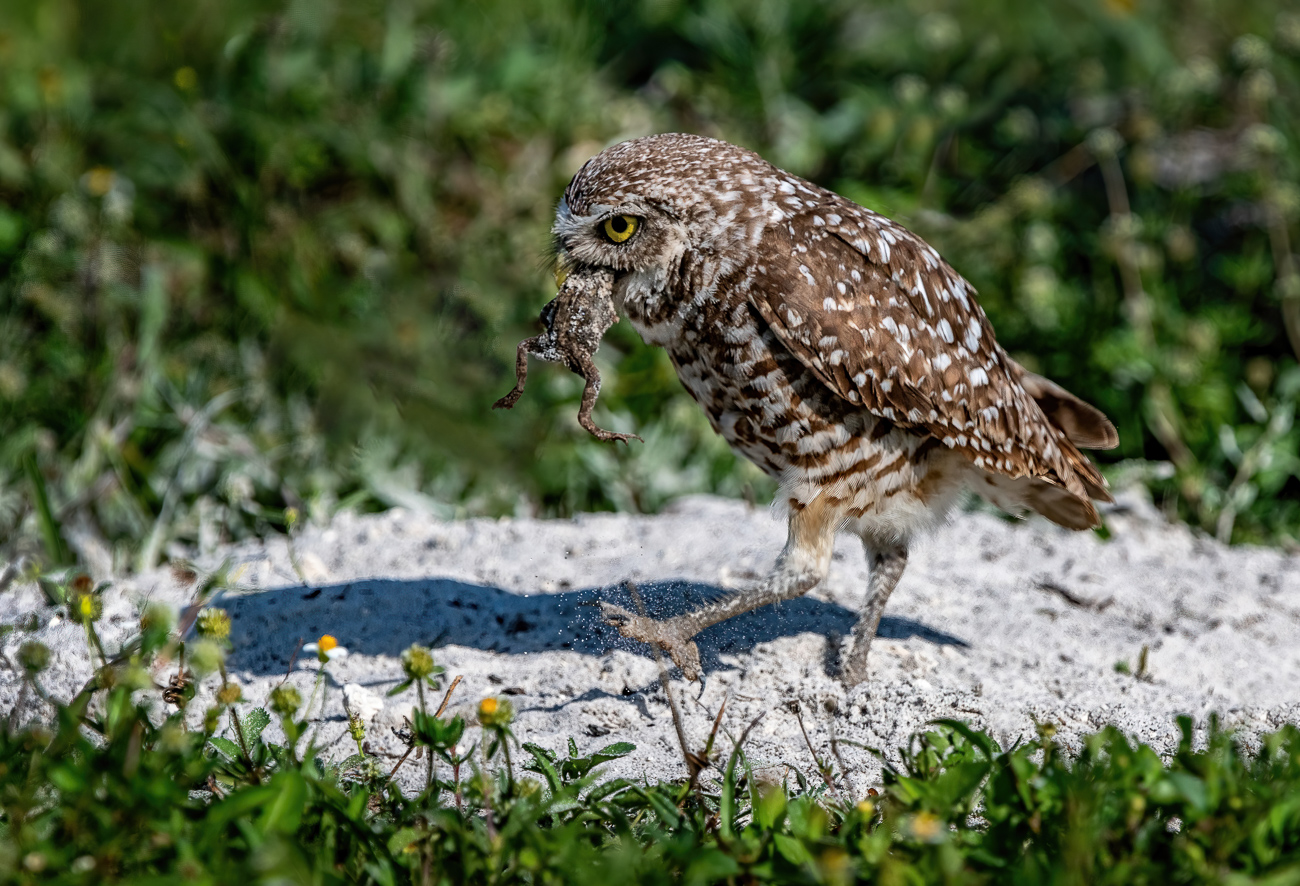
For such a drastic crop this is still a very pleasing image.
The humor fact certainly play into the impact of the image. I feel you did a good job of sharpening and that makes the image work. More impressive is your control of the white feathers without blowing out the highlights.
Quiet, don't tell PSA, but if it were mine, I work on cloning out that black stick on Larry. |
Jul 28th |
| 89 |
Jul 19 |
Comment |
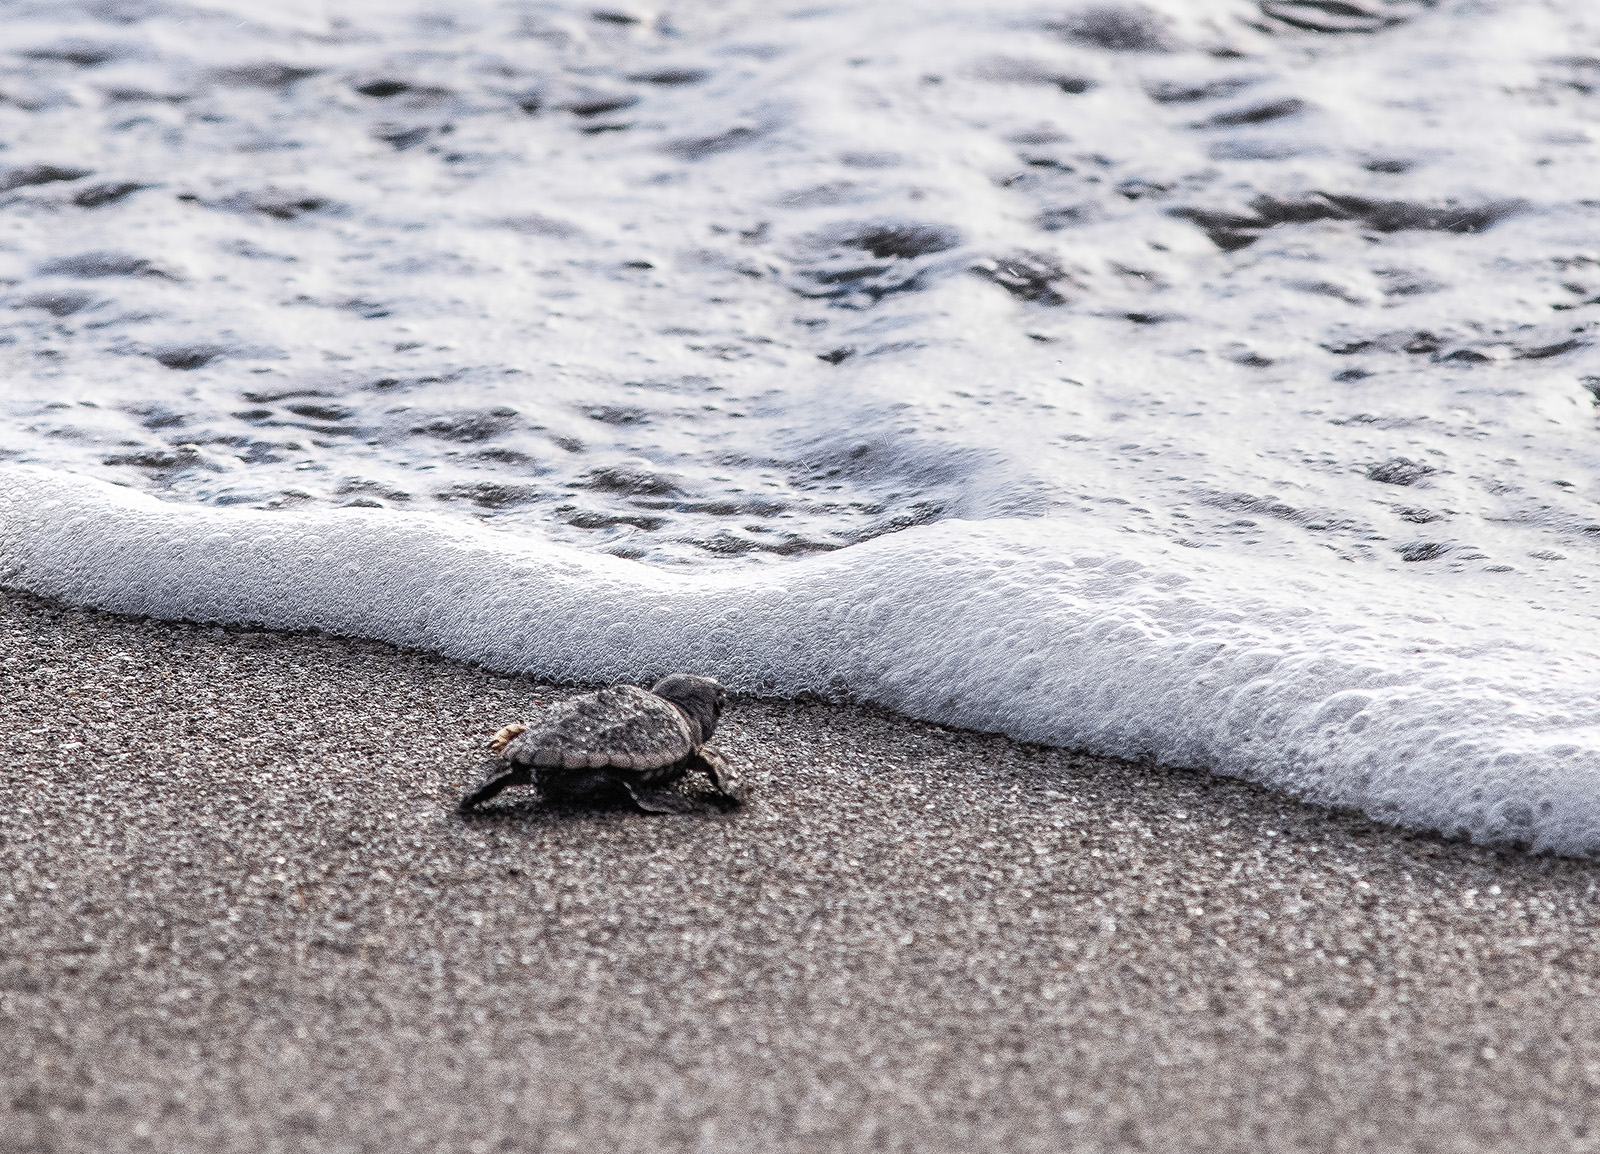
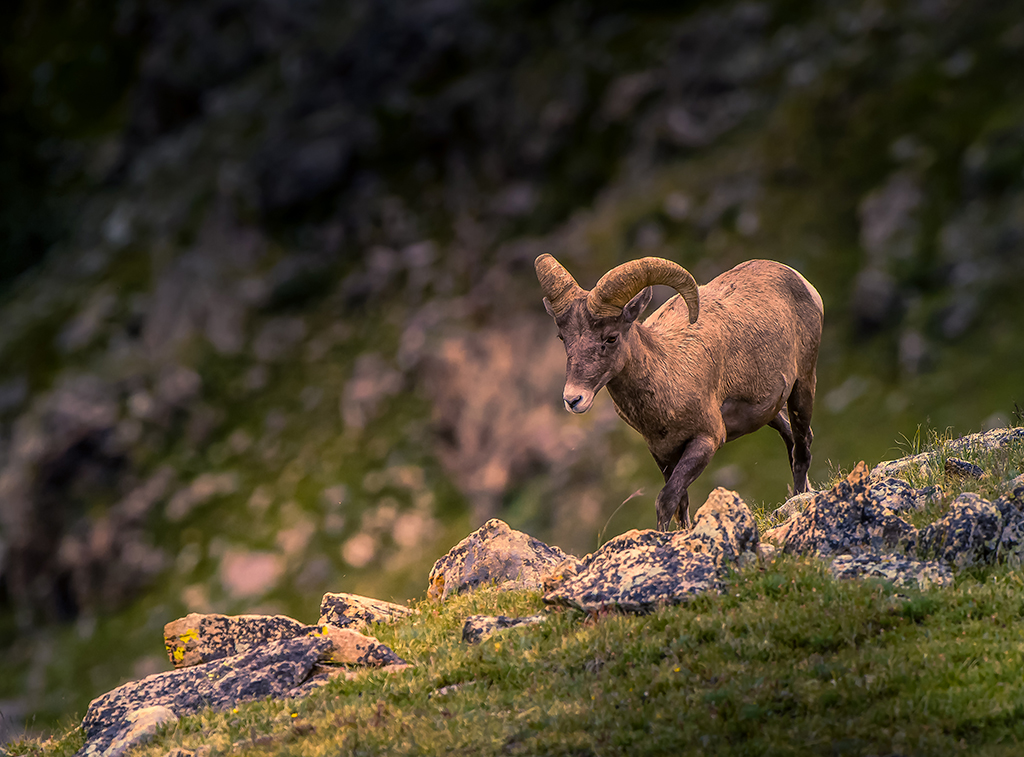
Lucky you! This is a strong nature subject with a great environmental feel. Probably a once in a lifetime shot. I feel you handled the whites in this quite well and kept some detail in them. Even thought you say you cropped it a great deal, may I suggest reducing the sky by about a half. It would put more emphasis on the bear without enlarging the image and reducing quality. |
Jul 28th |
| 89 |
Jul 19 |
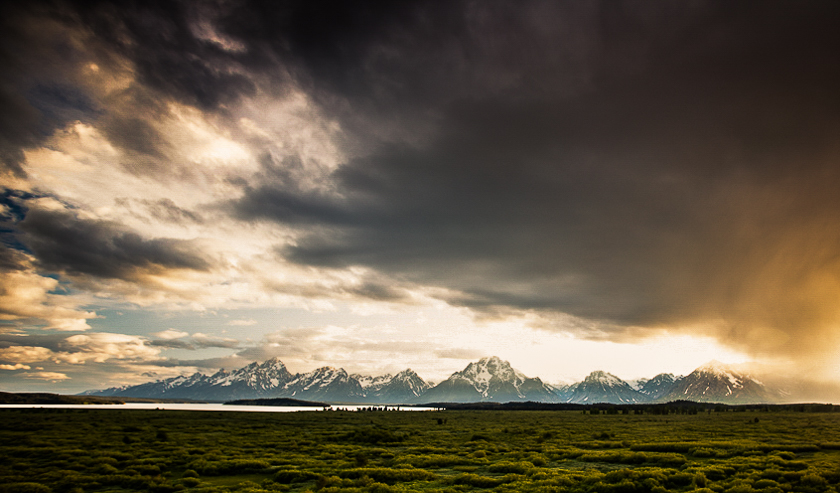
Comment |
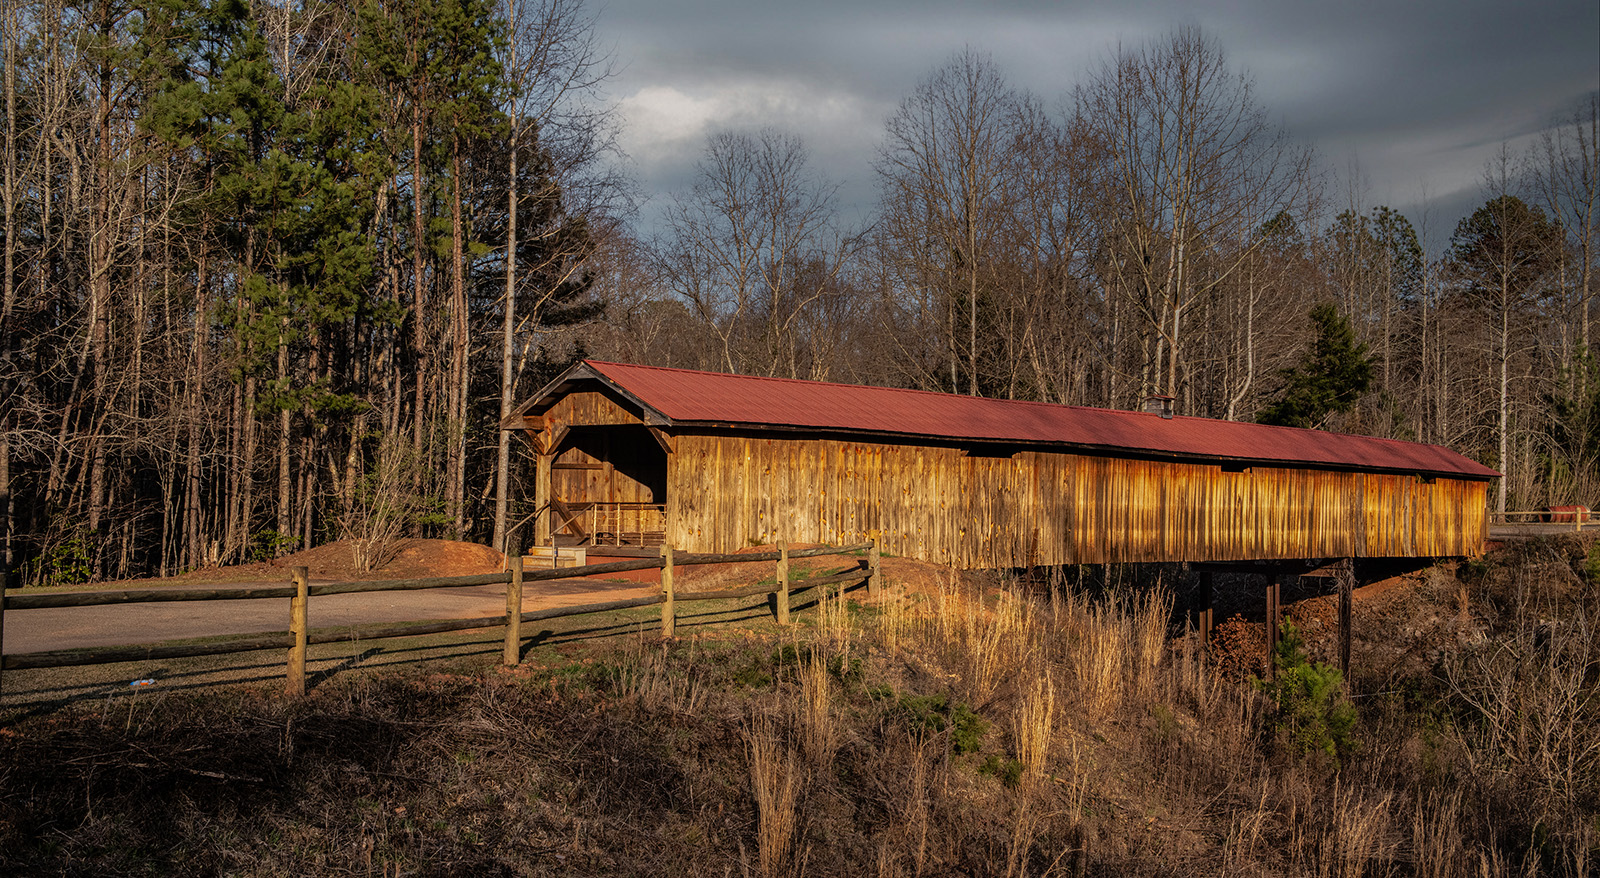
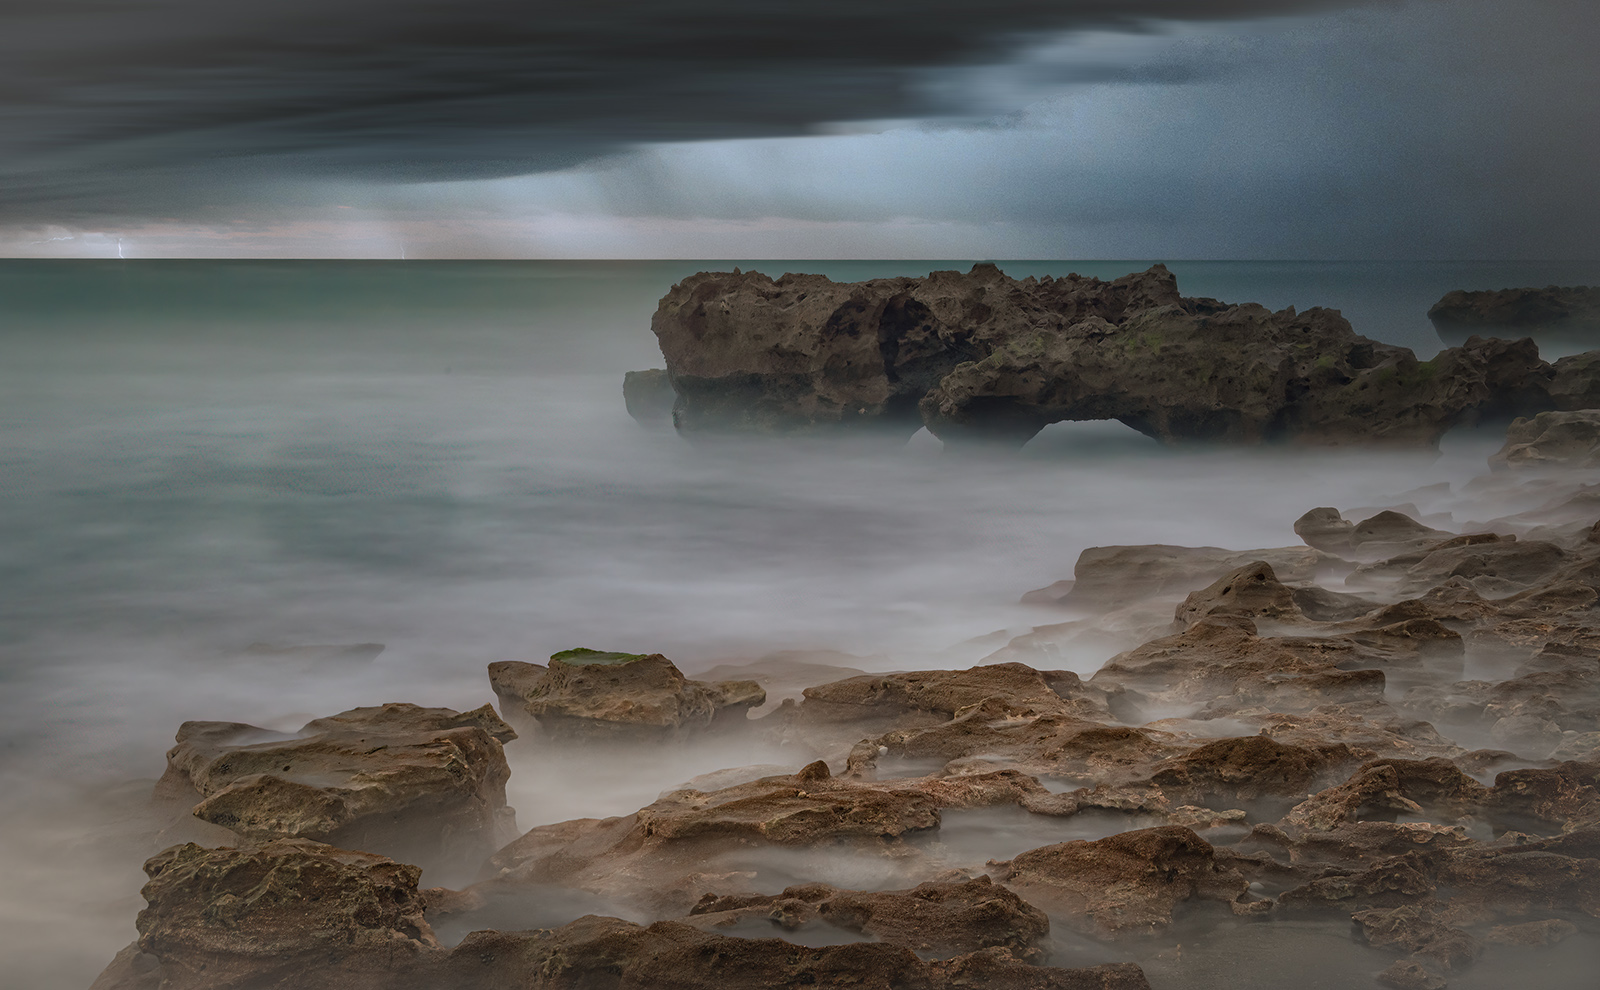
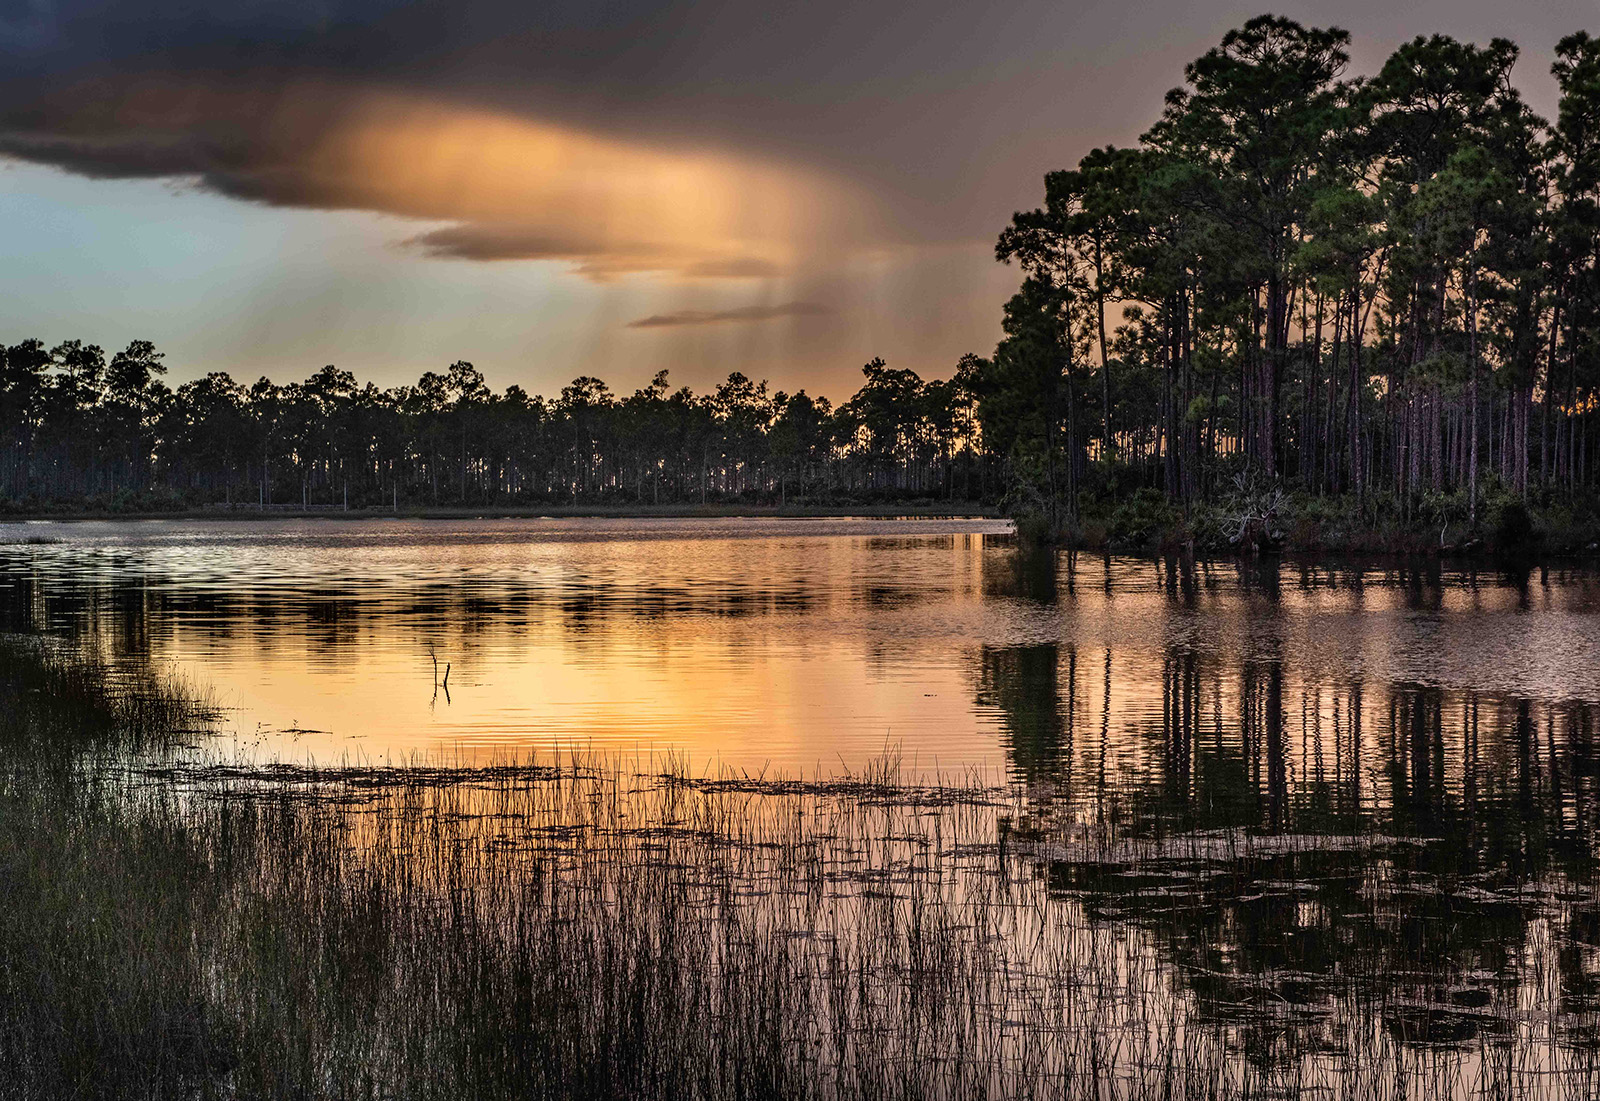
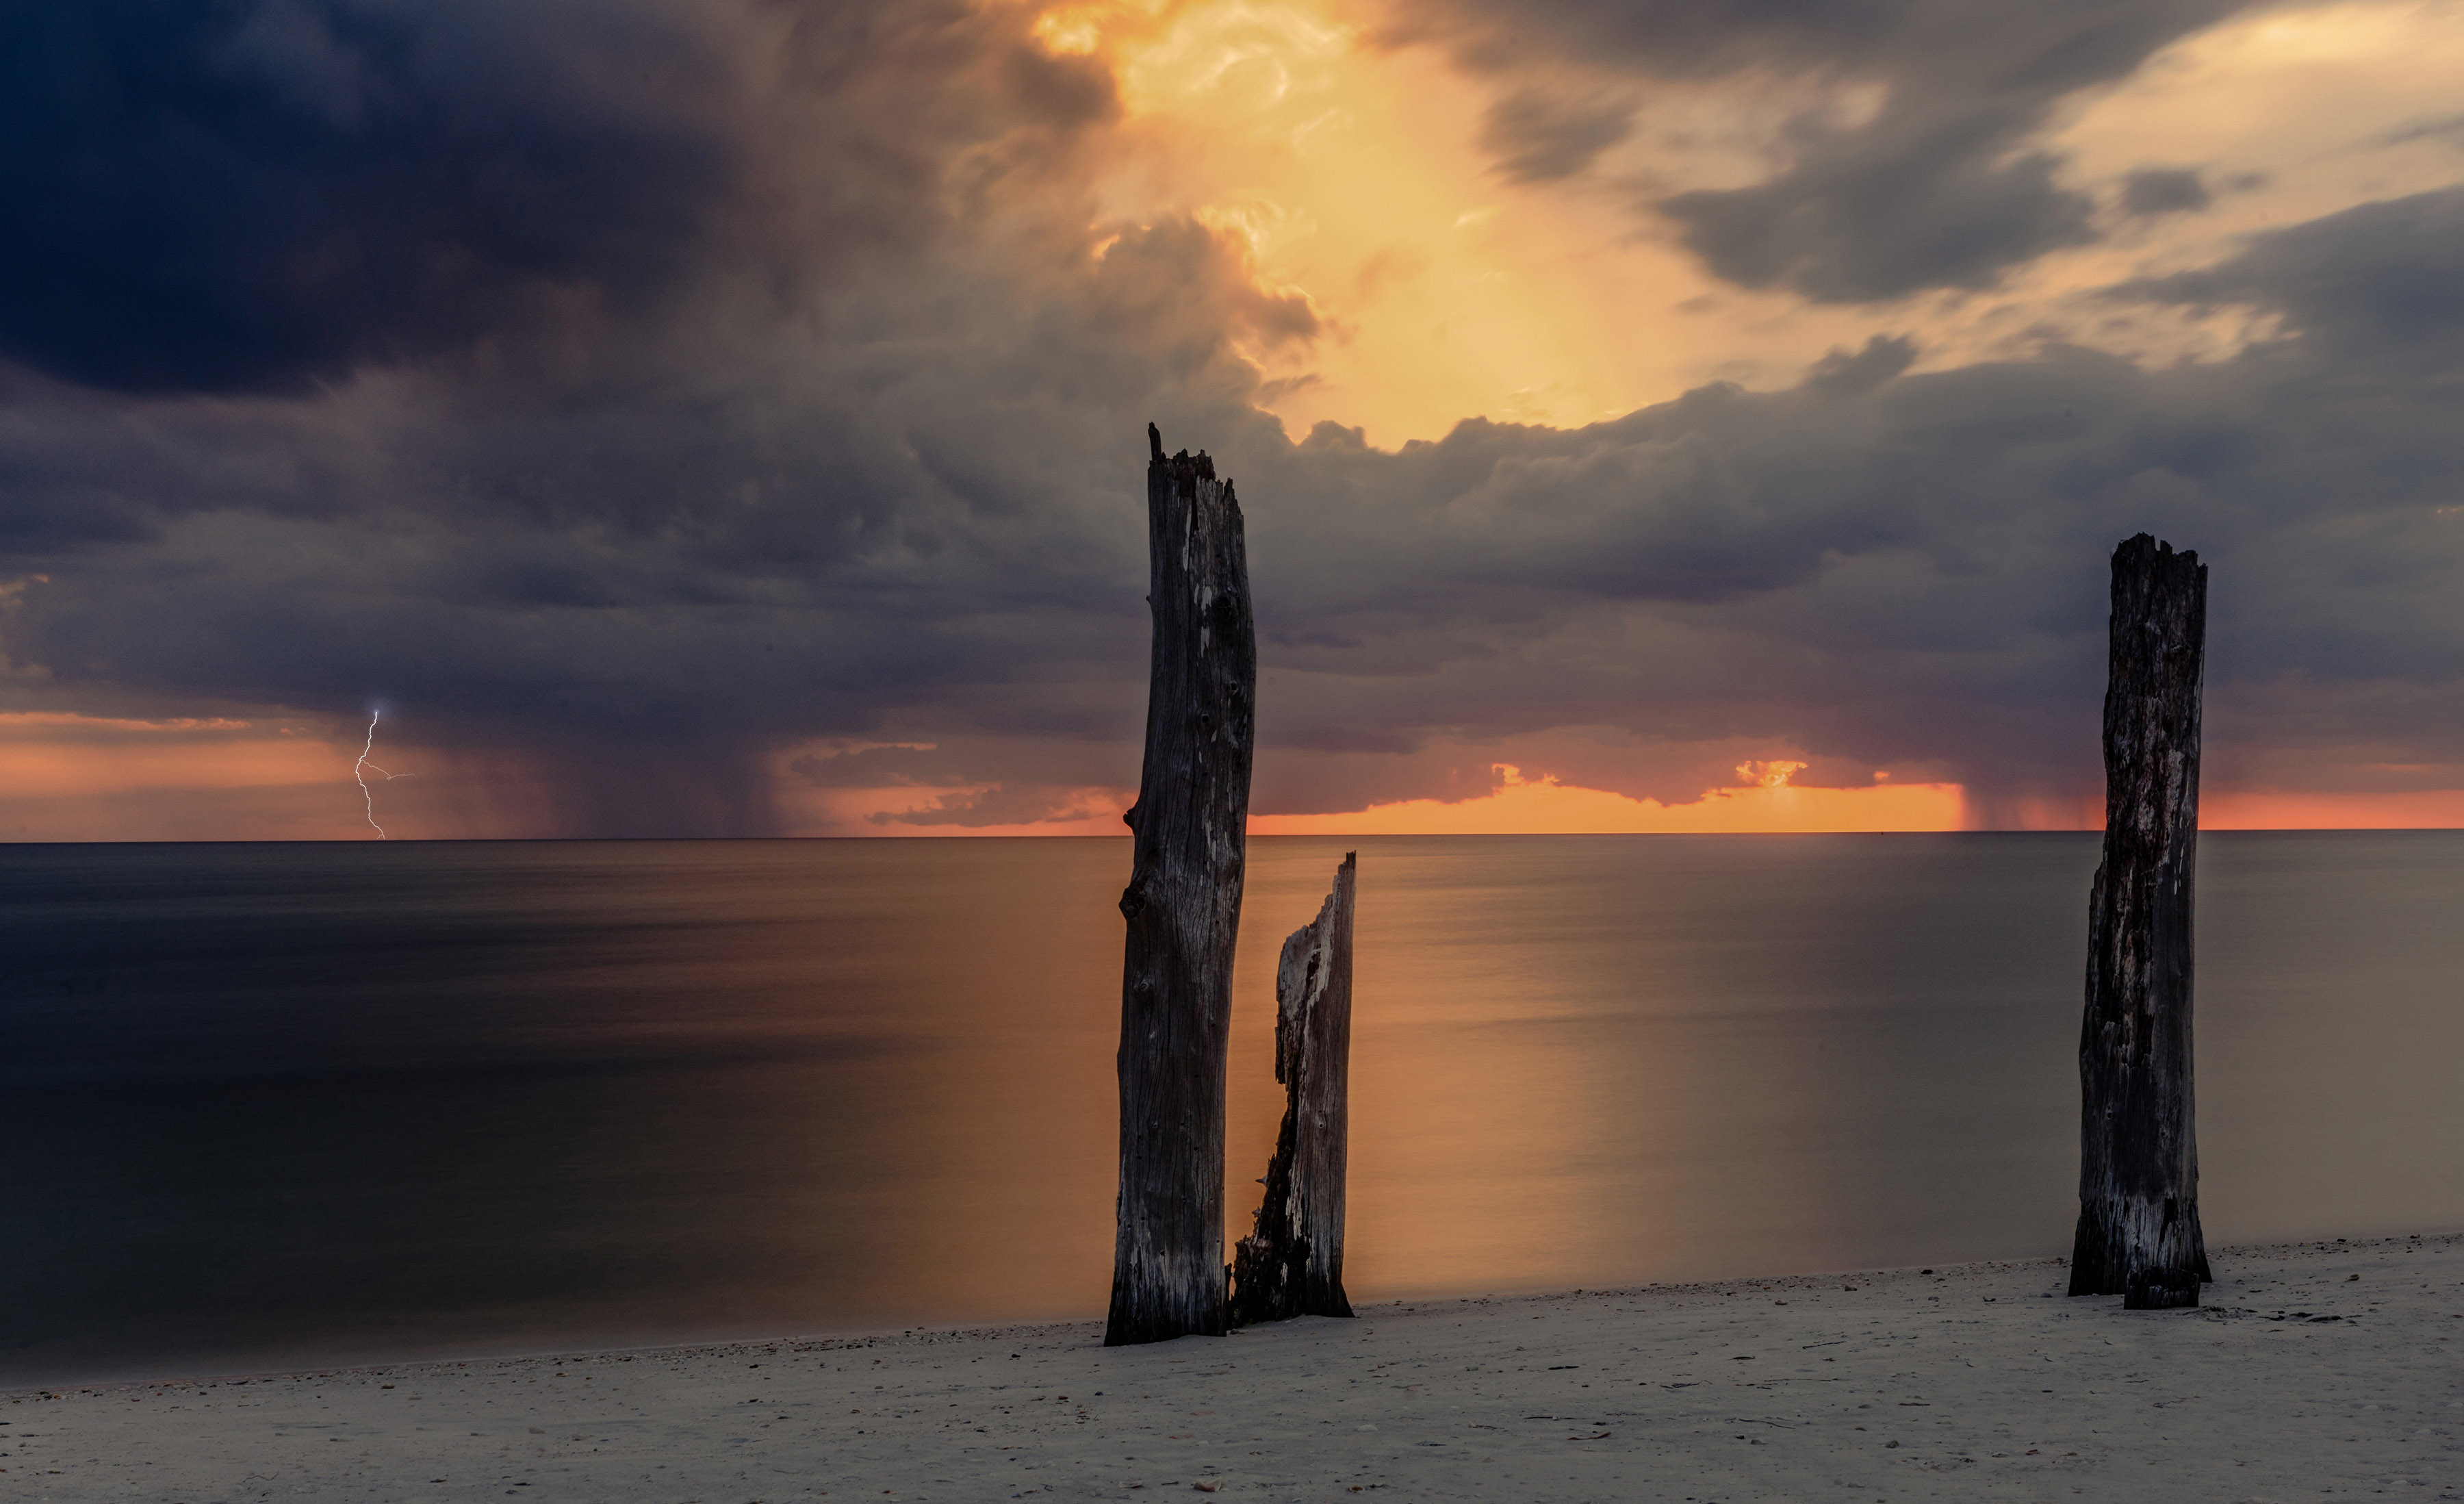
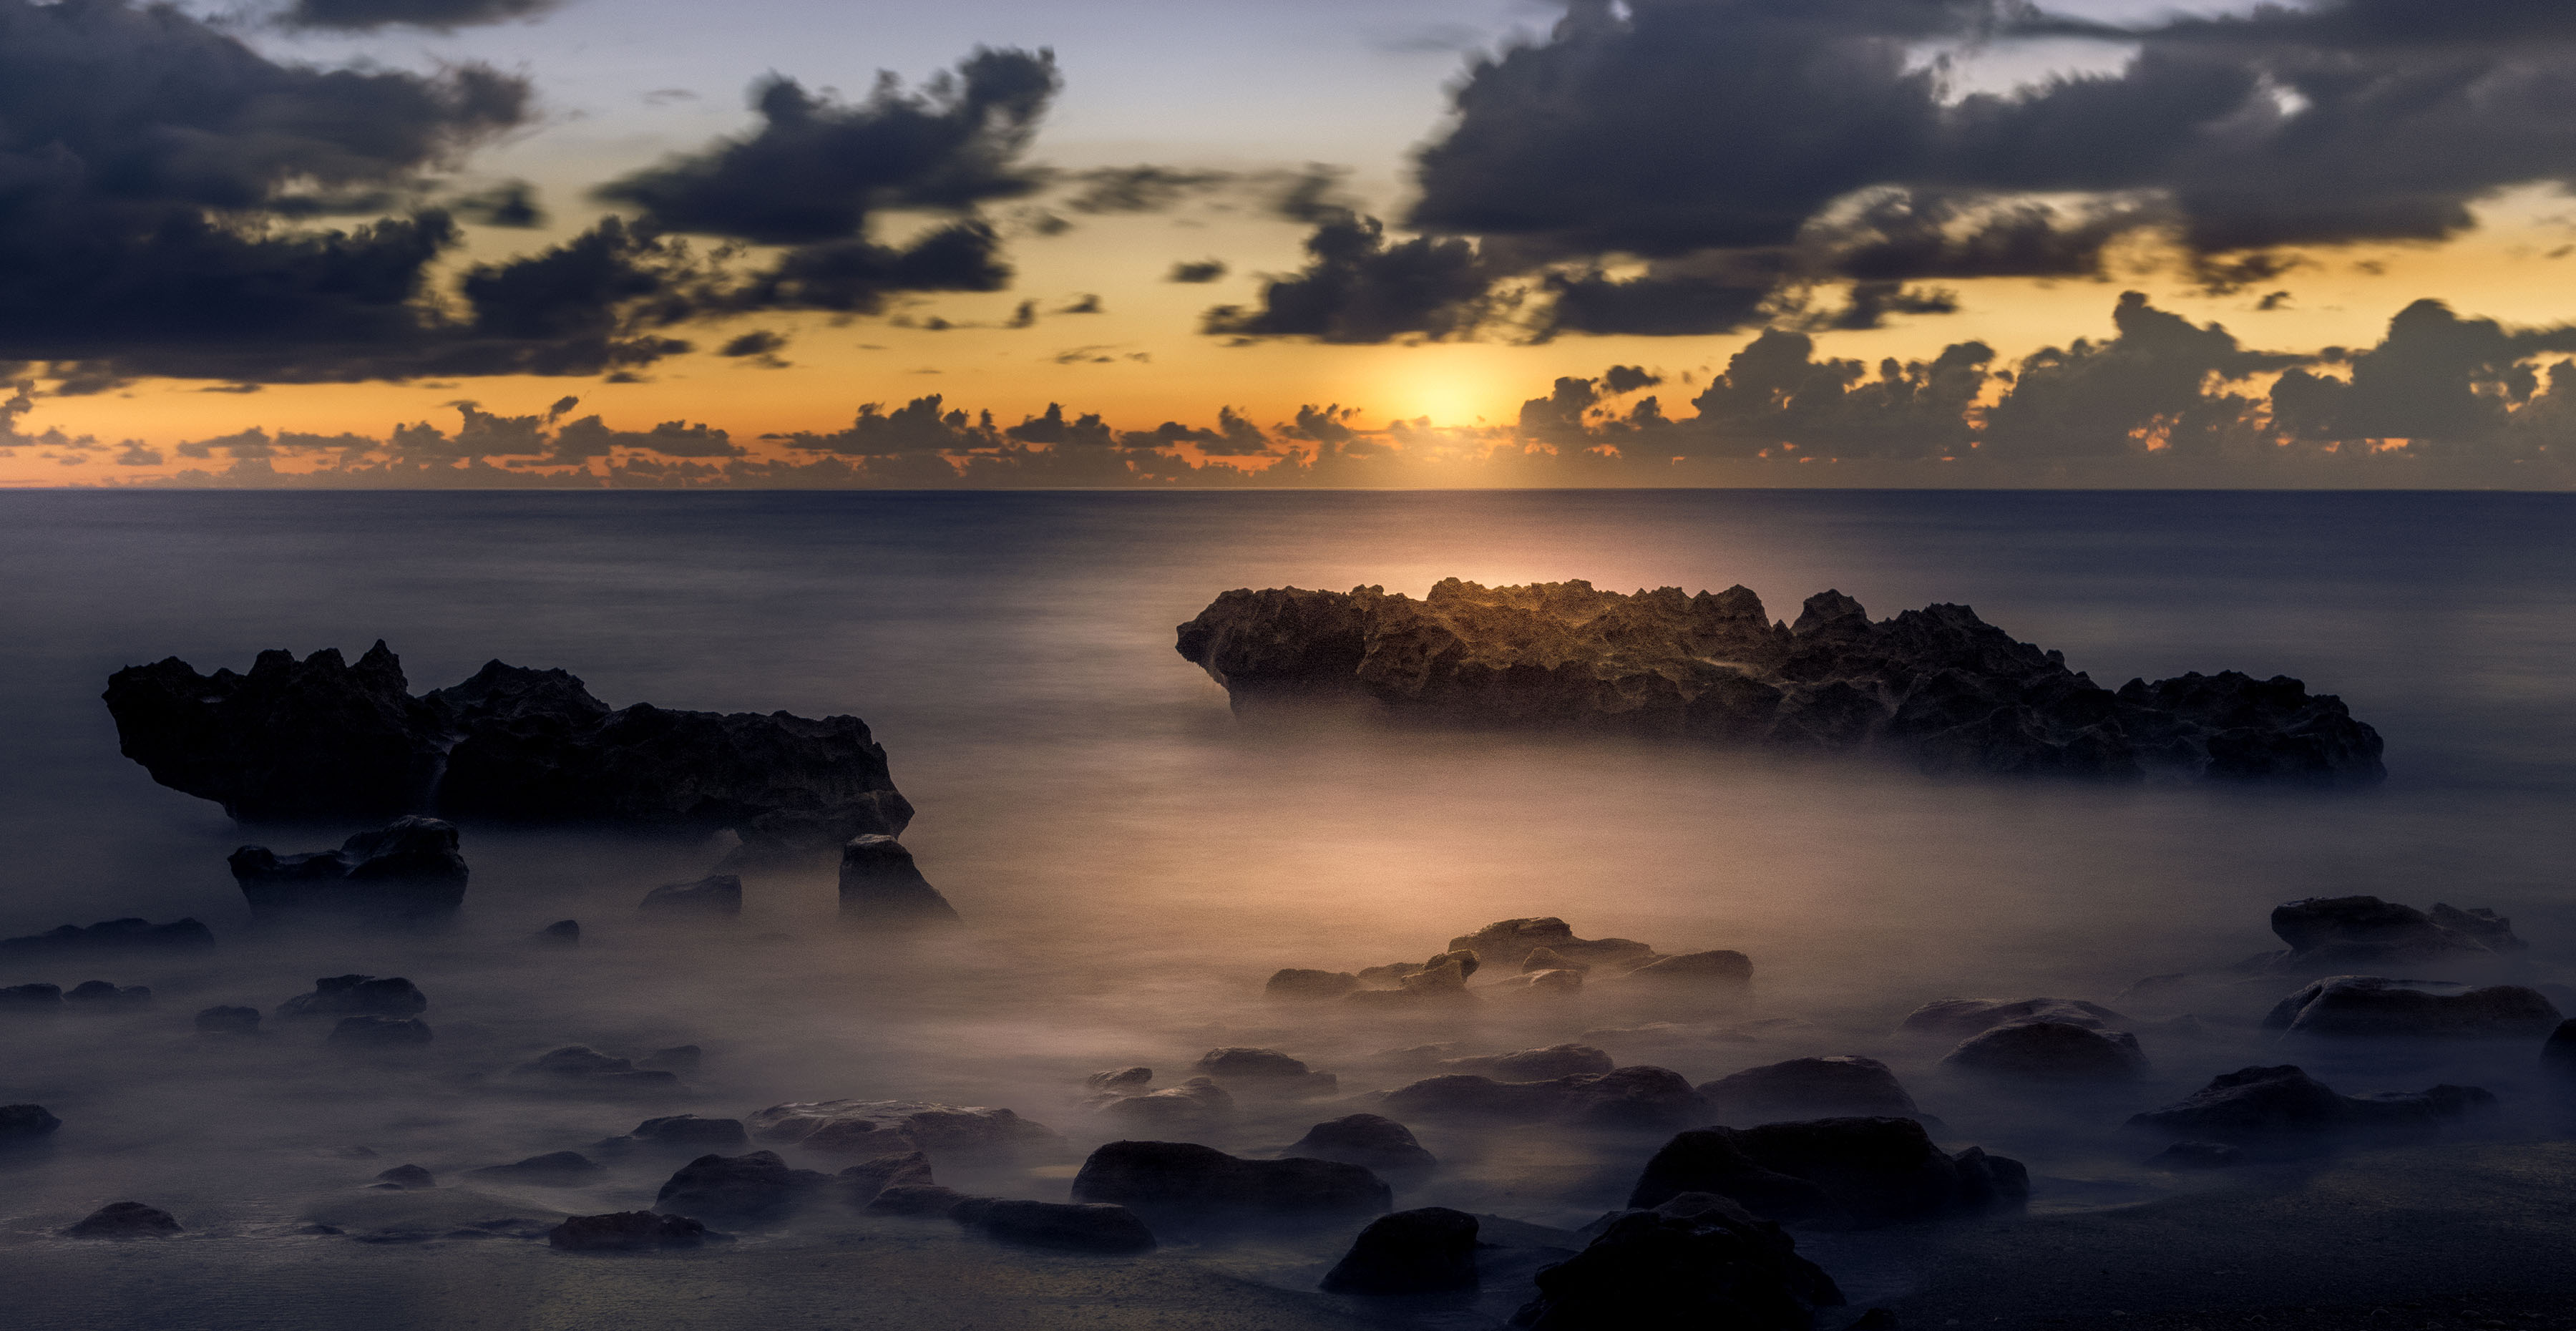
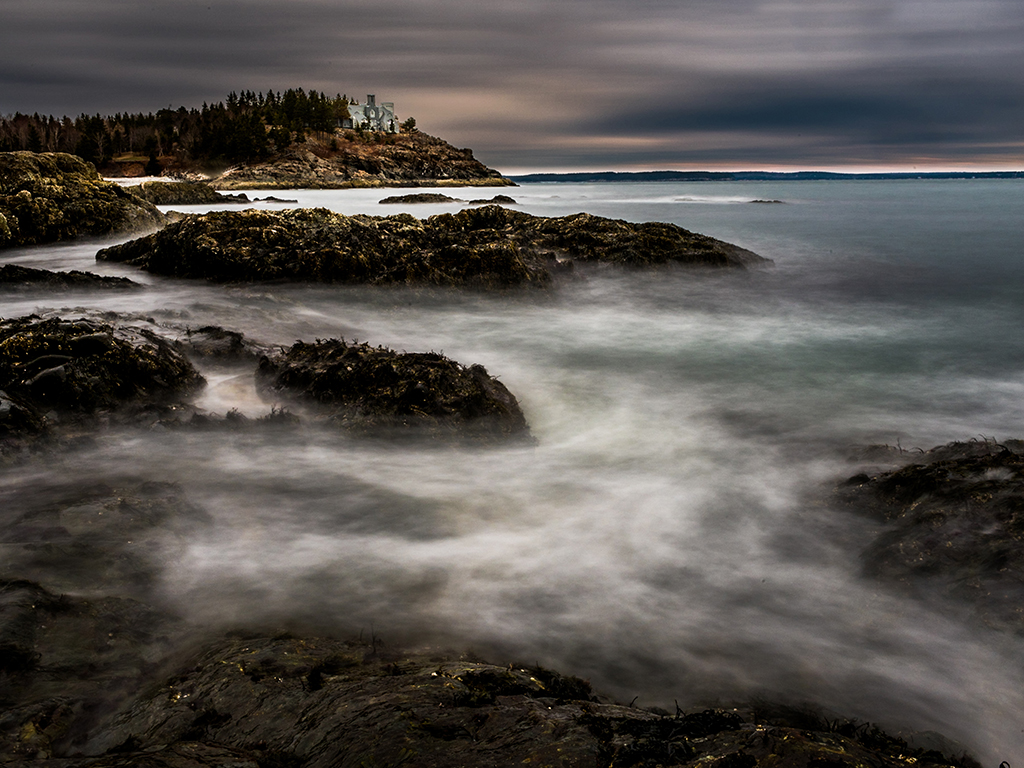
This is one of those i mages that carried a striking WOW factor. The two most gripping colors in photographs that are winners are blue and yellow and you have utilized them both. Photography is about light and your golden foreground, matched with the stormy background complement each other. The image is sharp and clear and the colors perfect. The story is the storm and the colors of the storm are the dimmest in the entire image. I feel you could enhance the power by cropping about 1/2 of the sky from the top. There is a little dark spot on the far right edge. I would crop to eliminate that. That would reduce the dark sky in mass and draw more attention to the storm itself. Great shot. |
Jul 28th |
| 89 |
Jul 19 |
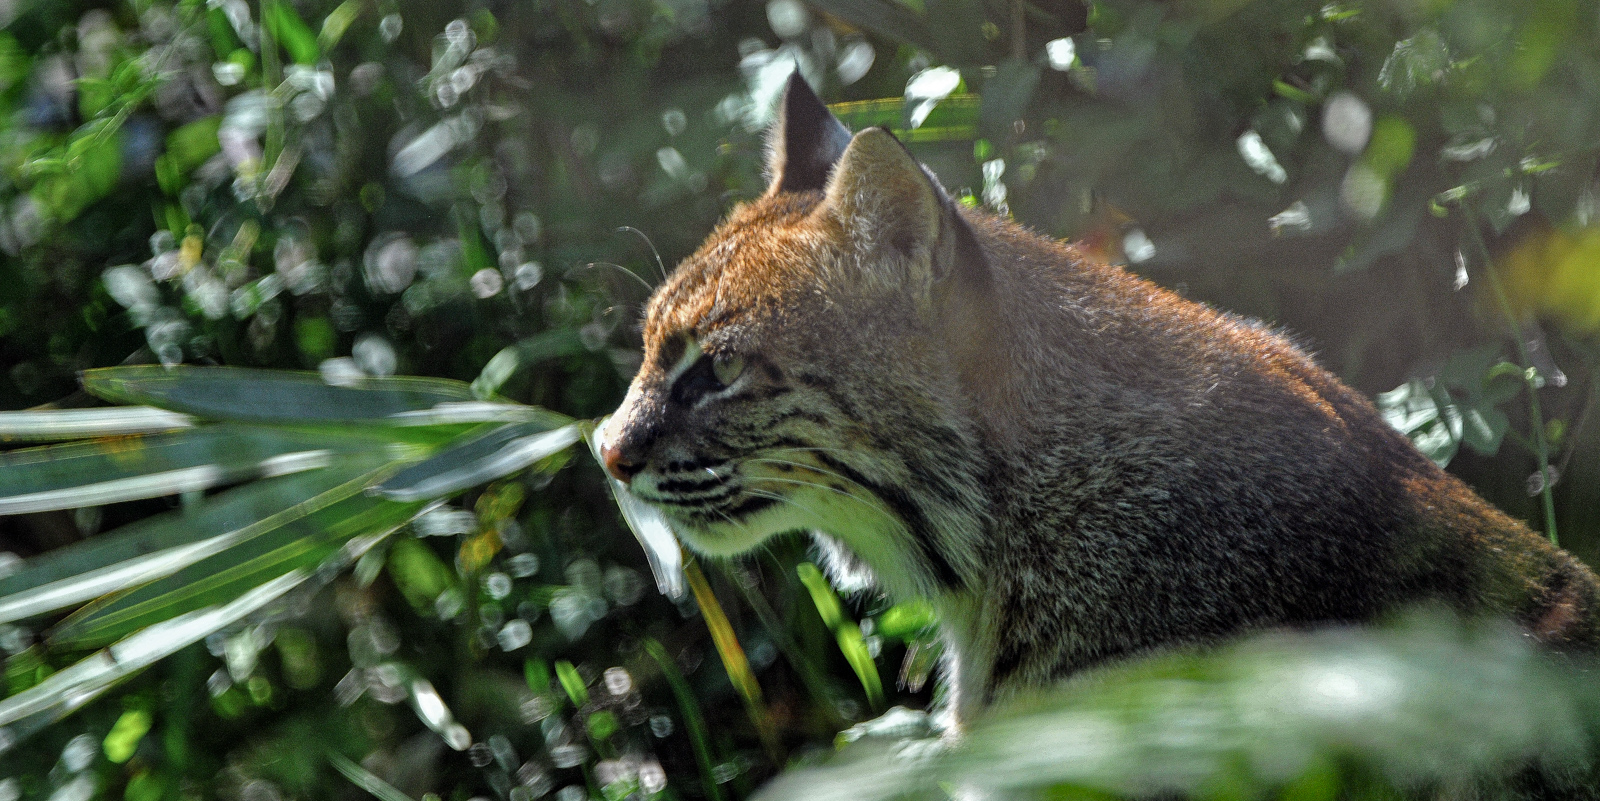
Comment |
I really like the pose for this cat. They are known for speed and this image bring out another feeling, it almost looks like a pet. The colors and lighting are pleasing and you have handled the background nicely. I do feel that it is cropped a bit tight. Personally I would prefer some space on the right side of the image. |
Jul 28th |
5 comments - 0 replies for Group 89
|
| 90 |
Jul 19 |
Comment |
This is really an excellent image. Peak action, sharp, well composed. This is great work. |
Jul 5th |
1 comment - 0 replies for Group 90
|
26 comments - 13 replies Total
|